
Capturing your computer screen, known as taking a screenshot or screen capture, is a fundamental skill for anyone using a computer. The quickest way to do this on a Windows PC is by using the Print Screen button. Once you press the Print Screen key, Windows automatically copies a snapshot of your screen to the clipboard. This allows you to easily paste the screenshot into various applications, from documents and emails to image editing software like Paint. Let’s explore how to effectively use the Print Screen button and its different functionalities.
Finding the Print Screen Key on Your Keyboard
Before you can start taking screenshots, you need to locate the Print Screen key on your keyboard. Its position varies slightly depending on whether you are using a desktop or laptop computer.
On desktop keyboards, the Print Screen key is generally situated in the upper right-hand corner, often near the function keys (F12, Delete, Insert). You might see it labeled in several ways, including Print Screen, PrtScn, PrntScr, PrtSc, or similar abbreviations. For simplicity, we’ll refer to it as PrtScr throughout this guide, understanding it represents all these variations.
Figure 1: Location of the Print Screen key on a typical desktop keyboard.
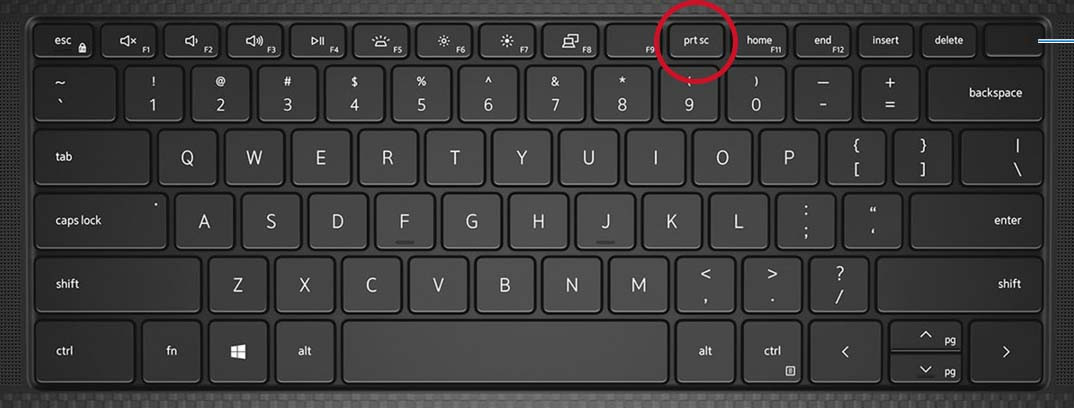 Print Screen key location on a desktop keyboard
Note: Some compact keyboards, especially wireless models like the Dell KM3322W, may not have a dedicated Print Screen key. In such cases, you often need to press the Fn (Function) key in combination with another key, such as Insert, to perform the Print Screen function.
On laptop keyboards, the Print Screen key is commonly found within the Function key row (F1 to F12). Typically, you’ll need to press and hold the Fn key while pressing the designated Function key (often F10 or similar) that doubles as the PrtScr key. Refer to your laptop’s user manual if you’re unsure which Function key is assigned to Print Screen.
Laptops with capacitive Function Key rows (where the function keys are touch-sensitive or illuminated) might require you to press the Fn key first to switch the Function keys to their primary functions, which will then illuminate the PrtScr key function. Once illuminated, you can use the PrtScr key as described below.
Figure 2: Print Screen key integrated with a Function key on a laptop keyboard.
Print Screen key location on a desktop keyboard
Figure 3: Example of a laptop keyboard with a capacitive Function Key row.
How to Take Screenshots Using the Print Screen Key in Windows 10 and Windows 11
The Print Screen button offers several ways to capture your screen in Windows 10 and Windows 11, giving you flexibility in what you want to capture.
Capturing the Entire Screen
To take a screenshot of your entire screen, including all monitors if you have multiple displays, simply press the PrtScr key. In some instances, particularly on tablets or certain laptops, you might need to press the Windows logo key + PrtScr keys simultaneously. On tablets without a physical keyboard, you can often capture the entire screen by pressing the Windows logo button + the volume down button together.
When you capture the entire screen using the Windows logo key + PrtScr method, Windows will often automatically save the screenshot as a file in the Screenshots folder within your Pictures library.
Capturing All Active Windows
If you only want to capture all currently active windows on your screen, press the PrtScr key alone. This will capture all open windows as a single image.
Capturing a Single Active Window
For capturing just one specific window, first, ensure that the window you want to capture is active (click on it to bring it to the foreground). Then, press the Alt + PrtScr keys together. This method will capture only the content of the active window, excluding the rest of your screen.
Pasting and Utilizing Your Screenshots
After capturing a screenshot using any of the methods above, the image is temporarily stored on your clipboard. To use or edit the screenshot, you need to paste it into an application.
The most common application for pasting and editing screenshots is Microsoft Paint, which is included with Windows. You can also use other image editing software like Photoshop, GIMP, or even document applications like Microsoft Word or email clients.
To paste your screenshot, open your chosen application and use the keyboard shortcut Ctrl + V (press and hold the Ctrl key, then press V). This will paste the screenshot into a new image document or directly into your document or email.
Once pasted, you can edit the screenshot in your chosen application, for example, to crop it, add annotations, or highlight specific areas. Finally, remember to save your screenshot as an image file (e.g., JPEG, PNG) if you want to keep it for future use.
Beyond the Print Screen Button: Exploring Other Screenshot Tools
While the Print Screen button is a quick and easy way to take basic screenshots, Windows also offers more advanced tools for screen capture. The Snipping Tool (and its successor, Snip & Sketch in newer Windows versions) provides more options, such as capturing specific rectangular areas, free-form selections, or window selections, and offers basic annotation features before saving. Exploring these tools can further enhance your screenshot capabilities.
In conclusion, mastering the Print Screen button and its various combinations is a valuable skill for any Windows user. Whether you need to quickly share something on your screen, document a process, or save a visual record, the Print Screen button offers a straightforward and efficient solution for capturing screen content.