
When working with extensive spreadsheets in Excel, printing the entire worksheet can often be unnecessary and wasteful. You might only need a specific table, chart, or a section of your data for a report or presentation. Fortunately, Excel offers a powerful feature called “Print Area” that allows you to designate exactly which part of your worksheet gets printed. This guide will walk you through how to Set Excel Print Area, ensuring you print only the essential information you need, saving paper and ink in the process.
Setting a Print Area in Excel
Defining a print area is straightforward and can significantly streamline your printing tasks. By specifying the exact cells you want to include, you avoid printing extraneous data, blank spaces, or irrelevant sections of your spreadsheet. Here’s how to set print area excel:
-
Begin by selecting the cells on your worksheet that you wish to include in your print area. This could be a single range of cells, a table, or even a chart embedded in your sheet.
Tip: To select multiple, non-contiguous areas as separate print areas, press and hold the Ctrl key while clicking and dragging to select each area. Each selected area will print on a different page.
-
Navigate to the Page Layout tab on the Excel ribbon.
-
In the Page Setup group, locate and click on the Print Area dropdown menu.
-
From the dropdown menu, choose Set Print Area.
 Page Layout tab with Print Area option highlighted
Excel will now remember this defined print area. Whenever you go to print this worksheet, only the specified area will be included in the printout. It’s important to note that the excel set print area setting is saved with your workbook. So, the next time you open the file, your print area will be preserved.
Viewing Print Areas
To ensure that you have correctly set your print area and to visualize how your worksheet will be printed, Excel offers a helpful view called “Page Break Preview”. This view clearly outlines the print area(s) you’ve defined.
To use Page Break Preview:
- Click on the View tab on the Excel ribbon.
- In the Workbook Views group, click on Page Break Preview.
This view will display your defined print area(s) with a solid border and page breaks. You can adjust the print area boundaries directly in this view if needed. Remember, any print area settings are saved automatically when you save your Excel workbook.
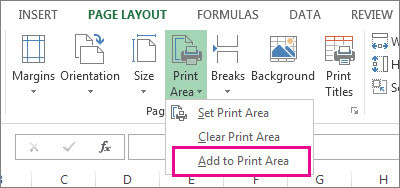
Adding Cells to an Existing Print Area
Over time, your data might expand, and you might need to enlarge your existing print area. Excel makes it easy to add more cells to your currently defined print area. Here’s how to add to print area in excel:
-
Select the new cells that you want to include in your existing print area. These cells should be adjacent to the current print area for seamless expansion.
Note: If you select cells that are not adjacent to the existing print area, Excel will create a new, separate print area. Each distinct print area will be printed on its own page. To expand the current print area, ensure the cells you are adding are directly next to it.
-
Go to the Page Layout tab, then to the Page Setup group.
-
Click on the Print Area dropdown menu again.
-
This time, select Add to Print Area.
Page Layout tab with Print Area option highlightedThe newly selected cells will now be incorporated into your existing print area, expanding the section that will be printed. This adjusted print area is also saved when you save your workbook.
Clearing a Print Area
If you no longer need a specific print area and want to revert to printing the entire worksheet, you can easily clear the defined print area. It’s important to remember that clearing the print area will remove all defined print areas from the worksheet.
To clear print area excel:
-
Click anywhere on the worksheet for which you want to remove the print area.
-
Navigate to the Page Layout tab, and then to the Page Setup group.
-
Click on the Print Area dropdown menu.
-
Select Clear Print Area.
After clearing the print area, Excel will print the entire worksheet by default, until you set a new print area again.
By mastering the “Set Print Area” feature in Excel, you gain greater control over your printouts, ensuring efficiency and professionalism in your document presentation. Whether you need to print specific data ranges, tables, or charts, setting a print area is a valuable skill for any Excel user.