In today’s fast-paced world, smartphones and tablets have become indispensable tools for managing our daily lives, both personally and professionally. Many of us create, edit, and store important documents and cherished photos right on our Android devices. The ability to print these directly from your phone or tablet offers unparalleled convenience, saving you the hassle of transferring files to a computer. Whether it’s essential documents for work or capturing those precious memories in physical form, knowing how to print from your Android device is a valuable skill.
Fortunately, printing from your Android device is simpler than you might think. Most modern Android apps, including popular ones like Google Docs, Google Photos, and Gmail, come equipped with built-in print functionalities. This, coupled with the advancements in wireless technology, means you can often connect directly to your printer via Wi-Fi or Bluetooth and get your documents or photos printed in just a few taps.
Step-by-Step Guide to Printing from Your Android Device
Let’s break down the process of printing from your Android phone or tablet into easy-to-follow steps. While the exact steps might slightly vary depending on the app you are using and your device’s Android version, the general process remains consistent.
1. Open the Document or Photo You Wish to Print.
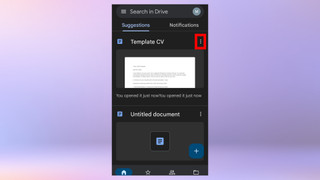 A person selecting a document to print in Google Drive on an Android phone.
The first step is to navigate to the file you intend to print. This could be a document in Google Drive, a photo in Google Photos, an email in Gmail, or any other printable file within an application that supports printing. Open the specific document, image, or email that you need a hard copy of.
2. Access the Print Option.
 Accessing the print menu from the document options in Google Drive on an Android device.
Once you have the file open, you’ll need to find the print command. In most apps, this is located within the app’s menu. Look for the three vertical dots (overflow menu) or three horizontal lines (hamburger menu) icon, usually found in the top right or top left corner of the screen. Tapping this menu should reveal options like “Print,” “Share & export,” or simply a “Share” option from which you can then select “Print.” In some applications, like Google Photos, you might find the print option by tapping the share icon directly, and then scrolling through the options to find “Print.”
3. Configure Your Print Settings.
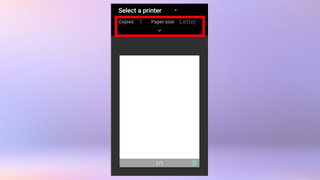 Adjusting print settings like paper size and orientation in the print preview menu on an Android phone.
After selecting the print option, the print preview screen will appear. Here, you can customize your print job to meet your needs. Typical settings you can adjust include:
- Printer Selection: Choose from a list of available printers.
- Number of Copies: Specify how many copies you need.
- Paper Size: Select the appropriate paper size (e.g., Letter, A4, Legal).
- Color: Choose between color or black and white printing.
- Orientation: Select portrait (vertical) or landscape (horizontal) orientation.
- Pages: Define the page range you want to print, if applicable.
- Layout: Options for printing multiple pages per sheet or adjusting margins.
Take a moment to review these settings and adjust them to your preferences before proceeding.
4. Select Your Printer.
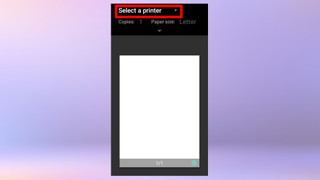 Choosing a printer from the dropdown list in the print settings on an Android device.
The printer selection menu is usually a dropdown list at the top of the print settings screen. Your available printers will be listed here. If your printer is Wi-Fi enabled and connected to the same network as your Android device, it should automatically appear in this list. If you are using a Bluetooth printer, ensure Bluetooth is enabled on your Android device and the printer is paired.
If your printer is not listed, ensure it is turned on, connected to the same Wi-Fi network as your Android device (if it’s a Wi-Fi printer), or properly paired via Bluetooth. You might need to install a printer service plugin for your printer brand from the Google Play Store if it’s the first time connecting. Most major printer brands like HP, Canon, Epson, and Brother have their own print service plugins available.
5. Tap the Print Icon.
Once you have configured your settings and selected the correct printer, the final step is to initiate the printing process. Usually, there is a print button or icon, often depicted as a printer symbol, within the print preview screen. Tap this button, and your document or photo will be sent wirelessly to your selected printer.
Expanding Your Printing Options
While the steps above cover the basics, here are a few additional points to enhance your Android printing experience:
- Google Cloud Print (Legacy): Google Cloud Print was a service that allowed printing over the web, but it is no longer supported. Modern Android printing relies on direct connections or printer manufacturer plugins.
- Printer Manufacturer Plugins: For advanced features and compatibility, install the print service plugin from your printer’s manufacturer (available on the Google Play Store). This often provides more control and troubleshooting options.
- USB OTG Printing: For printers without wireless capabilities, some Android devices support printing via USB OTG (On-The-Go). You’ll need a USB OTG adapter and a compatible USB printer cable. Connect your printer to your Android device using the adapter, and your device may detect it as a connected printer.
Conclusion
Printing from your Android phone or tablet is remarkably convenient and efficient. By following these simple steps, you can easily produce hard copies of your important documents and cherished photos directly from your mobile device. Embrace the ease of mobile printing and unlock the full potential of your Android device for both productivity and personal use.