
Printing your own labels can be a cost-effective and convenient solution for various needs, from organizing your home to branding your small business. If you’re wondering How To Print Avery Labels, you’ve come to the right place. Avery labels are a popular choice due to their wide availability and compatibility with both inkjet and laser printers.
With decades of experience in label solutions, we’ve compiled this comprehensive guide to answer all your questions. Whether you’re a beginner or have some experience, this article will walk you through selecting the right labels, designing them effectively, setting up your printer correctly, and troubleshooting common issues. You’ll discover how to achieve professional-looking labels right from your home or office, or when it might be best to consider professional printing services for ultimate quality.
Before we dive into the steps, if you’re still weighing the options, you might find our article Printing Your Own Labels vs. Professional Printing helpful in making the best choice for your specific project.
With Avery, the process is designed to be user-friendly. You can easily order your blank labels online, choosing from a variety of sizes and materials, or pick up retail packs at your local store. For larger quantities or when you require a truly polished, professional finish, Avery WePrint offers a premium custom printing service.
Step-by-Step Guide: How to Print Out Labels
Let’s break down the process of printing your own Avery labels into manageable steps.
1. Choose the Right Avery Labels for Your Printer
Selecting the correct labels is paramount for successful printing. One of the most frequent errors is purchasing labels that aren’t compatible with your printer type.
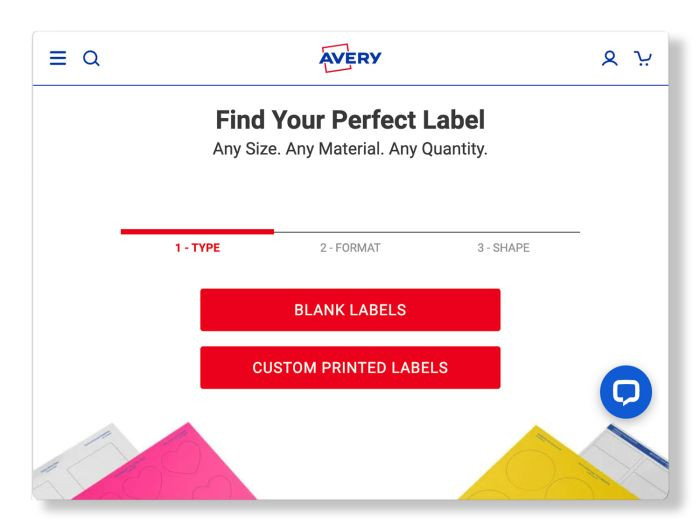 Selection of Avery blank and custom labels for printing, emphasizing size and shape choices
Avery offers a wide selection of blank printable labels and a custom printing service.
Inkjet and laser printers utilize distinct printing technologies. While some Avery labels are designed to work with both, the majority are specifically engineered for optimal performance with either inkjet or laser printers. Using laser labels in an inkjet printer can lead to ink smearing due to improper absorption. Conversely, inkjet labels used in a laser printer may experience toner flaking because the toner won’t adhere correctly.
Identifying your printer type is straightforward. Inkjet printers use smaller ink cartridges, while laser printers use larger toner cartridges. If you’re uncertain, consult your printer’s manual or the manufacturer’s website for definitive information. Ensuring compatibility from the outset will save you frustration and wasted materials.
2. Select Labels Based on Your Design Needs
Beyond printer compatibility, consider your label design when choosing Avery labels. Will your design incorporate a full-color background, or do you need to print a design that extends to the very edge of the label? The type of design you have in mind will influence the best label choice.
Designs that cover the entire label area are known as full-bleed designs. To achieve this edge-to-edge look, the design must extend slightly beyond the label’s trim edge. Print-to-the-edge labels are specifically designed for vibrant, impactful, full-color projects. However, for large runs of full-color labels, it might be more economical to use Avery WePrint rather than consuming significant amounts of your personal ink.
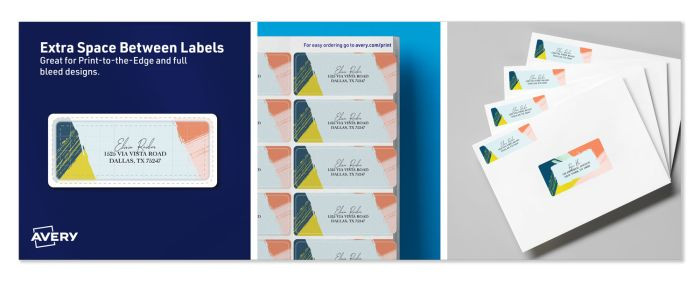 Avery 5160 label layout demonstrating full-bleed printing with no spacing between labels
Labels with space between them are ideal for designs with borders or no background color. This layout is also more efficient, allowing for more labels per sheet, which can be more cost-effective for projects like address labels or file folder labels.
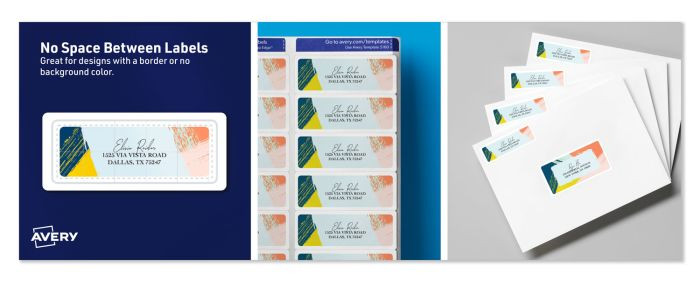 Avery 5160 label layout showing inset printing with spacing between labels
Exploring Unique Label Formats
Full-Sheet Labels
If you can’t find the exact label size or shape you require, consider full 8.5″ x 11″ sheet labels. These offer maximum flexibility, allowing you to print custom shapes and sizes and then cut them yourself using scissors or a cutting machine.
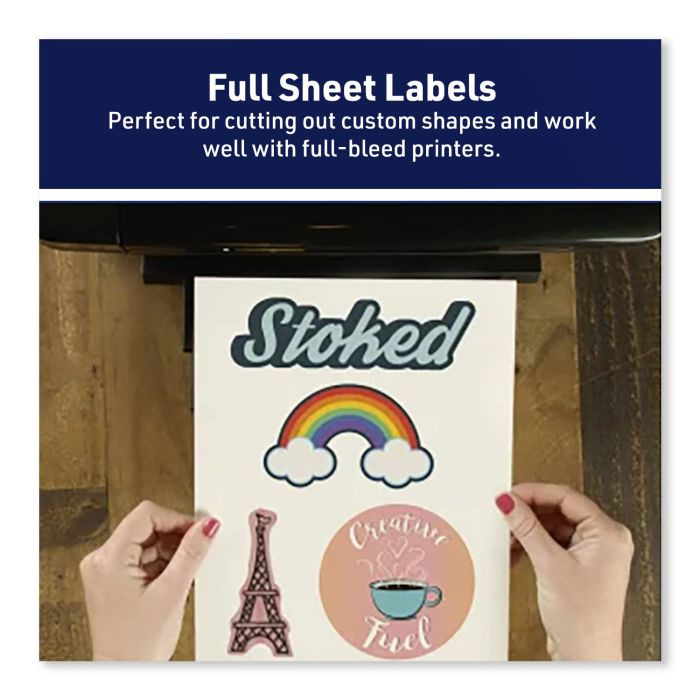 Printing on full-sheet labels for custom shapes and sizes
When using full-sheet labels, be mindful of your printer’s non-printable edges. While some printers can print edge-to-edge, most leave a blank margin around the sheet. Ensure your design stays within the printable area.
For even greater customization, you can order custom sizes on blank sheet labels. Avery WePrint also provides custom shapes and sizes at no extra charge, eliminating the need for manual cutting.
4″ x 6″ Label Sheets
Smaller 4″ x 6″ label sheets are convenient for storage and portability. However, verify that your printer supports this paper size before purchasing.
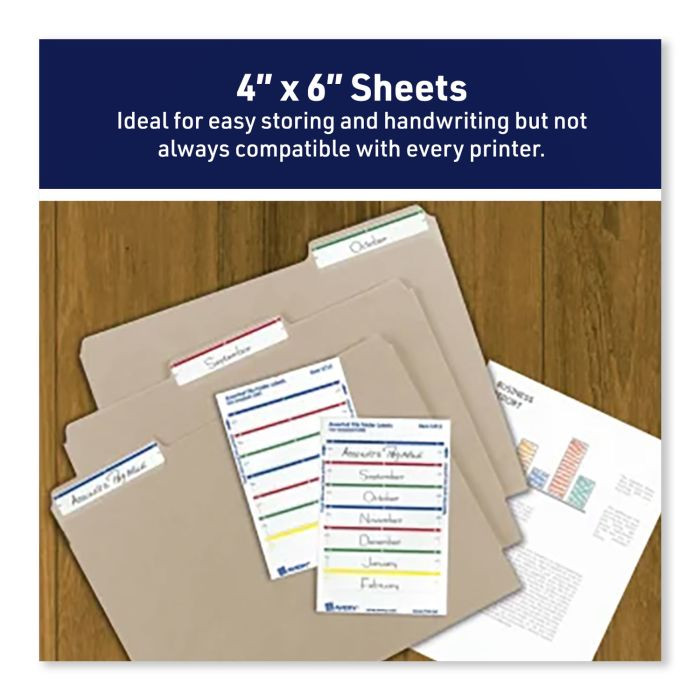 Printing on smaller 4×6 label sheets for convenient sizes
Our guide on choosing the correct label size can help you pinpoint the exact dimensions you need. Once you have your labels, proper storage is important. Keep them in their original packaging in a cool, dry place to prevent curling due to humidity. The original packaging also contains essential information like the template number and printer compatibility.
3. Utilize the Correct Avery Template
A frequent cause of print misalignment is using the wrong template. While some label companies claim compatibility with Avery templates, only genuine Avery templates are designed specifically for Avery products. When searching online for templates, prioritize those provided directly by Avery.
Locate the 4- or 5-digit product or template number on your Avery label packaging or sheet. Use this code to find the exact template you need. For more detailed instructions, see how to find templates on avery.com. You can even download blank Avery templates for offline use with Word, Pages, and Adobe software. Visit our Help page for tutorials on printing Avery products from various software applications, such as this guide for printing from Apple Pages.
Once you have your template, leverage our free Design & Print software. This software automatically optimizes your design, displays the safety area, alerts you to potential design incompatibilities, and offers a range of editing tools. You can also choose from thousands of pre-designed templates within the software, ready for personalization and printing, either DIY or through Avery WePrint.
4. Understand the Printable Area of Your Avery Labels
Before starting your design, understanding the printable area is crucial to prevent important elements from being cut off during printing. This knowledge allows you to design effectively within the label’s boundaries.
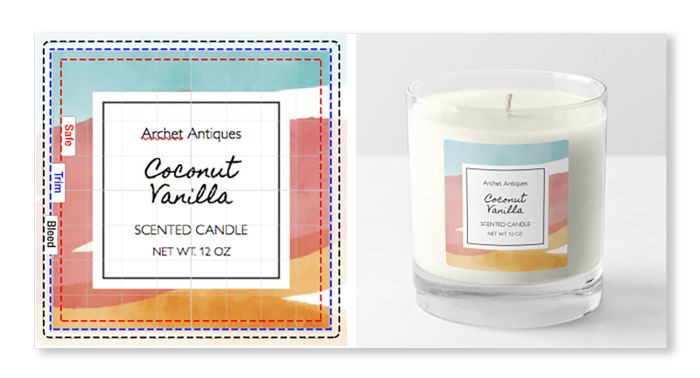 Understanding safety, trim, and bleed areas on Avery labels for optimal printing
The printable area is divided into three key sections:
- Safety Area: This is the guaranteed printable section within the label. Keep all critical content, such as text and logos, within this area to ensure it prints correctly.
- Trim Area: This represents the physical edge of the label. It serves as a visual guide for where your design will be cut off.
- Bleed or Print-to-the-Edge Area: This is extra space beyond the trim line for full-color backgrounds and images. Extending your design into this bleed area ensures that there are no unwanted white margins around your final printed label when using print-to-the-edge labels.
5. Design Best Practices for Avery Labels
Printers aren’t always perfectly precise, and slight sheet shifting during printing is common. However, you can minimize the impact of minor misalignments by using the safety, trim, and bleed areas effectively and following these design tips.
Best Practices for Adding Text to Labels
Keep essential information like names and addresses within the safety area. Design & Print software helps by displaying warnings when content moves outside the printable area. Consult our artwork guidelines for detailed design and artwork uploading advice.
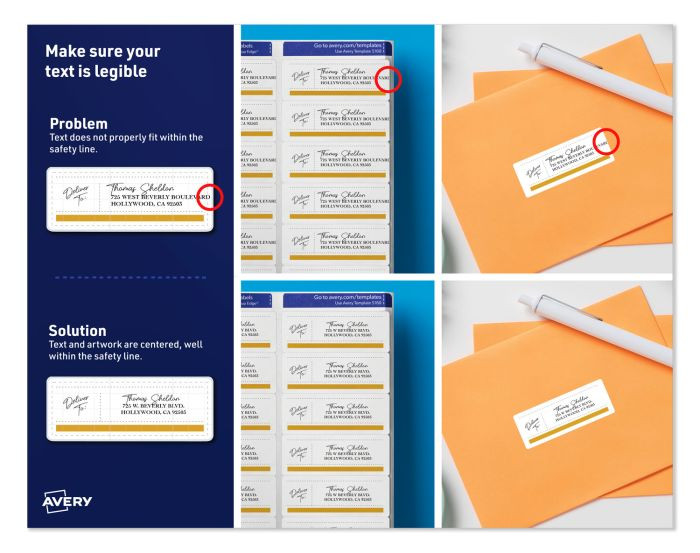 Ensuring text legibility when printing Avery labels, emphasizing font size and clarity
Ensure your text remains legible at the printed size. A font that looks readable on screen might appear much smaller and less clear when printed. Aim for a minimum font size of 7pt, adjusting based on your label size. Design & Print will also warn you if your font size is likely too small.
For font inspiration, explore How To Pick the Right Fonts for Your Labels. Also, ensure good contrast between your font color and background for readability. If using our free barcode generator, verify that your printed barcodes are scannable.
Achieving a Full-Bleed Look on Labels
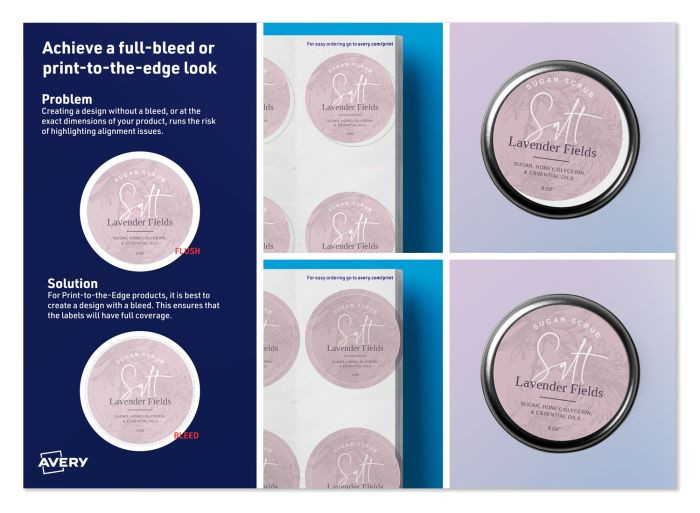 Adding full-bleed colors and designs to Avery labels for a professional edge-to-edge finish
Full-bleed designs require print-to-the-edge labels and compatible templates. In Design & Print, confirm you’re using the correct template by checking if your design extends into the designated “bleed” area, beyond the label trim line.
Preventing Overlapping Designs on Label Sheets
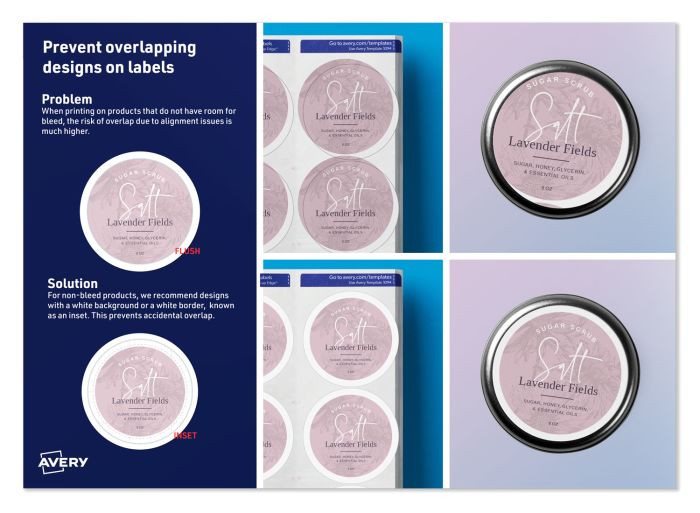 Avoiding overlapping designs on printable labels by staying within safety margins
For label sheets without spacing between labels, keep your design comfortably within the safety area. This creates a uniform border and prevents printing onto adjacent labels. Alternatively, use blank backgrounds to ensure no design overlap occurs.
Tips for Using Full-Sheet Labels
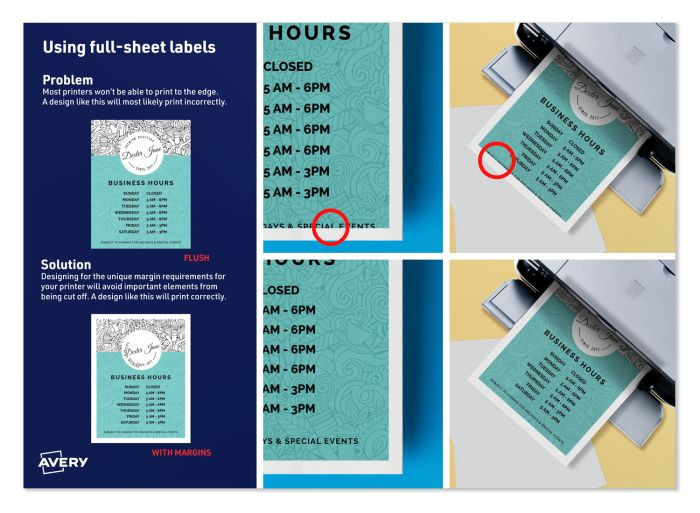 Printing on full sheet labels with consideration for printer margins
Most printers can’t print to the very edges of a full sheet. Determine your printer’s non-printable margins before printing on full 8.5″ x 11″ label sheets. This margin varies by printer model, but a 0.25″ margin is a common guideline.
Design & Print Online displays a dotted line indicating the page margin on edge-to-edge sheet templates. Test print on plain paper and check your printer specifications to confirm the exact printable area.
6. DIY Pre-Print Printer Settings
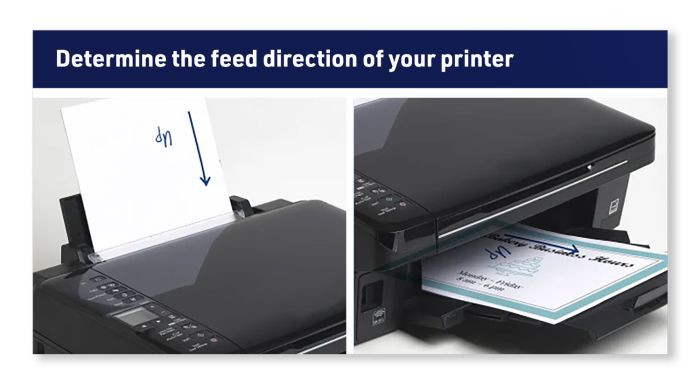 Determining the correct printer feed direction for label printing
Before printing labels, check three critical printer settings: paper size, paper type, and page scaling. Setting names may vary by printer manufacturer. For specific guidance, our help article on recommended printer settings offers assistance for navigating different printer options.
Paper Size Setting
The “sheet size” or “paper size” setting dictates how your design scales to the label sheet. Ensure this setting matches your label sheet size. Incorrect paper size settings are a primary cause of misalignment. Letter size (8.5″ x 11″) is the most common. If using 4″ x 6″ sheets, change the paper size setting accordingly.
Paper Type Setting
The “paper type” or “media type” setting controls the sheet feeding speed. Change this to “Labels” to slow down the feed and minimize misalignment risk. If “Labels” isn’t an option, “Cardstock,” “Heavyweight,” or “Premium” are suitable alternatives. On some printers, selecting “Labels” or “Cardstock” may direct you to use the manual feed tray. The manual feed tray often yields the best results as it feeds sheets flat, preventing bending and curling through multiple rollers.
Page Scaling Setting
Always set page scaling to 100% or “actual size.” Never use “fit to page,” as this will shrink your design to the wrong size and cause misalignment.
After adjusting these settings, perform a test print on plain paper. Mark the test sheet to indicate the top side and feed direction to confirm how to load your label sheets correctly. While most labels feed face-up, double-check the proper feed direction for your Avery label sheets.
7. Troubleshooting Common Label Printing Issues
Encountering problems? Here are solutions to common label printing issues.
Print Misalignment
Q: Why is the entire print shifted uniformly in one direction?
A: This can have various causes, often difficult to pinpoint precisely. However, Design & Print allows you to adjust print alignment in the final step. Alternatively, you can adjust margins in downloadable templates.
Q: Why are all labels printing towards a corner?
A: This typically results from the print being scaled to “fit to page” instead of printing at the correct size. Verify your page scaling setting is set to “actual size” or 100% scale.
Paper Jams
Q: Why are my labels jamming in the printer?
A: Paper jams can arise from incorrect paper type settings, improper sheet feeding, or damaged printer rollers. Ensure your paper/media type is set to “Labels.” When printing multiple sheets, feed them one at a time or ensure they are separated and not sticking together. Avery labels with Sure Feed technology can minimize printer jams by providing more reliable feeding.
Smearing or Smudging
Q: Why is the print smearing on my labels?
A: The most common cause is printer incompatibility. Double-check that your labels are compatible with your printer type (inkjet or laser). Avoid using laser labels in inkjet printers and vice versa.
Blank Margin Around the Label Sheet
Q: Why is there a blank white margin around the printed label sheet?
A: Many printers cannot print to the edge of a sheet, resulting in a blank margin. Perform a test print to assess your printer’s full-bleed capability. Consider using print-to-the-edge labels to minimize or eliminate this margin.
8. Final Print and Further Assistance
After making any necessary adjustments, proceed to print on your Avery label sheets.
If you’re still unsure about DIY label printing, remember that Avery WePrint offers professionally printed, perfectly aligned, full-color labels, stickers, cards, tags, and more, with quick turnaround times.
For further assistance, contact our consumer care center. Our team is ready to help with any design, printing, or ordering questions you may have.
Author: Melanie Neff
Melanie Neff brings extensive writing experience from a distinguished journalism background. As a former reporter for USA Today and The Los Angeles Times for nearly two decades, she covered diverse topics from major events to sports and entertainment. Following her newspaper career, she spent considerable time covering commercial real estate. For the past 12 years, Melanie has focused on writing about small business marketing and labeling solutions. She is passionate about research and providing valuable, up-to-date information to her readers in the business world. View all posts by Melanie Neff