Printing documents and photos directly from your iPhone might seem like a task requiring complicated setups, but with AirPrint, Apple simplifies this process immensely. This guide will walk you through how to print from your iPhone or iPad, ensuring you can easily get your digital files onto paper without any hassle.
Before you begin, there are a couple of essential prerequisites to ensure a smooth printing experience. First, verify that your printer is AirPrint-enabled. Most modern printers from major manufacturers support AirPrint, but it’s always best to check your printer’s specifications or contact the manufacturer for confirmation. Secondly, ensure both your iPhone or iPad and your printer are connected to the same Wi-Fi network. Being on the same network is crucial for AirPrint to function correctly and for your devices to discover each other. Also, make sure you are within a reasonable range of your Wi-Fi network for stable connectivity.
Once you’ve confirmed these prerequisites, printing is straightforward:
- Start by opening the app containing the document, photo, or content you wish to print. This could be anything from Photos, Safari, Mail, or even third-party apps that support printing.
- Look for the print option within the app. Typically, this is found by tapping the Share button (it usually looks like a square with an arrow pointing upwards) or an Actions button, which might be represented by three dots or lines.
- After tapping the Share or Actions button, scroll down through the options until you find Print represented by the Print button . Tap on “Print”. If you are unable to locate the print option, it’s advisable to consult the app’s user guide or help section, as not all apps inherently support AirPrint.
- In the Printer Options screen, you’ll see “No Printer Selected” initially. Tap on this to reveal a list of available AirPrint-enabled printers on your Wi-Fi network. Choose your desired printer from the list. If your printer is properly set up and on the network, it should appear here.
- Once you’ve selected your printer, you can customize your print job. Options typically include selecting the number of copies, specifying page ranges, choosing paper size, and sometimes even print quality, depending on the app and printer capabilities. Adjust these settings to your preferences.
- Finally, after configuring all your settings, tap Print located in the upper-right corner of the screen. Your print job will now be sent wirelessly to your selected printer.
During the printing process, you can easily monitor or even cancel your print job directly from your iPhone. Apple provides a handy way to manage your print tasks through the App Switcher.
Managing Your Print Jobs
Viewing a Print Job
To check the status of a print job in progress, you can quickly access the Print Center. 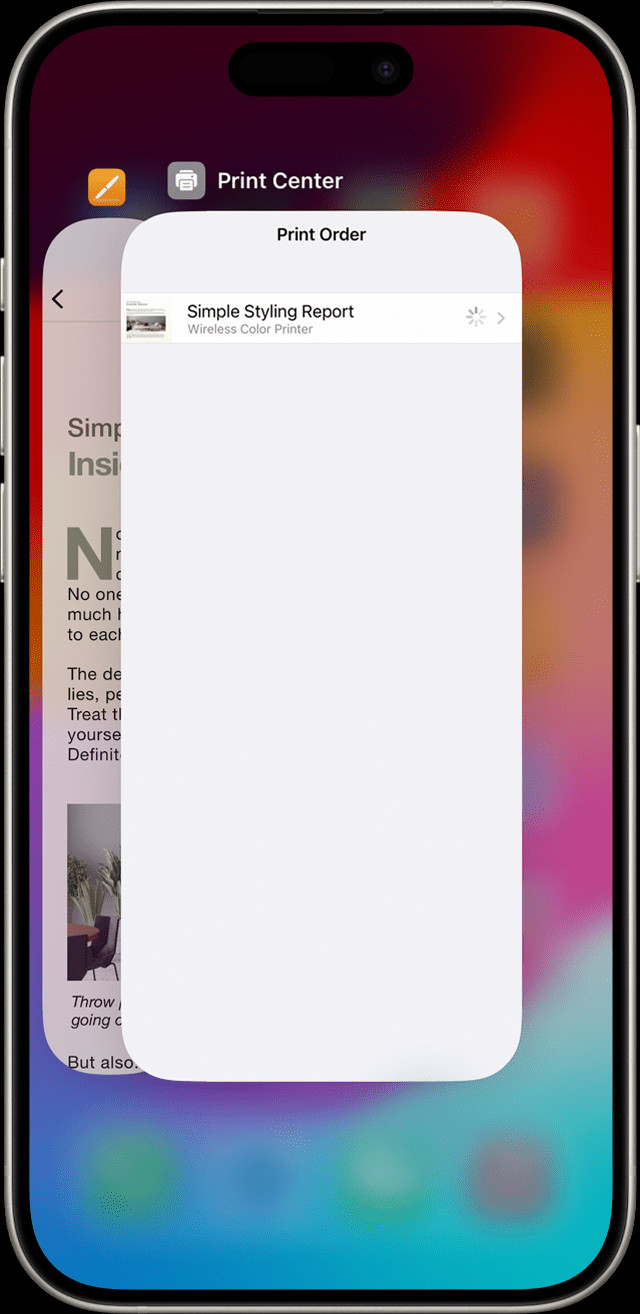 View print jobs in Print Center on iPhone Simply open the App Switcher (usually by swiping up from the bottom of the screen and holding, or double-clicking the home button on older models), and look for Print Center. Tapping on Print Center will show you the current print queue and the status of each job.
Canceling a Print Job
If you need to stop a print job for any reason, canceling is just as straightforward. To cancel, again, open the App Switcher, navigate to Print Center, and then tap Cancel Printing. This will stop the current print job from proceeding, saving paper and ink if needed.
AirPrint’s compatibility extends to both Wi-Fi and wired network connections, offering flexibility in setup. However, it’s important to note that AirPrint printers connected via USB to an Apple AirPort Base Station or AirPort Time Capsule, or those connected to your computer via Bluetooth, are not supported. AirPrint is designed for direct network connectivity.
By following these steps, you can seamlessly print from your iPhone or iPad, leveraging the convenience of AirPrint for all your mobile printing needs. Enjoy the simplicity and efficiency of wireless printing directly from your Apple devices.