
Microsoft Word’s Track Changes feature is invaluable for collaborative document editing, allowing multiple users to suggest modifications, insertions, and deletions. However, when it comes to sharing or printing a final version of your document, you might want to present a clean, uncluttered copy without these markups and comments. This guide will walk you through various methods to print your Word document without displaying comments and tracked changes, ensuring your printed output is exactly as you intend.
Understanding Track Changes and Comments in Word
Track Changes in Word visually displays every edit made to a document, including insertions, deletions, and formatting modifications. Comments, on the other hand, are notes or annotations added to the document, often for feedback or discussion purposes. While essential during the editing process, these elements can be distracting or unnecessary in a printed version intended for final viewing or distribution.
Step-by-Step Guide to Print Word Documents Without Markups
Here’s how to ensure your printed Word document is free of tracked changes and comments:
1. Hiding Tracked Changes and Comments Before Printing
The simplest way to print without markups is to hide them from view before sending your document to the printer. This does not remove the tracked changes or comments from the document itself, but it prevents them from appearing in the printed output.
For Desktop Word Application:
-
Navigate to the Review Tab: Open your Word document and click on the “Review” tab in the ribbon menu.
-
Choose “No Markup” for Display: In the “Tracking” group, find the “Display for Review” dropdown menu (or “All Markup” dropdown in some versions).
-
Select “No Markup”: From the dropdown options, select “No Markup”. This will hide all tracked changes and comments in your document view.
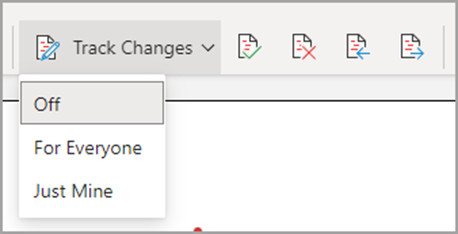 Track changes drop down Off, For Everyone, Just Mine
 -
Print Your Document: Go to “File” > “Print” as you normally would. Word will print the document as it appears in the “No Markup” view, without any tracked changes or comments visible.
For Word for Web:
-
Go to the Review Tab: In Word for Web, navigate to the “Review” tab.
-
Select “No Markup” under Markup view: Click on the “Markup view” dropdown and choose “No Markup”.
-
Print Your Document: Use the browser’s print function (usually Ctrl+P or Cmd+P) to print your document. The printed version will exclude the hidden markups.
2. Controlling What to Print in Word Print Settings
Word offers direct control over what document information gets printed through its print settings. You can specifically deselect “Print Markup” to exclude tracked changes and comments from your printouts.
Steps to Adjust Print Settings:
-
Go to Print Settings: Open the “File” menu and select “Print”.
-
Check Settings: Look for the “Settings” section, usually located below the printer selection. By default, “Print All Pages” is selected.
-
Document Info Options: Under “Settings,” find “Document Info.” If “Print Markup” is checked, uncheck it.
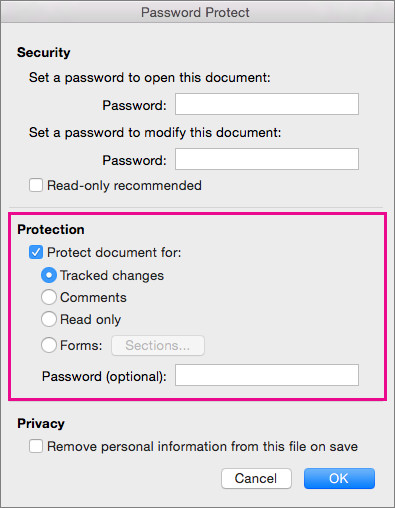 Protection section is highlighted
By unchecking “Print Markup,” you instruct Word to print only the clean document content, effectively removing comments and tracked changes from the printed version.
-
Print Your Document: Proceed with printing. Your document will now print without any markups.
3. Permanently Removing Tracked Changes and Comments
If you intend to distribute the document widely and want to ensure no recipients see the tracked changes or comments, you should permanently remove them from the document.
Accepting or Rejecting Tracked Changes:
-
Navigate to the Review Tab: Go to the “Review” tab in Word.
-
Accept or Reject Changes: In the “Changes” group, you have options to “Accept” or “Reject” changes.
-
Review Changes Sequentially: Use “Next” and “Previous” buttons in the “Changes” group to go through each tracked change one by one.
-
Accept or Reject Individually: For each change, choose “Accept” to incorporate it into the document or “Reject” to discard it.
Image alt text: Comment card displayed upon clicking a tracked change in Word, showing options to Accept or Reject the suggested change.
-
Accept or Reject All Changes: For a quicker process, use the dropdown menu under “Accept” or “Reject” and choose “Accept All Changes” or “Reject All Changes” to process all tracked edits at once. Be cautious when using “Accept All” or “Reject All,” especially in collaborative documents, to ensure you’re not unintentionally applying or discarding important revisions.
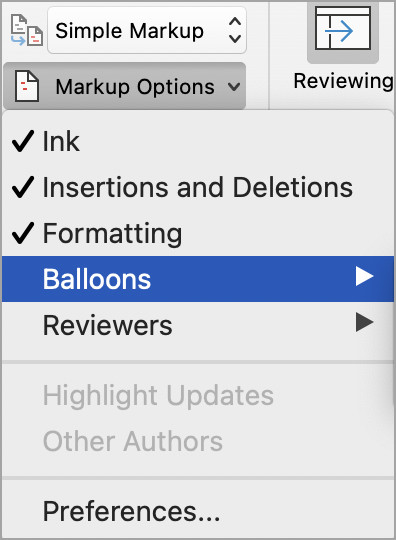 Track changes markup options
-
-
Save Your Document: After accepting or rejecting all tracked changes, save the document. The tracked changes are now permanently incorporated or removed.
Deleting Comments:
-
Navigate to the Review Tab: Go to the “Review” tab.
-
Delete Comments: In the “Comments” group, you can delete comments.
-
Delete Comments Sequentially: Use “Previous” and “Next” in the “Comments” group to navigate through comments.
-
Delete Individual Comments: Click on a comment, and then select “Delete” in the “Comments” group to remove the current comment.
-
Delete All Comments: To remove all comments in the document at once, use the dropdown arrow under “Delete” and select “Delete All Comments in Document.”
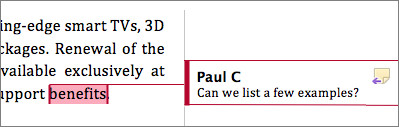 A comment in the margin is highlighted
-
-
Save Your Document: Save the document after deleting comments. They are now permanently removed.
4. Printing to PDF for Final Distribution
Another effective method to ensure your document prints cleanly without comments or tracked changes is to save it as a PDF and then print the PDF. When you save a Word document as a PDF, it typically captures the document’s current display state, including whether markups are hidden or shown.
Steps to Print to PDF:
- Hide Markups: Ensure you have hidden tracked changes and comments by setting the “Display for Review” to “No Markup” as described in Step 1.
- Save as PDF: Go to “File” > “Save As”. Choose “PDF” from the “Save as type” dropdown menu.
- Print the PDF: Open the saved PDF file and print it. The PDF version will not contain any tracked changes or comments if they were hidden in Word when you saved it.
Conclusion
Printing a Word document without comments and tracked changes is straightforward once you understand the available options. Whether you choose to hide markups for printing, adjust print settings, permanently remove tracked changes and comments, or print to PDF, Word provides the flexibility to control exactly what gets printed. By following these steps, you can confidently produce clean, professional-looking printed documents, free from editing marks and annotations, perfect for final submissions, sharing, or presentations.