Winter’s unexpected encore this year has brought a prolonged spell of cool weather, transforming the landscape with vibrant greens as ferns unfurl and nature embraces the damp. While the grey skies pour down, we find warmth and creativity in the heart of our baking studio. Today, we’re embarking on a baking adventure that’s as delightful to create as it is to devour: Giraffe Print Bread.
For bakers, the kitchen is our canvas, and dough, our medium. This Giraffe Print Bread recipe is more than just baking; it’s an exercise in precision and artistry. The magic lies in the details, making a kitchen scale your best companion for this culinary craft. Prepare to be amazed as you slice through this loaf, revealing the captivating giraffe patterns hidden within! This subtly chocolate-flavored bread is perfect on its own or elevated with a smear of chocolate spread or creamy peanut butter.

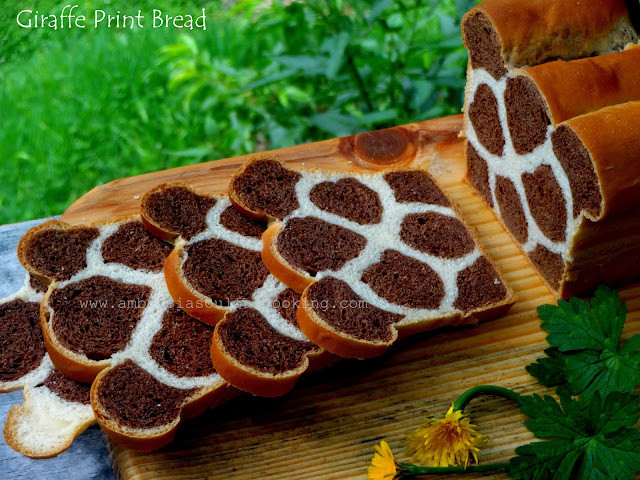
Close-up of a freshly baked Giraffe Print Bread loaf, showcasing its golden crust and the distinctive patterned end slice.
Before we dive into the patterned wonder, let’s appreciate the simple joys of nature that inspire us. Even amidst baking, the natural world provides constant entertainment. Just outside our window…

A Jungle Myna bird bathing in a bird bath, its dark feathers glistening with water droplets.
A Jungle Myna, with its sleek dark feathers, recently graced our makeshift bird bath, turning the simple water hole into a sparkling spa. Nearby, a Grey Winged Blackbird diligently forages, scratching away damp leaves to unearth a juicy earthworm, a testament to nature’s persistent rhythm. And high in the pear tree, a Drongo fiercely guards her delicate nest, a tiny cup of life, deterring any would-be branch perchers with unwavering resolve. Nature’s small dramas unfold around us as we embark on our own creative endeavor in the kitchen.
Crafting the Giraffe Pattern: Dough Preparation
The secret to the giraffe print lies in creating two contrasting doughs: a plain, светлое (light) dough and a rich cocoa dough. We’ll carefully divide each dough to achieve the signature pattern. Don’t worry if your dough weights vary slightly from the recipe; baking is forgiving! A little adjustment here and there is all part of the fun.

Slices of Giraffe Print Bread revealing the distinctive spot pattern, perfect for sandwiches or toast.
Ingredients You’ll Need:
For the Plain Dough:
- 250 grams all-purpose flour
- ¾ cup warm milk (plus 1-2 tablespoons extra, if needed)
- 2 tablespoons unrefined sugar or brown sugar
- 2 tablespoons softened butter
- ¼ teaspoon salt
- 1 teaspoon instant dry yeast
For the Cocoa Dough:
- 330 grams of the prepared plain dough (measured after mixing)
- 3 tablespoons cocoa powder
- 3-4 teaspoons water or milk
Step-by-Step Giraffe Bread Baking Instructions
Let’s get baking! Follow these simple steps to create your own masterpiece of Giraffe Print Bread:
1. Prepare the Plain Dough:
In a large bowl, warm the milk slightly and dissolve the sugar and yeast into it. Let it stand for a few minutes until the yeast starts to activate (it will become slightly foamy). Add the remaining ingredients for the plain dough and knead for 6-7 minutes until you have a smooth, elastic dough. If the dough feels too stiff, add milk one tablespoon at a time until it softens. Cover the bowl and let the dough rest for 20 minutes.

Step 1: Plain dough ingredients mixed in a bowl, ready for kneading.
2. Divide and Refrigerate Plain Dough:
Weigh out 330 grams of the plain dough. Shape the remaining lighter dough into a ball, place it in a greased bowl, cover, and refrigerate. This chilling step helps manage the dough consistency.

Step 2: Plain dough divided, with a portion set aside for the cocoa dough and the rest being shaped into a ball.
3. Create the Cocoa Dough:
In a separate small bowl, make a paste by mixing the cocoa powder with water or milk. Gradually knead this cocoa paste into the 330 grams of plain dough until it’s evenly incorporated and you have a uniform brown cocoa dough. Shape it into a ball, place it in a greased bowl, and cover with cling wrap.

Step 3: Cocoa powder being kneaded into the plain dough to create the chocolate-colored dough.
4. First Rise (Proofing):
Remove the plain dough from the refrigerator. Place both bowls (plain and cocoa dough) in a warm place to rise for 45-50 minutes, or until doubled in size. This is a crucial step for light and airy bread.

Step 4: Both plain and cocoa doughs in bowls, undergoing their first rise in a warm spot.
5. Divide the Doughs for Patterning:
Once the doughs have doubled, divide the cocoa dough into 4 pieces: one larger piece (90 grams) and three smaller pieces (80 grams each). Divide the plain dough similarly: one larger piece (50 grams) and three smaller pieces (40 grams each). Roll each piece into a smooth ball.

Step 5: Divided dough balls of both plain and cocoa varieties, ready for shaping.
6. Shape into Rolls:
Roll out the largest piece of cocoa dough into a rectangle, as long as your loaf pan. Starting from the long side, roll it up tightly into a log. Pinch the seams to seal the edges. Repeat this with the remaining cocoa dough balls. Then, roll out the largest piece of plain dough into a rectangle, large enough to wrap around the biggest cocoa roll. Place the cocoa roll on the plain dough rectangle, wrap the plain dough around it, and seal all edges. Repeat with the remaining dough pieces to create 4 combined rolls.
7. Assemble the Loaf:
Cut each of the 4 rolls in half, giving you 8 pieces with one sharp and one open end. Grease an 8×4 inch loaf pan. Arrange the rolls in the pan: three small rolls at the bottom, two large rolls in the middle, and three small rolls on top. Alternate the direction of the cut ends as you place them.

Step 7: Shaped dough rolls placed in a loaf pan, ready for the final proofing.
8. Second Rise (Final Proofing):
Cover the loaf pan and let the dough rise again in a warm place until it doubles in size. This second rise will ensure a light and airy texture.
9. Bake to Golden Perfection:
Preheat your oven to 175 degrees C (350 degrees F). Bake for 20-25 minutes, or until the loaf is golden brown and sounds hollow when tapped on the bottom.
10. Cool and Slice:
Let the Giraffe Print Bread cool in the pan for 10 minutes before transferring it to a wire rack to cool completely. Resist the urge to slice it warm! Once cooled, slice and reveal the amazing giraffe pattern you’ve created.

Final baked and sliced Giraffe Print Bread, displaying the beautiful giraffe spot pattern within each slice.
Enjoy Your Wildly Delicious Bread!
This Giraffe Print Bread is not just a treat for the taste buds but also a feast for the eyes. It’s a conversation starter, a fun baking project, and a delicious way to explore your creativity in the kitchen. Enjoy it fresh, toasted, or with your favorite spreads.
Recipe adapted from www.foodieyuki.com
This recipe is part of the #BreadBakers monthly challenge, focusing on breads with surprises inside, hosted by Kelly. Explore more surprise-inside breads from fellow baking enthusiasts:
- Broccoli Bread from A Day in the Life on the Farm
- Cheesy Chicken Stuffed Bread from Making Miracles
- Cinnamon Apple Surprise Bread from Food Lust People Love
- Giraffe Print Bread from Ambrosia
- Leopard Print Milk Bread from Karen’s Kitchen Stories
- Paw Print Bread from Passion Kneaded
- Peek-a-boo Panda Bread from Culinary Adventures with Camilla
- Picasso Floral Surprise Loaf from A Messy Kitchen
- Swirl Bread from Zesty South Indian Kitchen
- Swirl Sourdough Whole Wheat Bread (Chocolate, Garlic & Herbs) from Cook with Renu
- Whey Watermelon Bread from Sneha’s Recipe