When working with large spreadsheets in Excel, you often need to print only a specific section rather than the entire worksheet. Excel’s print area feature allows you to designate one or more areas of your worksheet to be printed, giving you precise control over your printed output. This is particularly useful for reports, summaries, or when you only need a subset of your data on paper.
This guide will walk you through how to define, modify, and clear print areas in Excel, ensuring you print exactly what you intend, efficiently and effectively.
Setting a Print Area in Excel
Defining a print area is a straightforward process that saves time and resources by preventing unnecessary printing. Here’s how to set a print area in Excel:
-
Select the Range: Begin by selecting the cell range you wish to include in your print area. This is the portion of your worksheet that you want to print.
Tip: To select multiple, non-contiguous areas as separate print areas, press and hold the Ctrl key while selecting each range. Each selected range will print on a separate page.
-
Navigate to Page Layout: Go to the Page Layout tab on the Excel ribbon.
-
Set the Print Area: In the Page Setup group, find and click on the Print Area dropdown menu. From the options, select Set Print Area.
 Set Print Area Option in Excel
Excel will now remember this defined print area. Whenever you choose to print this worksheet, only the specified area(s) will be printed. This setting is saved with your Excel workbook, so you won’t need to redefine it each time you open the file.
To visually confirm your set print area, you can switch to Page Break Preview. Navigate to the View tab, and in the Workbook Views group, click Page Break Preview. This view clearly outlines the print area(s) you have defined.
Expanding Your Print Area
Sometimes you might need to add more cells to an existing print area. Excel makes it easy to expand your defined print area to include adjacent cells.
-
Select Additional Cells: On your worksheet, select the new cells you want to add to the current print area.
Note: You can only add cells that are adjacent to the existing print area. If you select non-adjacent cells and attempt to add them, Excel will create a new, separate print area instead.
-
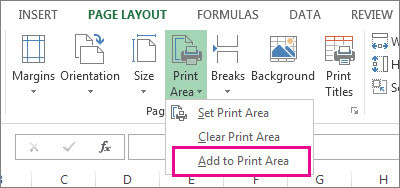
Add to Print Area: Go back to the Page Layout tab, and in the Page Setup group, click Print Area, and then choose Add to Print Area.
Set Print Area Option in Excel
The print area will now be updated to include the newly selected cells, as long as they are adjacent to the original area. Remember to save your workbook to keep these print area settings.
Clearing a Print Area
If you no longer want to print only a specific area and wish to revert to printing the entire worksheet, you need to clear the defined print area.
-
Select Any Cell in the Worksheet: Click on any cell within the worksheet for which you want to remove the print area.
-
Clear Print Area: Go to the Page Layout tab, in the Page Setup group, click Print Area, and select Clear Print Area.
By clearing the print area, Excel will disregard any previously defined print areas for that worksheet, and printing will default to the entire sheet’s content. If you had multiple print areas set, this action will remove all of them at once.
Need Further Assistance?
For more in-depth help or to connect with other Excel users, consider exploring the Excel Tech Community. You can also find support and answers to common questions in Microsoft Communities. These resources offer a wealth of information and expert advice to help you master Excel and its features, including print area settings.