Do you often find yourself needing to print only a specific part of your Excel worksheet? Instead of printing the entire sheet and wasting paper, Excel’s print area feature allows you to designate exactly which cells should be included in your printouts. This guide will walk you through how to set, modify, and clear print areas in Excel, ensuring you always print precisely what you need.
Setting One or More Print Areas in Excel
The print area function in Excel is incredibly useful when you have large worksheets but only require a portion of the data in printed format. Here’s how to define a print area:
-
Begin by selecting the cell range you want to set as your print area on your Excel worksheet. This is the portion of your sheet that will be printed.
Tip: Need to set multiple, non-contiguous print areas? Simply hold down the Ctrl key as you select each area you want to include. Each of these selected areas will print on a separate page.
-
Navigate to the Page Layout tab on the Excel ribbon.
-
In the Page Setup group, locate and click on the Print Area dropdown menu.
-
From the dropdown options, choose Set Print Area.
Once set, Excel remembers this print area even after you save and reopen your workbook. This is a saved setting specific to your Excel file.
To visualize the set print areas and confirm they are correct, you can switch to Page Break Preview. Go to the View tab, and in the Workbook Views group, click Page Break Preview. This view will show you the boundaries of your print area(s).
Expanding Your Print Area by Adding Cells
Need to include more data in your printout? You can easily add cells to an existing print area. Remember, you can only add cells that are directly adjacent to the currently defined print area to expand it. Adding non-adjacent cells will result in the creation of a new, separate print area.
-
On your worksheet, select the additional cells you wish to include in your current print area.
Note: If you select cells that are not next to the existing print area, Excel will interpret this as a request to create a new, independent print area. Each print area on a worksheet is printed on its own page. Only contiguous cells can extend an existing print area.
-
Go back to the Page Layout tab, and in the Page Setup group, click Print Area again.
-
This time, select Add to Print Area from the dropdown menu.
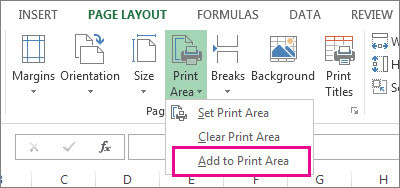 Adding to Print Area in Excel
Alt text: Excel interface showing the “Add to Print Area” option within the Print Area dropdown menu under the Page Layout tab, used for expanding the defined print selection on a worksheet.
Your print area will now be updated to include the newly selected cells, assuming they were adjacent to the original area. This updated print area setting is also saved with your Excel workbook.
Clearing a Print Area to Print the Entire Worksheet
If you no longer need to print just a specific area and want to revert to printing the entire worksheet, you need to clear the defined print area. It’s important to note that clearing the print area will remove all print areas set on the active worksheet.
-
Ensure you are on the worksheet for which you want to remove the print area. You can click anywhere on this sheet.
-
Navigate to the Page Layout tab, and in the Page Setup section, click Print Area.
-
From the dropdown options, select Clear Print Area.
By clearing the print area, Excel will now print the entire worksheet content when you choose to print, just as it would by default if no print area was ever set.
Need Further Assistance?
For more in-depth help or to connect with other Excel users, consider exploring the Excel Tech Community. You can also find support and ask questions within the broader Microsoft Communities. These resources are excellent for troubleshooting and learning more about Excel’s features.