Capturing what’s on your computer screen, also known as taking a screenshot or screen capture, is a fundamental skill for anyone using Windows. Once you’ve captured your screen, the image is automatically copied to your clipboard, ready to be used. Windows systems utilize the Print Screen key, often labeled as PrtScn, either on its own or in combination with other keys, to capture different types of screenshots: the entire screen, all currently active windows, or just the window you are currently working in. After capturing, you can easily paste these screenshots into documents, emails, or image editing software like Paint for further use or saving. Alternatively, you can directly insert the screenshot as an image file into various applications. This guide will walk you through How Do You Print Screen effectively on your Windows device.
Finding the PrtScn Key on Your Keyboard
Locating the Print Screen key is the first step to mastering screen captures. On a standard desktop keyboard, you’ll typically find the Print Screen key in the upper right-hand corner. While the function remains the same, the key label can vary slightly across different keyboard models. You might see labels such as PrintScreen, PrntScrn, PrntScr, PrtScn, PrtScr, PrtSc, or similar abbreviations. For simplicity and consistency, we’ll use PrtScn throughout this article to refer to all these variations.
It’s worth noting exceptions. For instance, the Dell Wireless Keyboard and Mouse combo, model KM3322W, doesn’t have a dedicated Print Screen button. On this model, you’ll need to press the Fn (Function) key and the Insert key simultaneously to perform a screen capture.
Laptop keyboards usually place the Print Screen key within the Function Key row, often sharing space with another function. To activate Print Screen on a laptop, you generally need to press and hold the Fn key while also pressing the associated Function key, which is frequently F10.
For laptops equipped with capacitive (illuminated) Function Key rows, you might need to press the Fn key once to switch the function keys to their secondary functions, which will illuminate the PrtScn option. Once illuminated, you can then use the PrtScn key in combination with other keys as described below to capture your desired screenshot. If you’re unsure about your specific laptop model, consulting your product’s user guide can provide detailed instructions.
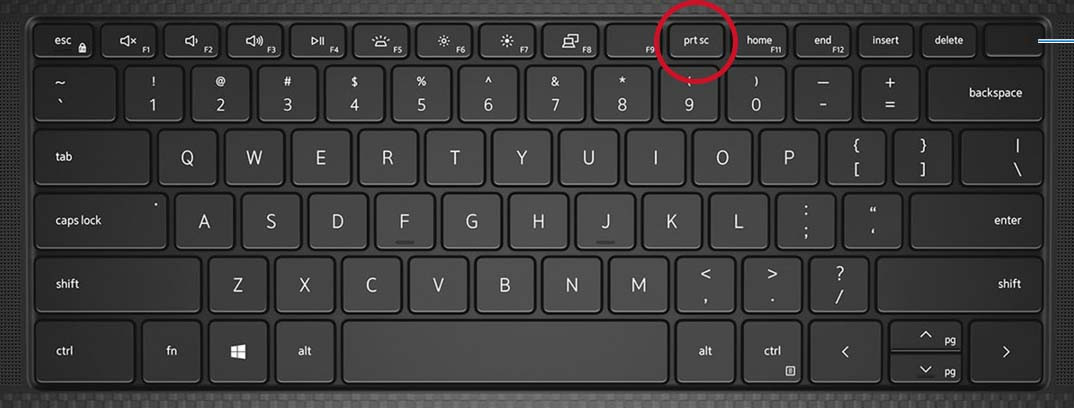 Illustration of the print screen key on Dell KM5221W wireless keyboard
Figure 1: Print Screen key highlighted on a Dell KM5221W wireless keyboard, commonly located in the upper right corner for desktop setups.
Illustration of the print screen key on Dell KM5221W wireless keyboard
Figure 2: Print Screen key as seen on a Dell Precision 5550 mobile workstation laptop keyboard, often integrated within the function key row.
In some instances, particularly on more compact laptop keyboards, a dedicated Print Screen key might be absent altogether. In such cases, the Print Screen function is often accessed by pressing and holding the Fn key together with the Insert key.
Mastering Print Screen in Windows 10 and Windows 11
The functionality of the Print Screen key is consistent across both Windows 11 and Windows 10, offering several methods to capture your screen depending on your needs.
Capturing the Entire Screen
To capture a screenshot of your entire display, including everything visible on your screen, press the Windows logo key and the PrtScn key simultaneously. If you are using a tablet device, you can achieve the same result by pressing the Windows logo button along with the volume down button. When you use this method, Windows automatically saves the screenshot as a PNG file in the “Screenshots” folder, which is located within your “Pictures” folder. This is a quick and convenient way to save full-screen captures directly.
Capturing All Active Windows
If you need to capture all windows that are currently active and open on your screen, simply press the PrtScn key by itself. This action will capture all active windows and copy the screenshot to your clipboard. You will then need to paste it into an application to view, edit, or save it.
Capturing a Single Active Window
For capturing only the specific window you are currently working in, first ensure that the window you wish to capture is active by clicking on it. Then, press and hold the Alt key while pressing the PrtScn key. This combination will capture only the active window and copy it to your clipboard, leaving out any other windows or background elements.
Pasting and Utilizing Your Screenshots
After you’ve successfully captured your desired screen area using any of the Print Screen methods, the next step is to use the captured image. The screenshot is temporarily stored on your clipboard. To make it usable, you need to paste it into an application. Image editors like Microsoft Paint, Paint 3D, or Adobe Photoshop are ideal for this purpose, allowing you to edit, annotate, or save your screenshot.
To paste the screenshot, open your chosen application and create a new image document if necessary. Then, use the keyboard shortcut Ctrl + V (hold down the Ctrl key and press V). This will paste the screenshot from your clipboard into the application window, where you can then work with the image as needed.
Illustration of the print screen key on Dell KM5221W wireless keyboard
Figure 3: Example of a laptop keyboard featuring a capacitive Function Key row, where the Fn key may need to be pressed to access secondary functions like Print Screen.
For users who require more advanced screenshot options, Windows offers the Snipping Tool. The Snipping Tool provides various capture modes, including free-form snip, rectangular snip, window snip, and full-screen snip, along with annotation and delay-capture features, offering greater flexibility for your screen capturing needs.