In today’s digital world, capturing your screen is a basic necessity. The Print Screen key provides a simple method for taking screenshots in Windows. Learn how to use it effectively for sharing, tutorials, and saving information.
Understanding the Print Screen Key and Screenshots
The Print Screen key (PrtScr) is your quick way to capture what’s on your screen. Pressing it takes a snapshot, called a screenshot, and copies it to the clipboard – a temporary storage area. From there, you can paste the screenshot into applications like Paint, documents, or emails. This function allows you to quickly create a visual copy of your screen’s content for various purposes.
Locating the Print Screen Key on Your Keyboard
The Print Screen key’s location varies. Desktops usually have it in the upper right, labeled ‘Print Screen’, ‘PrntScrn’, or similar. Laptop keyboards often integrate it with the Function keys (F1-F12). Look for ‘PrtScr’ on the F-keys or Insert key. You might need to press the Fn key + PrtScr (or Fn + Insert) to take a screenshot. Consult your laptop manual if needed for the precise combination.
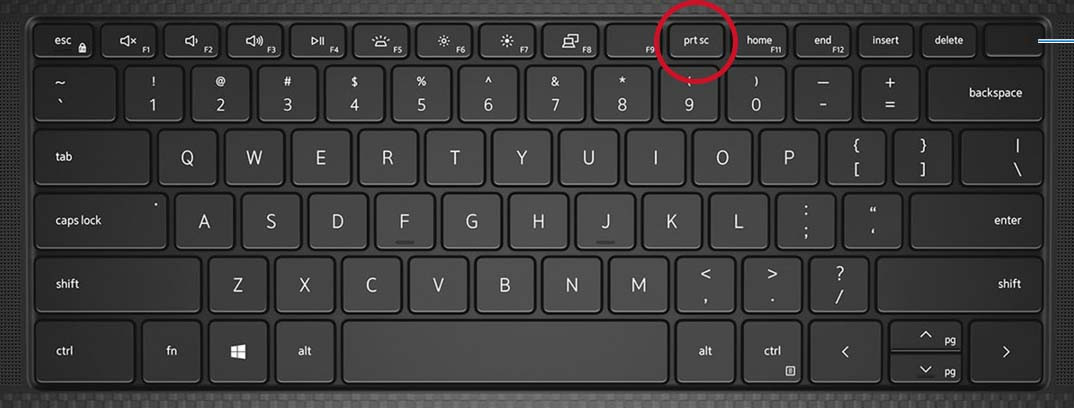 Close-up of a desktop keyboard highlighting the Print Screen key, typically located in the upper right corner for easy screen capture.
Different Print Screen Methods in Windows
Windows offers several ways to use Print Screen for different capture needs:
- Capture the Entire Screen: Press the Windows logo key + PrtScr keys together. On tablets, press the Windows logo button + the volume down button together. This method saves the screenshot directly as a file in the “Screenshots” folder within your “Pictures” library. It’s the fastest way to save a full screen capture.
- Capture All Active Windows: Simply press the PrtScr key. This captures all open windows on your screen and copies the image to the clipboard. You can then paste it into an application for viewing or saving.
- Capture a Single Active Window: To capture only the window you are currently using, select that window to make it active and press Alt + PrtScr keys together. This will capture only the selected window and copy it to the clipboard.
Close-up of a desktop keyboard highlighting the Print Screen key, typically located in the upper right corner for easy screen capture.
Pasting and Using Your Screenshots
Once captured using any of the Print Screen methods, your screenshot is temporarily stored on the clipboard. To use or save it, you need to paste it into another application.
- Using an Image Editor: Open an image editing program like Microsoft Paint (pre-installed on Windows) or more advanced software like Adobe Photoshop or GIMP. Press Ctrl + V to paste the screenshot into a new document within the image editor. From here, you can edit, crop, annotate, or save the screenshot in various image formats (JPEG, PNG, etc.).
- Pasting into Documents or Emails: You can also directly paste screenshots into documents (like Microsoft Word or Google Docs), email messages, presentation software, and many other applications that support image insertion. Simply navigate to where you want to insert the image and use Ctrl + V to paste.
Beyond Basic Print Screen: Exploring the Snipping Tool
For more than basic screenshots, Windows includes the Snipping Tool. This utility offers more advanced capture options, including:
- Rectangular Snip: Draw a rectangle to capture a specific area of your screen.
- Free-form Snip: Draw any shape around the area you want to capture.
- Window Snip: Capture a specific window by selecting it.
- Full-screen Snip: Captures the entire screen, similar to the Windows key + PrtScr shortcut.
Snipping Tool also provides basic annotation tools, allowing you to draw or highlight directly on the screenshot before saving. It is a more versatile built-in option for screen capturing.
Conclusion
Print Screen is a powerful and easy tool for screenshots in Windows. Mastering these different methods allows you to quickly capture and share information directly from your screen, whether for quick communication, creating guides, or saving important visuals. Practice the different Print Screen techniques to become proficient in capturing exactly what you need.