Screen printing is a fantastic technique for transferring designs onto various surfaces, especially fabrics. While there are several methods to achieve this, using screen filler and drawing fluid offers a wonderfully accessible entry point, particularly for beginners venturing into the world of screen printing. Often underestimated as a basic approach, this method is capable of producing high-quality, artistic prints with a unique, hand-drawn aesthetic, making it a compelling choice for anyone looking to explore Screen For Screen Printing. This guide will delve into the screen filler and drawing fluid technique, demonstrating how you can create stunning prints with a painterly touch, right from your home studio.
Why Choose Screen Filler for Screen Printing?
For hobbyists and makers working without professional studio setups, the screen filler and drawing fluid method stands out as a remarkably straightforward alternative to more complex techniques like photo emulsion. While photo emulsion methods are viable at home, they typically demand more specialized equipment and a steeper learning curve. This method, in contrast, simplifies the process while retaining the core essence of screen printing.
Compared to other DIY fabric printing options such as block printing or stenciling with cut stencils (mylar, freezer paper, or vinyl), screen printing with screen filler offers a unique blend of detail and organic charm. It allows for more intricate designs than block printing and avoids the sharp, sometimes rigid edges of cut stencils, resulting in prints that possess a beautiful, handcrafted quality. The inherent imperfections of this method are not flaws, but rather contribute to the distinctive, painterly character that many artists find appealing.
If you’re drawn to the idea of printing your own fabrics, whether for bespoke curtains, unique clothing, or artistic projects, this method empowers you to bring your creative visions to life. It provides a sense of creative freedom, enabling you to produce textiles that perfectly match your imagination, something often elusive when browsing pre-made fabrics.
Understanding the Screen Filler and Drawing Fluid Technique
How it Works: A Simple Overview
The screen filler and drawing fluid method hinges on a clever masking principle. Here’s a simplified breakdown of the process:
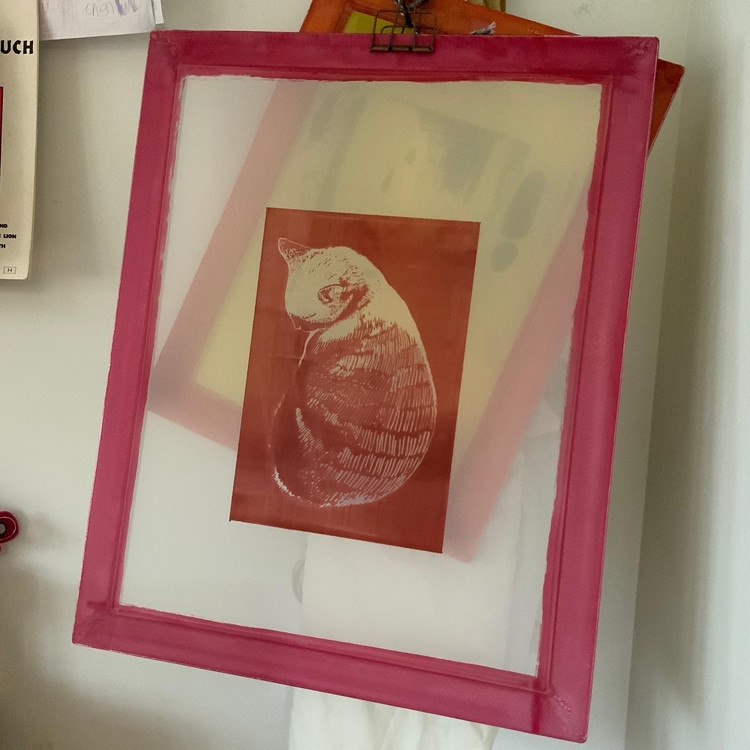
- Drawing Your Design: Using a brush or ruling pen, you apply the drawing fluid directly onto the mesh of your silkscreen, creating your positive image.
- Applying Screen Filler: Once the drawing fluid is completely dry, you spread a thin, even layer of screen filler over the entire screen surface.
- Creating the Stencil: The magic happens when you wash away the drawing fluid with cold water. Because the drawing fluid is water-soluble and the screen filler is water-resistant when dry, the drawing fluid dissolves, leaving behind open mesh areas in the shape of your design, effectively creating a stencil within the screen filler.
- Screen Printing: Your screen is now ready to be used for printing! Ink will pass through the open areas of your stencil onto your chosen material, replicating your design.
 Kevin stencil
What You’ll Need: Essential Supplies
To get started with screen printing using screen filler and drawing fluid, you’ll need a few key materials. Here’s a breakdown of each component:
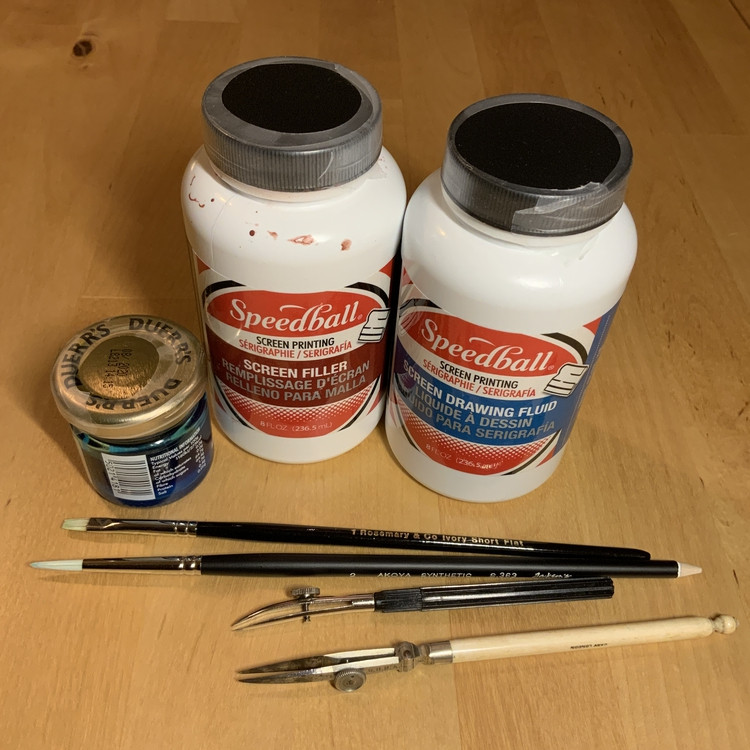
Drawing Fluid
This is a viscous, water-based liquid, typically tinted blue for visibility. It serves as the removable mask in your stencil-making process. Popular brands include Speedball and Daler Rowney System 3. Choose a drawing fluid specifically designed for screen printing to ensure it washes out cleanly without damaging the screen filler.
Screen Filler / Screen Block
Screen filler, also known as screen block, is a water-resistant compound that dries to form a durable stencil. It’s applied as a thin layer over the drawing fluid and becomes the permanent part of your stencil. Speedball is a widely recognized brand for screen filler. This material effectively blocks ink from passing through the mesh in areas where it’s applied, defining the negative space of your design.
Speedball Speed Clean (or Screen Filler Remover)
While not strictly essential initially, a screen filler remover like Speedball Speed Clean simplifies the process of reclaiming your screen after use. These removers are formulated to break down the screen filler, making it easier to wash away with hot water. Although some screen fillers might be removable with just hot water and scrubbing, a dedicated remover can save time and effort, especially for stubborn stencils.
Silkscreen
Silkscreens come in various sizes and mesh counts. The mesh count refers to the fineness of the mesh fabric stretched over the frame. Higher mesh counts (e.g., 90T, 110T) are finer, allowing for more detailed prints and are generally preferred for thinner fabrics. Lower mesh counts (e.g., 43T, 60T) are more open and better suited for thicker fabrics and bolder designs, often recommended for t-shirt printing. For beginners and fabric printing, a mesh count around 77T or 90T offers a good balance. Ensure your screen is larger than your design, providing at least an inch of border around all sides for proper ink management during printing.
Squeegee
A squeegee is a crucial tool for both applying screen filler and pushing ink through the stencil during printing. Ideally, your squeegee should be slightly wider than your design to ensure even coverage in a single pass. When selecting a squeegee, consider the inner dimensions of your screen frame to make sure it fits comfortably within the printable area.
Screen Printing Ink
For fabric printing, water-based screen printing inks like Permaset Aqua are excellent choices. They are environmentally friendly, easy to clean up with water, and produce vibrant, durable prints on fabric. Numerous brands and sellers offer water-based screen printing inks; exploring different options can help you find inks that suit your specific needs and budget.
Fabric
Pre-washed cotton calico is a versatile and affordable fabric ideal for screen printing practice and projects. Pre-washing removes sizing and potential shrinkage, ensuring better ink adhesion and print quality. You can experiment with various fabrics as you gain experience, but cotton calico is a great starting point.
Drawing Tools
Brushes are the most common tools for applying drawing fluid, allowing for varied line widths and painterly strokes. Ruling pens offer finer, more consistent lines, ideal for detailed work and lettering. When using ruling pens, ensure the tips are smooth to prevent snagging or tearing the delicate mesh of your screen.
 Speedball screenfiller
Step-by-Step Guide: Creating Your Screen Printing Stencil
Let’s walk through the process of creating a screen printing stencil using screen filler and drawing fluid:
1) Preparing Your Design
While mistakes can be corrected by washing out the drawing fluid and starting over, it’s more efficient to plan your design beforehand. Sketch your artwork on paper first to refine your composition and details. This paper draft can also serve as a guide when you transfer your design onto the screen.
2) Applying Drawing Fluid
Using a brush or ruling pen, carefully apply the drawing fluid to the squeegee side (the inside) of your silkscreen. Working on the squeegee side ensures a smoother printing surface later. If using a paper draft, you can place it beneath the screen for reference, ensuring it doesn’t directly touch the mesh to prevent smudging.
3) Drying the Drawing Fluid
Allow the drawing fluid to dry completely. Depending on the thickness of application and humidity, this can take several hours. For best results, let it dry overnight to ensure it’s thoroughly set before proceeding to the next step.
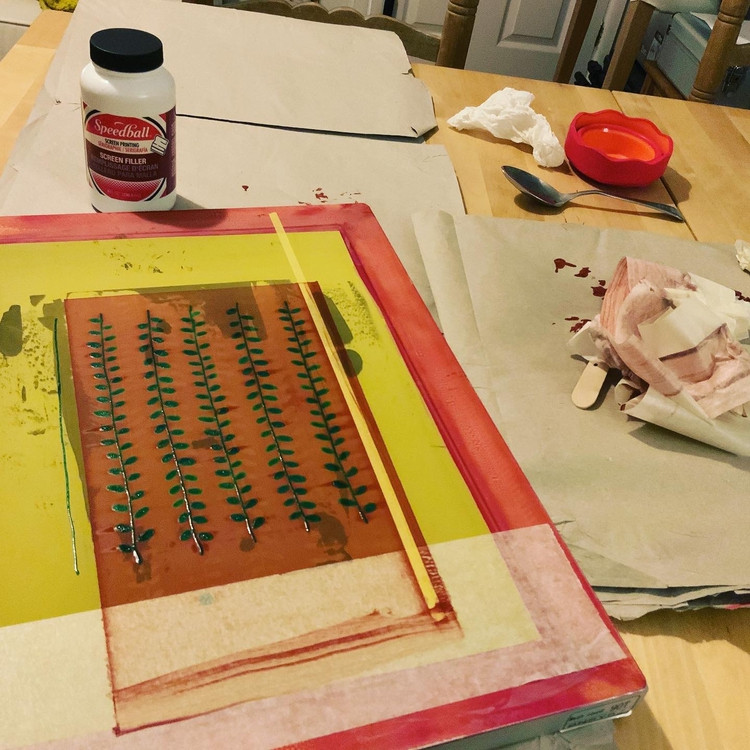
4) Applying Screen Filler
Once the drawing fluid is dry, apply a thin, even layer of screen filler to the same side of the screen where you applied the drawing fluid. Use your squeegee to spread the screen filler smoothly and evenly across the entire mesh area. It’s crucial to apply the filler to only one side to allow for the drawing fluid to be washed out later and create the stencil.
5) Drying the Screen Filler
Let the screen filler dry completely. Similar to the drawing fluid, drying time depends on environmental factors. Allowing it to dry overnight is recommended to guarantee a fully cured, water-resistant stencil.
 Screenfiller filled
6) Revealing Your Design
This is where your stencil comes to life! Gently wash the screen with cold water. The cold water will dissolve and remove the water-soluble drawing fluid, revealing the areas of open mesh that form your design. Continue rinsing until all traces of the drawing fluid are gone and your stencil is clearly defined within the screen filler.
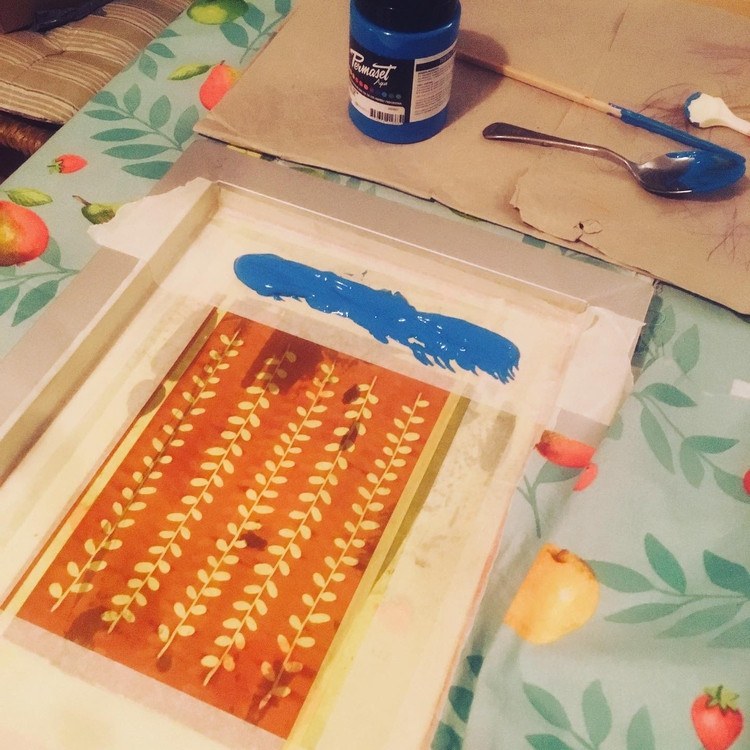
7) Printing and Reusing Your Stencil
Your screen is now ready for printing! Position your screen over your fabric or printing surface and apply screen printing ink. Use your squeegee to pull the ink across the screen, forcing it through the open stencil areas onto your material. After printing, you can clean the ink from your screen with cold water. The screen filler stencil is durable and can be reused for multiple prints. However, keep in mind that the longer the stencil remains on the screen, the more challenging it can be to reclaim the screen later.
8) Reclaiming Your Screen
When you’re finished with your stencil and want to reuse the screen for a new design, you’ll need to reclaim it. Use hot water and, optionally, a screen filler remover like Speed Clean to dissolve and wash away the screen filler. A shower hose or bathtub is often sufficient for this process; you don’t necessarily need a high-pressure power washer. Reclaiming your screen promptly after use is advisable to prevent the screen filler from becoming overly difficult to remove.
 Screen printing
Pro Tips for Success with Screen Filler and Drawing Fluid
Mastering Drawing Fluid Application
- Squeegee Side vs. Substrate Side: Applying drawing fluid to the squeegee side of the screen is generally recommended. This creates a smoother surface for squeegee action during printing. It also minimizes ink drying on the mesh and avoids the need to invert lettering.
- Using a Reference Drawing: Tape your paper design beneath the screen, leaving a small gap (around 2mm) using a coin as a spacer to prevent smudging. This provides a guide without the paper touching the mesh directly.
- Avoid Thick Pools: Excessive drawing fluid can create uneven screen filler application and bumpy stencils. Blot any pools with a dry brush or tissue before drying.
- Keep Water Handy: Drawing fluid can dry quickly on brushes and ruling pens. Keep a jar of water nearby to periodically clean your tools and prevent clogs.
- Decant Drawing Fluid: Pour a portion of drawing fluid into a smaller, more manageable container for easier dipping and to avoid contaminating the entire bottle if dilution is needed.
- Practice Ruling Pen Technique: Practice with ruling pens on paper first to get a feel for the tool and ensure smooth, consistent lines. Hold the pen parallel to the gap between the tips and be gentle on the screen mesh.
- Correcting Mistakes: Mistakes in drawing fluid can be wiped away with a damp cloth or tissue. For major errors, wash the entire screen and start again once dry.
 Ruling pens
Optimizing Screen Filler Application
- Tape the Screen: Tape the top and bottom edges of your screen to create “staging areas” for the screen filler. This prevents the filler from seeping through the mesh and dripping when you pause squeegeeing.
- Apply Thin Layers: Avoid applying screen filler too thickly, as it can pool on the underside of the mesh and compromise stencil sharpness.
- Limit Squeegee Passes: Excessive squeegee passes (aim for around 3) can dissolve the drawing fluid and blur fine details in your design.
- Border Control: You don’t need to fill the entire screen with filler. You can tape off borders during printing if your design doesn’t require the full screen area.
- Stir, Don’t Shake: Thoroughly stir the screen filler before use to ensure consistency, but avoid shaking to prevent air bubbles.
- Reuse Excess Filler: Excess screen filler can be returned to the bottle for future use, similar to screen printing inks.
Good luck!
Screen printing with screen filler and drawing fluid is a rewarding and accessible technique for creating unique prints. Experiment with these tips and techniques to develop your own style and discover the creative possibilities this method offers. Embrace the organic nature of this process and enjoy the journey of bringing your designs to life on screen.