Printing documents from your MacBook is a straightforward process, allowing you to easily get your digital files onto paper. Whether you need to print a simple text document, a vibrant photo, or a detailed presentation, macOS provides a user-friendly Print dialog with a range of options to customize your output. This guide will walk you through the essential steps of printing from your MacBook, ensuring you get the results you need every time.
Accessing the Print Dialog on Your MacBook
The first step to printing any document on your MacBook is to access the Print dialog. This is your control center for selecting your printer and configuring print settings. Here’s how to get there:
- Open your document: Begin by opening the document, image, or webpage you wish to print using the relevant application. This could be Pages for documents, Preview for images and PDFs, Safari for web pages, or any other application you are working in.
- Navigate to the Print Menu: In the menu bar at the top of your screen, click on “File.”
- Select “Print”: From the “File” dropdown menu, choose “Print”. Alternatively, you can use the keyboard shortcut Command + P to quickly open the Print dialog.
Upon opening the Print dialog, you will see a preview of your document, along with various print options.
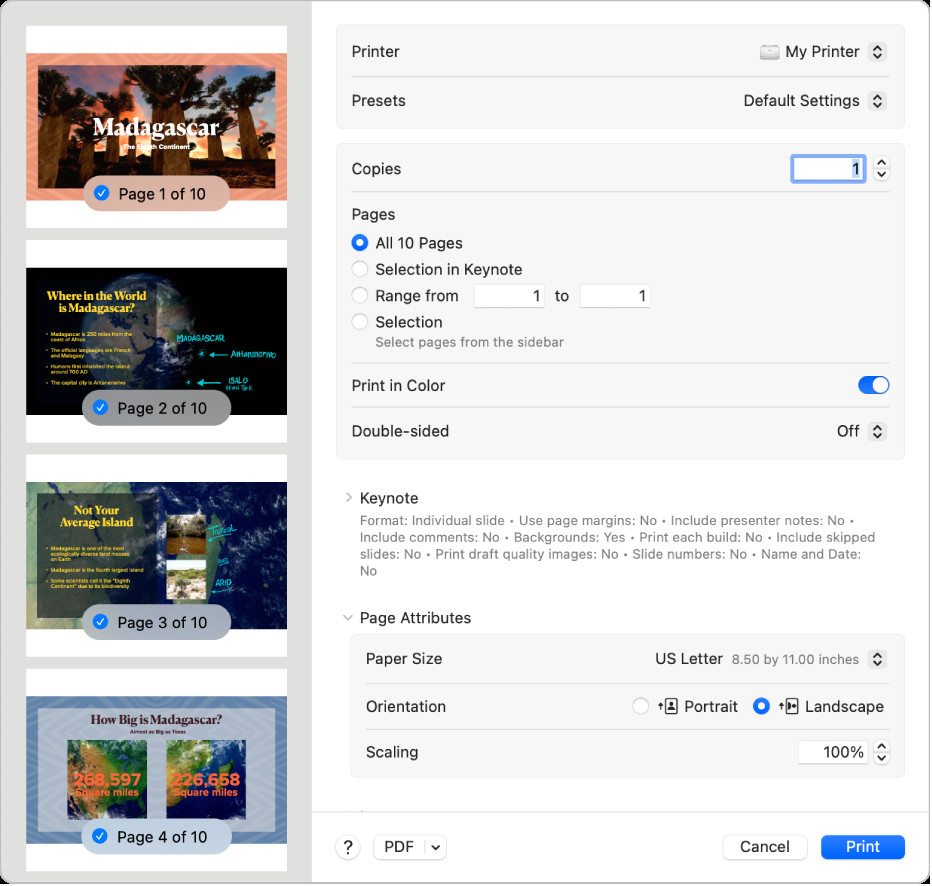 The Print dialog showing print options and a preview of your print job.
Understanding the Print Dialog Interface: The macOS Print dialog box provides a preview of your document alongside customizable settings for printer selection, presets, copies, page range, paper handling, and more.
Key Print Options Explained
The Print dialog offers a variety of settings to tailor your printing job. Let’s explore the most commonly used options:
1. Printer Selection
- Printer: This dropdown menu allows you to choose the printer you want to use. If you have multiple printers set up, they will all be listed here. If your printer is not listed, you may need to add it. You can learn how to add a printer in our guide on adding a printer to your printer list. For users with multiple Apple devices logged into the same Apple ID, recently used AirPrint printers will conveniently appear across devices, streamlining the printing process (macOS Sequoia, iOS 18, or iPadOS 18 or later required for this feature).
2. Presets for Quick Printing
- Presets: Presets are saved groups of print settings that can be quickly applied. This is useful if you frequently use specific print configurations. You can choose from default settings or select a preset you’ve saved from previous print jobs. To learn how to save your preferred settings as presets, refer to saving frequently used print settings.
3. Copies and Collation
- Copies: Specify the number of copies you need using the up and down arrows.
- Collate Sheets: To print complete copies of a multi-page document before starting the next copy, go to the “Paper Handling” options (often found in a dropdown menu within the Print dialog, which may vary depending on your printer and application) and select “Collate Sheets”. This ensures your documents are neatly organized when printing multiple copies. Further information on print order can be found in printing pages in normal order.
4. Print Range Customization
- Print Range: Choose which pages to print. You can select “All Pages” to print the entire document or “Pages” to specify a range, such as printing pages “2-5” of a larger document.
- Selection: For more granular control, the “Selection” option allows you to print only selected text or graphics within your document. First, select the content you want to print directly in your document, then return to the Print dialog and choose “Selection”.
5. Color or Black & White Printing
- Print in Color: If you have a color printer, this option allows you to choose whether to print in color or black and white. Deselecting this option will print your document in grayscale, which is useful for saving color ink when color is not necessary.
6. Double-Sided Printing (Duplex)
- Double-Sided: If your printer supports double-sided printing (also known as duplex printing), you can choose “On” from the “Double-Sided” menu to print on both sides of the paper.
- Double-Sided (Short Edge): For documents intended for binding along the top edge, select “On (Short Edge)”. This option flips the content on the back side appropriately for short-edge binding.
7. Paper Size and Orientation
- Paper Size: Select the correct paper size from the dropdown menu to match the paper loaded in your printer. Common sizes include US Letter (8.5 x 11 inches), A4, and others. Incorrect paper size selection can lead to printing issues or misaligned output.
- Orientation: Choose between “Portrait” (vertical) and “Landscape” (horizontal) orientation using the orientation buttons. The preview in the Print dialog will update to reflect your orientation choice.
8. Scaling for Fit
- Scaling: Adjust the “Scaling” percentage to enlarge or reduce the printed image size relative to the paper. Entering a value less than 100% will shrink the content, while a value greater than 100% will enlarge it. This can be helpful for fitting content to a specific paper size or for creating handouts in a smaller format.
Troubleshooting Common Printing Issues
Occasionally, you might encounter issues such as unexpected margins or clipped text. This can often be resolved by ensuring the margins set in your document application are compatible with your printer’s non-printable area. You can explore adjusting the non-printable area settings, or for more advanced paper size adjustments, see printing on unusual sized paper by creating a custom paper size.
For further assistance with printer setup, troubleshooting, and advanced printing features, explore these helpful resources:
- Choose a paper size for your printed document on Mac
- Add a printer to your printer list so you can use it on Mac
- Check on a printer or print job using the Dock on Mac
- Solve printing problems on Mac
By understanding these steps and options, you can confidently print any document from your MacBook with precision and ease.