Enabling double-sided printing, also known as duplex printing, on your Mac should be a straightforward way to save paper and reduce your environmental footprint. However, many users encounter a frustrating issue where the two-sided printing option is greyed out or missing altogether when they go to print. This guide provides a comprehensive walkthrough of solutions to get double-sided printing working again on your macOS device, ensuring you can efficiently print on both sides of the page.
Many factors can cause this problem, ranging from incorrect printer driver configurations to software-specific glitches. This article consolidates effective solutions shared by users who have successfully overcome this hurdle, offering step-by-step instructions to help you regain your duplex printing capability. Let’s dive into the methods to resolve this common Mac printing issue.
Common Causes of Double-Sided Printing Issues on Mac
Before jumping into solutions, it’s helpful to understand why the double-sided printing option might be unavailable. Here are some common culprits:
1. Incorrect Printer Driver
The most frequent cause is using a generic or incorrect printer driver. macOS sometimes defaults to “AirPrint” drivers, which, while convenient, may not expose all the features of your printer, including duplex printing. Printer manufacturers offer specific drivers that are designed to unlock the full functionality of your device.
2. Printer Not Properly Configured in System Preferences
Even with the correct driver, the printer settings in your Mac’s System Preferences might not be correctly configured to recognize the duplex feature of your printer. This could be due to an improper initial setup or settings that have become corrupted over time.
3. Software-Specific Issues
In some instances, the application you are printing from might have its own print settings that override the system defaults or might not fully support duplex printing. Adobe Acrobat and other specialized software are often mentioned as examples where users face this issue.
Solutions to Enable Double-Sided Printing on Mac
Now, let’s explore the solutions to bring back the double-sided printing option. Work through these methods step-by-step to identify the fix that works for your situation.
Method 1: Resetting the Printing System and Re-adding Your Printer
This method, suggested by user Zara1985, is effective when the printing system has becomeGlitchy or misconfigured. Resetting the printing system essentially starts fresh, allowing you to re-add your printer with potentially corrected settings.
-
Open System Preferences: Click on the Apple menu in the top-left corner of your screen and select “System Preferences.”
-
Go to Printers & Scanners: Find and click on the “Printers & Scanners” preference pane.
-
Right-Click (or Control-Click) on Your Printer: In the left sidebar, locate your printer. Hover over its name and right-click (or Control-click).
-
Select “Reset printing system…”: From the context menu, choose “Reset printing system…”. A warning message will appear – confirm that you want to reset. This will remove all printers from your list.
-
Add Your Printer Back: Click the “+” button at the bottom of the printer list to add a new printer.
-
Choose “Use” Dropdown and Select Original Printer Software: This is the crucial step. Instead of selecting the default “Secure AirPrint” or similar, click on the “Use” dropdown menu.
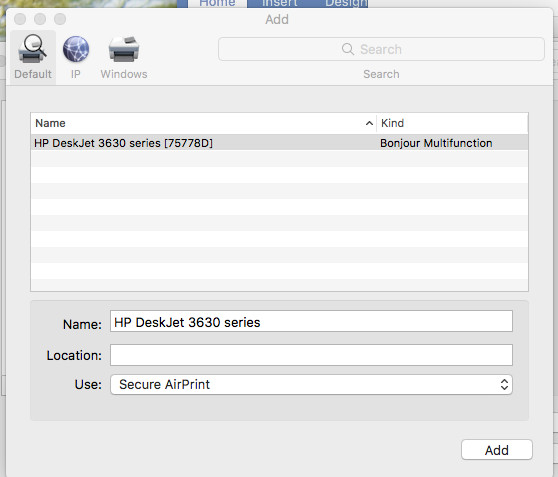 ignore the default setting (e.g. Secure AirPrint) and click the field "Use"
 -
Select Your Printer’s Specific Driver: From the list, choose the driver software specifically for your printer (e.g., “Epson Printer Driver”, “HP Printer Driver”). Look for options that explicitly mention “duplex” or your printer model name, indicating full feature support. You might need to try different options provided for your printer manufacturer.
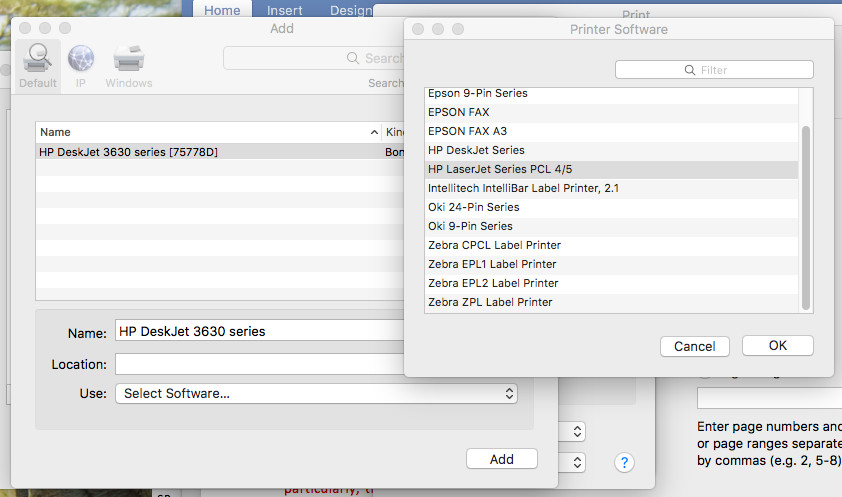 click the field "Use" and select the original software for your printer (it may be Epson, HP etc…)
 -
Click “Add”: After selecting the correct driver, click the “Add” button in the bottom right corner.
 click Add in the right bottom corner
 -
Check for Duplexer Option: After adding the printer, you might see a window with options. Look for a checkbox for “Duplexer” or a similar term that indicates double-sided printing capability. Ensure this is checked if available.
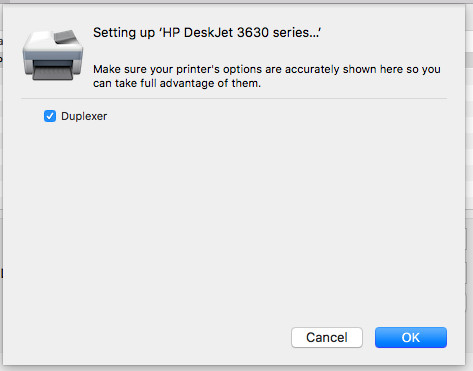 then, in the opened up window, check "duplexer" option or sounding something like this
 -
Test Printing: Try printing a document and check if the two-sided printing option is now available in the print dialog.
Method 2: Enabling Duplex in Printer Options & Supplies
User jweaver74 suggests checking the printer’s “Options & Supplies” settings directly within System Preferences. This method assumes your printer driver is correctly installed but the duplex feature might need to be explicitly enabled.
-
Open System Preferences and Go to Printers & Scanners: As in Method 1, navigate to “Printers & Scanners” in System Preferences.
-
Select Your Printer: Choose your printer from the list on the left.
-
Click “Options & Supplies…”: Click the “Options & Supplies…” button next to your printer name.
-
Go to the “Options” Tab: In the window that appears, click on the “Options” tab.
-
Look for Duplex Settings: Browse through the options. You should be looking for settings related to “Duplex Unit,” “Two-Sided Printing,” or simply “Duplex.”
-
Enable Duplex: If you find a duplex option, ensure it is checked or set to “Installed” or “On”.
-
Apply Settings and Test: Click “OK” or “Apply” to save the settings. Try printing to see if the two-sided option is now available.
Method 3: Utilizing CUPS Web Interface for Advanced Configuration
BobHarris offers a more technical approach using the Common Unix Printing System (CUPS) web interface. This method is useful for directly configuring the printer subsystem, especially if driver settings are not fully exposing duplex capabilities.
Note: This method involves using the Terminal application and some command-line operations. Be cautious when using Terminal commands.
-
Enable CUPS Web Interface: Open the Terminal application (found in /Applications/Utilities/). Type or paste the following command and press Enter:
sudo cupsctl WebInterface=yesYou will be prompted for your administrator password. Enter it and press Enter.
-
Access CUPS Web Interface: Open a web browser (like Safari, Chrome, Firefox). In the address bar, type:
localhost:631and press Enter. This will take you to the CUPS web interface. -
Go to “Printers” Tab: In the CUPS interface, click on the “Printers” tab.
-
Select Your Printer: Click on the name of your printer from the list.
-
Administration Dropdown and “Set Default Options”: Find the “Administration” dropdown menu (or buttons, depending on your CUPS version). Select “Set Default Options.”
-
Look for Duplex Settings: Within the printer options, search for settings related to “Duplex,” “Two-Sided Printing,” or “Duplex Unit.” It might be presented as a dropdown or checkboxes.
-
Enable Duplex and Set Default Options: If you find a duplex option that is set to “Not Installed” or “Off,” change it to “Installed” or “On.” Then, click the “Set Default Options” button at the bottom of the page. You may be prompted to enter your macOS username and password again for authentication.
-
Disable CUPS Web Interface (for security): After configuring, it’s recommended to disable the CUPS web interface. In the Terminal, type or paste:
sudo cupsctl WebInterface=noand press Enter.
-
Test Printing: Try to print a document and check if the two-sided printing option is now working.
Method 4: For Epson Printers – Auto Error Solver via Printer Webpage
Lea323 provides a specific solution for Epson Workforce printers, focusing on an “Auto Error Solver” setting within the printer’s web interface. This suggests that for some Epson models, an error setting might be preventing duplex printing from being properly recognized by macOS.
-
Open System Preferences and Go to Printers & Scanners: Navigate to “Printers & Scanners” in System Preferences.
-
Select Your Epson Printer.
-
Click “Options & Supplies…”, then “Show Printer Webpage…”: Click “Options & Supplies…” and then select the “Show Printer Webpage…” button. This should open your printer’s built-in web interface in your browser.
-
Navigate to Advanced Settings: On the printer’s webpage, look for a “Back to Main” button and click it. Then find a dropdown menu, often at the top of the page, and select “Advanced Settings.”
-
Find Printer Settings and Error Settings: In the settings list on the left side of the page, look for “Printer Settings” and then “Error Settings” within it.
-
Enable “Auto Error Solver”: Ensure that the “Auto Error Solver” option is switched to “On.”
-
Apply Settings and Test: Save or apply the changes in the printer’s web interface. Return to your Mac and attempt to print, checking for the two-sided printing option.
Method 5: Checking Application-Specific Print Settings
As theatermacker and VikingOSX mentioned, some applications, particularly Adobe products like Acrobat and InDesign, might have their own print dialogs and settings that can be different from the system-wide print settings. If you are having trouble with double-sided printing in a specific application, check its print dialog more closely.
-
Look for “Printer…” Button: In applications like Adobe InDesign, you might need to click a “Printer…” button within the application’s print dialog to access the macOS standard print options where duplex settings might be available.
-
Explore Layout Settings: Some applications might nest the duplex option under “Layout” or similar sections in their print dialogs.
-
Test with Different Applications: Try printing from other applications like TextEdit, Safari, or Preview to see if the two-sided option works there. This can help you determine if the issue is application-specific or system-wide.
Method 6: Verifying Printer Duplex Capability and Driver Compatibility
MrHoffman and AstroMacMan highlight the fundamental point that your printer must actually support duplex printing hardware. Also, the correct driver is essential for macOS to recognize and utilize this hardware.
-
Confirm Printer Specifications: Check your printer’s manual or the manufacturer’s website to confirm that your printer model is indeed capable of automatic duplex printing. Some models may appear similar but lack this feature.
-
Update Printer Drivers: Visit your printer manufacturer’s website (e.g., Epson, HP, Brother) and download the latest drivers specifically for your printer model and macOS version. Uninstall the old drivers before installing the new ones to avoid conflicts.
-
Avoid Generic Drivers if Possible: As mentioned earlier, try to avoid using generic “AirPrint” drivers if possible, especially if you need advanced features like duplex printing. Opt for the manufacturer-specific full-feature drivers.
Conclusion
Enabling double-sided printing on your Mac can sometimes be more complex than expected, but by systematically working through these solutions, you should be able to restore this functionality. Starting with the simplest methods like resetting the printing system and checking printer options, and progressing to more advanced steps like CUPS configuration and driver verification, you can effectively troubleshoot and resolve the “two-sided option greyed out” issue. Remember to always verify your printer’s duplex capability and ensure you are using the most appropriate drivers for your device and macOS version. With patience and these detailed steps, you’ll be printing double-sided documents in no time, saving paper and contributing to a more sustainable printing practice.