The Dremel Idea Builder 3D printer is a fantastic machine, especially renowned for its reliability and ease of use, making it a popular choice in educational settings and for hobbyists alike. Many users, like myself, have been consistently impressed with the print quality achievable with a Dremel 3d Printer. However, one area where the stock experience can fall short is in the realm of software, specifically when it comes to generating effective support structures, a critical component for successful 3D printing of complex models.
Initially, the Dremel Idea Builder, which is a rebranded Flashforge Dreamer, presented a software hurdle. Unlike many 3D printers, it didn’t readily accept standard gcode files, instead relying on its proprietary *.3gdrem format. This limitation, in itself, wasn’t insurmountable, but it became more significant when coupled with the capabilities of the bundled Dremel 3D software. This software notably lacked the ability to automatically generate supports and rafts – features considered indispensable for a large proportion of 3D printing projects, especially those with overhanging or intricate geometries.
Dremel’s official recommendations pointed users towards Autodesk MeshMixer or PrintStudio for support generation. While these are powerful tools, they primarily produce tree-like or branching supports.
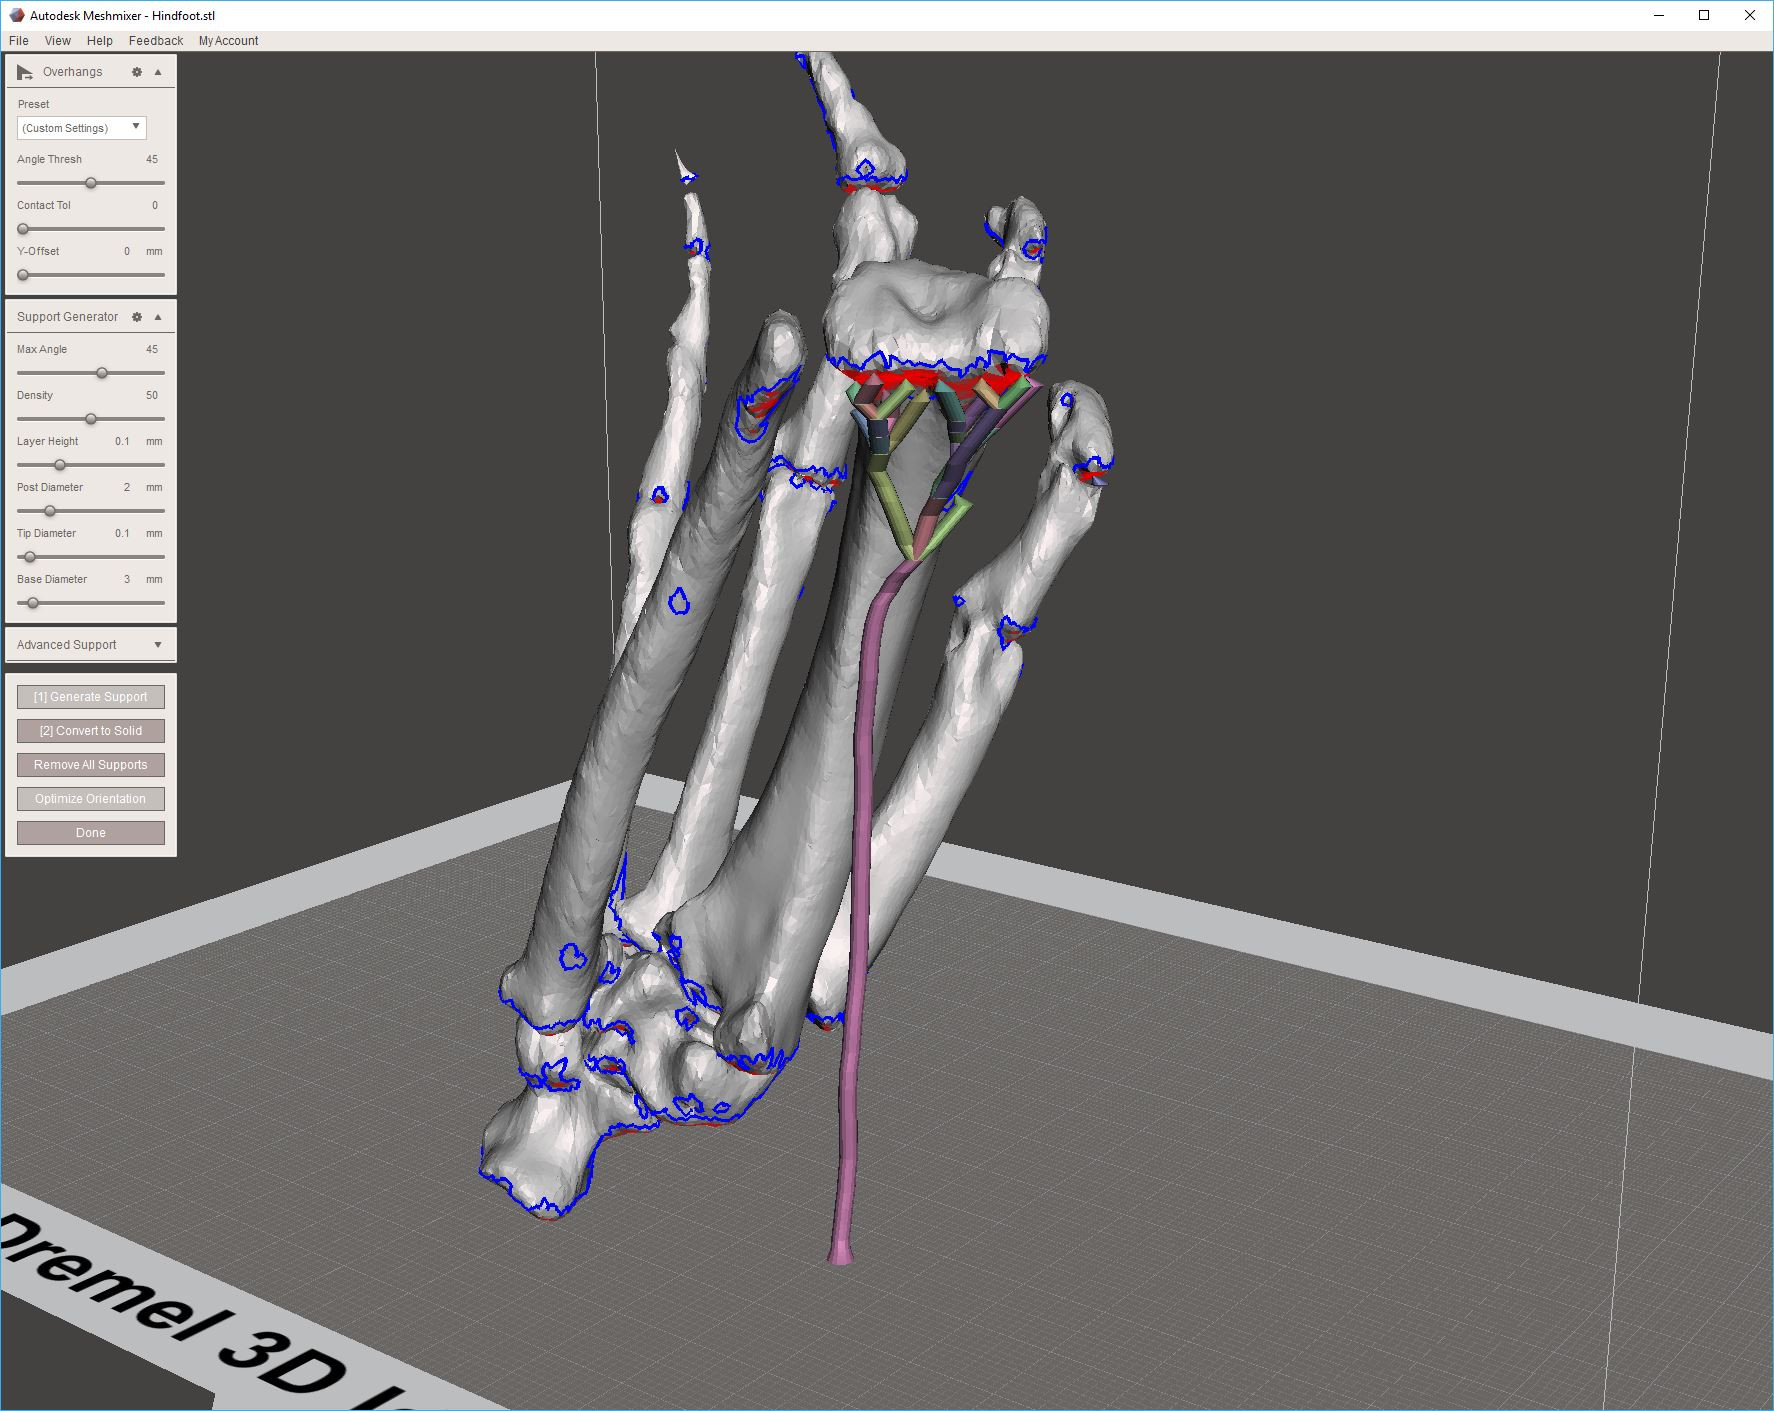 Example tree-like supports around a crocodile foot in Autodesk MeshMixer, the software recommended by Dremel for producing supports.
These tree-style supports, while theoretically material-saving, often proved problematic in practice, particularly for complex, organic shapes like the animal bones I frequently print for educational purposes. These shapes often lack a flat, stable base for adhesion to the build plate, and the tree supports frequently led to print failures. My initial workaround involved splitting models, printing halves separately, and then joining them – a cumbersome and less-than-ideal solution. Attempting to print both halves simultaneously often resulted in warping and print head collisions, further complicating the process. It’s worth acknowledging that MeshMixer, aside from its support style, is a robust piece of software in many respects.
My search for a software solution that could generate traditional scaffold-style supports and output the necessary *.3gdrem file proved fruitless for some time. Surprisingly, Microsoft’s 3D Builder, a standard application in Windows 10, emerged as a strong contender. It excels at creating excellent scaffold supports and rafts. However, a frustrating incompatibility arose: 3D Builder would inexplicably set the print temperature to 215°C when sending files to the Dremel, a temperature too low for reliable printing with standard Dremel filament (which typically requires 220°C). This temperature mismatch consistently led to print failures.
After considerable experimentation and tinkering, I discovered a workaround that allowed me to leverage the superior support generation of another slicer with my Dremel Idea Builder. This method, detailed below, involves using Craftware to create scaffold supports and then adapting the output for compatibility with the Dremel printer.
!!!WARNING – PLEASE PROCEED WITH CAUTION. MODIFYING PRINTER FILES CAN CARRY RISKS. THE FOLLOWING PROCEDURE IS UNDERTAKEN AT YOUR OWN RISK. INCORRECT MODIFICATIONS COULD POTENTIALLY DAMAGE YOUR DREMEL IDEA BUILDER.!!!
Step-by-Step Guide: Using Craftware for Scaffold Supports on Your Dremel 3D Printer
This guide outlines the process of using Craftware to generate gcode with scaffold supports and converting it into the *.3gdrem format readable by your Dremel Idea Builder.
1. Download and Install Craftware
Craftware is a free and comprehensive 3D printing slicer that offers advanced features, including excellent support generation.
Download Craftware here: https://www.craftunique.com/craftware
Install the software on your computer.
2. Import Your 3D Model into Craftware
Launch Craftware and import your 3D model. Drag and drop functionality is typically the easiest method.
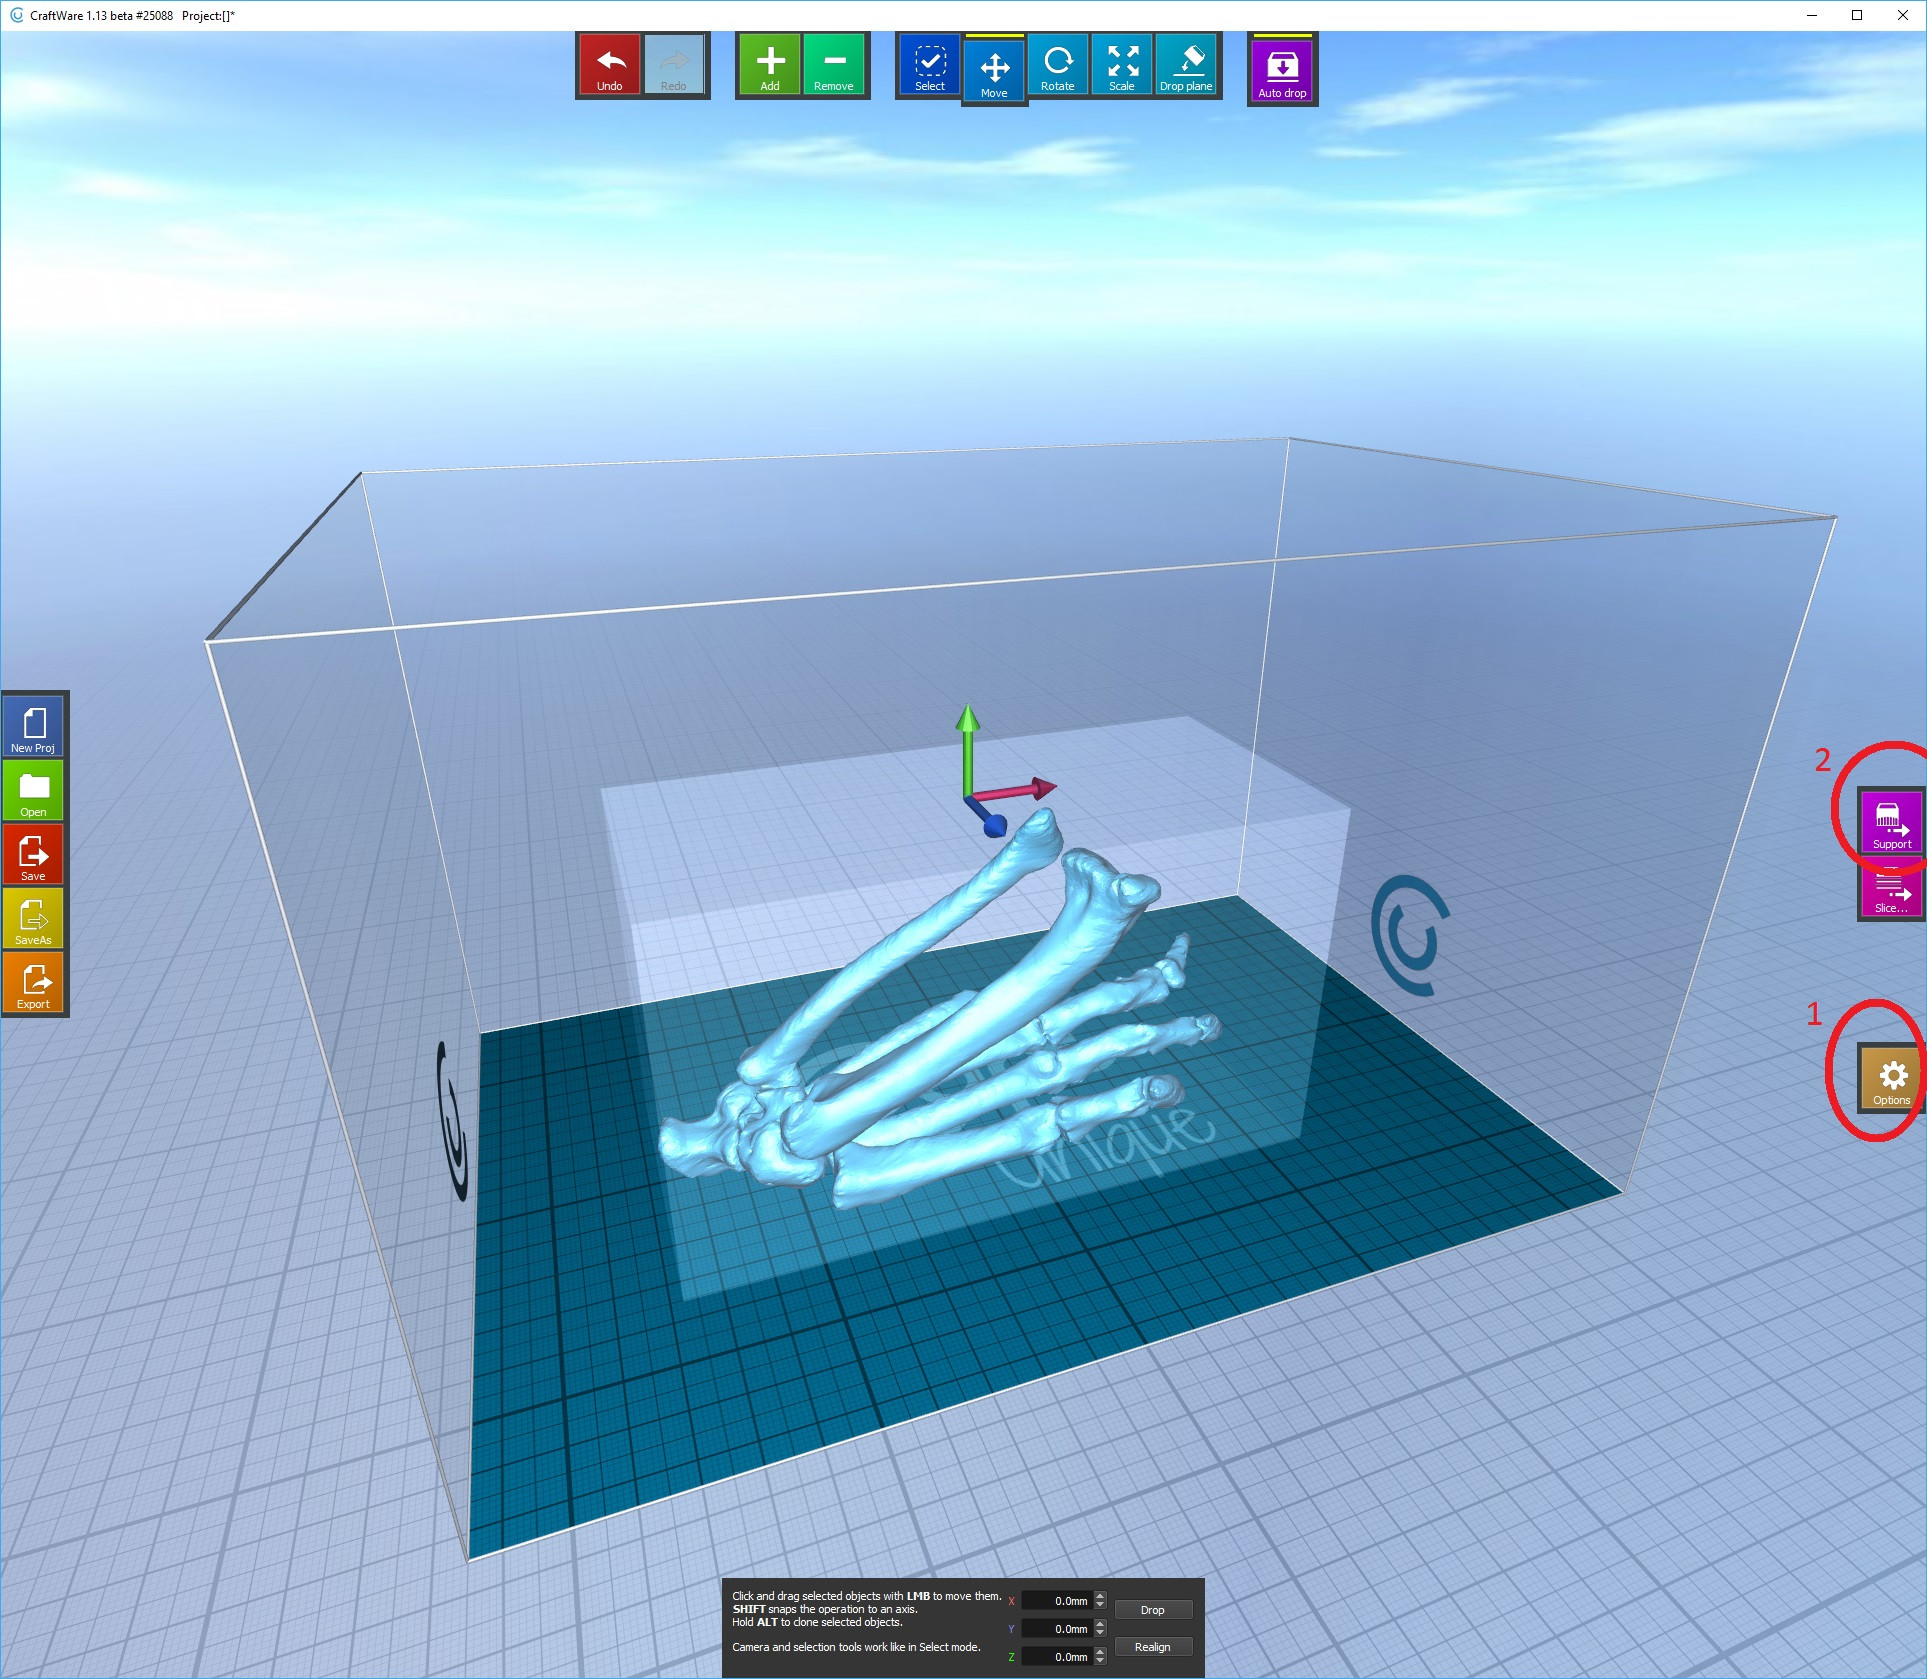 Croc foot imported into Craftware
3. Configure Printer Settings in Craftware
It’s crucial to configure Craftware to match the build volume and origin of the Dremel Idea Builder. Navigate to the settings panel within Craftware and ensure the following:
- Build Platform Dimensions: Set these to match the Dremel Idea Builder’s build plate dimensions (check Dremel specifications for exact measurements).
- Origin (0,0 Position): Crucially, set the origin to “Center” rather than “Front Left.” This aligns Craftware’s coordinate system with the Dremel.
After configuring these settings, proceed to the “Supports” tab.
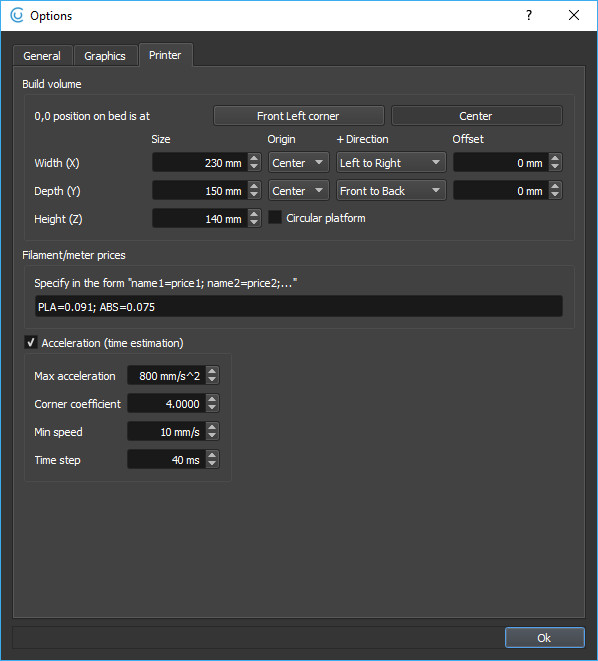 Options suitable for preparing a model to build on the Dremel Idea Builder
4. Generate Scaffold Supports
Within the “Supports” tab, click on the “Auto-Generate Support” button. Craftware will automatically analyze your model and generate scaffold-style supports.
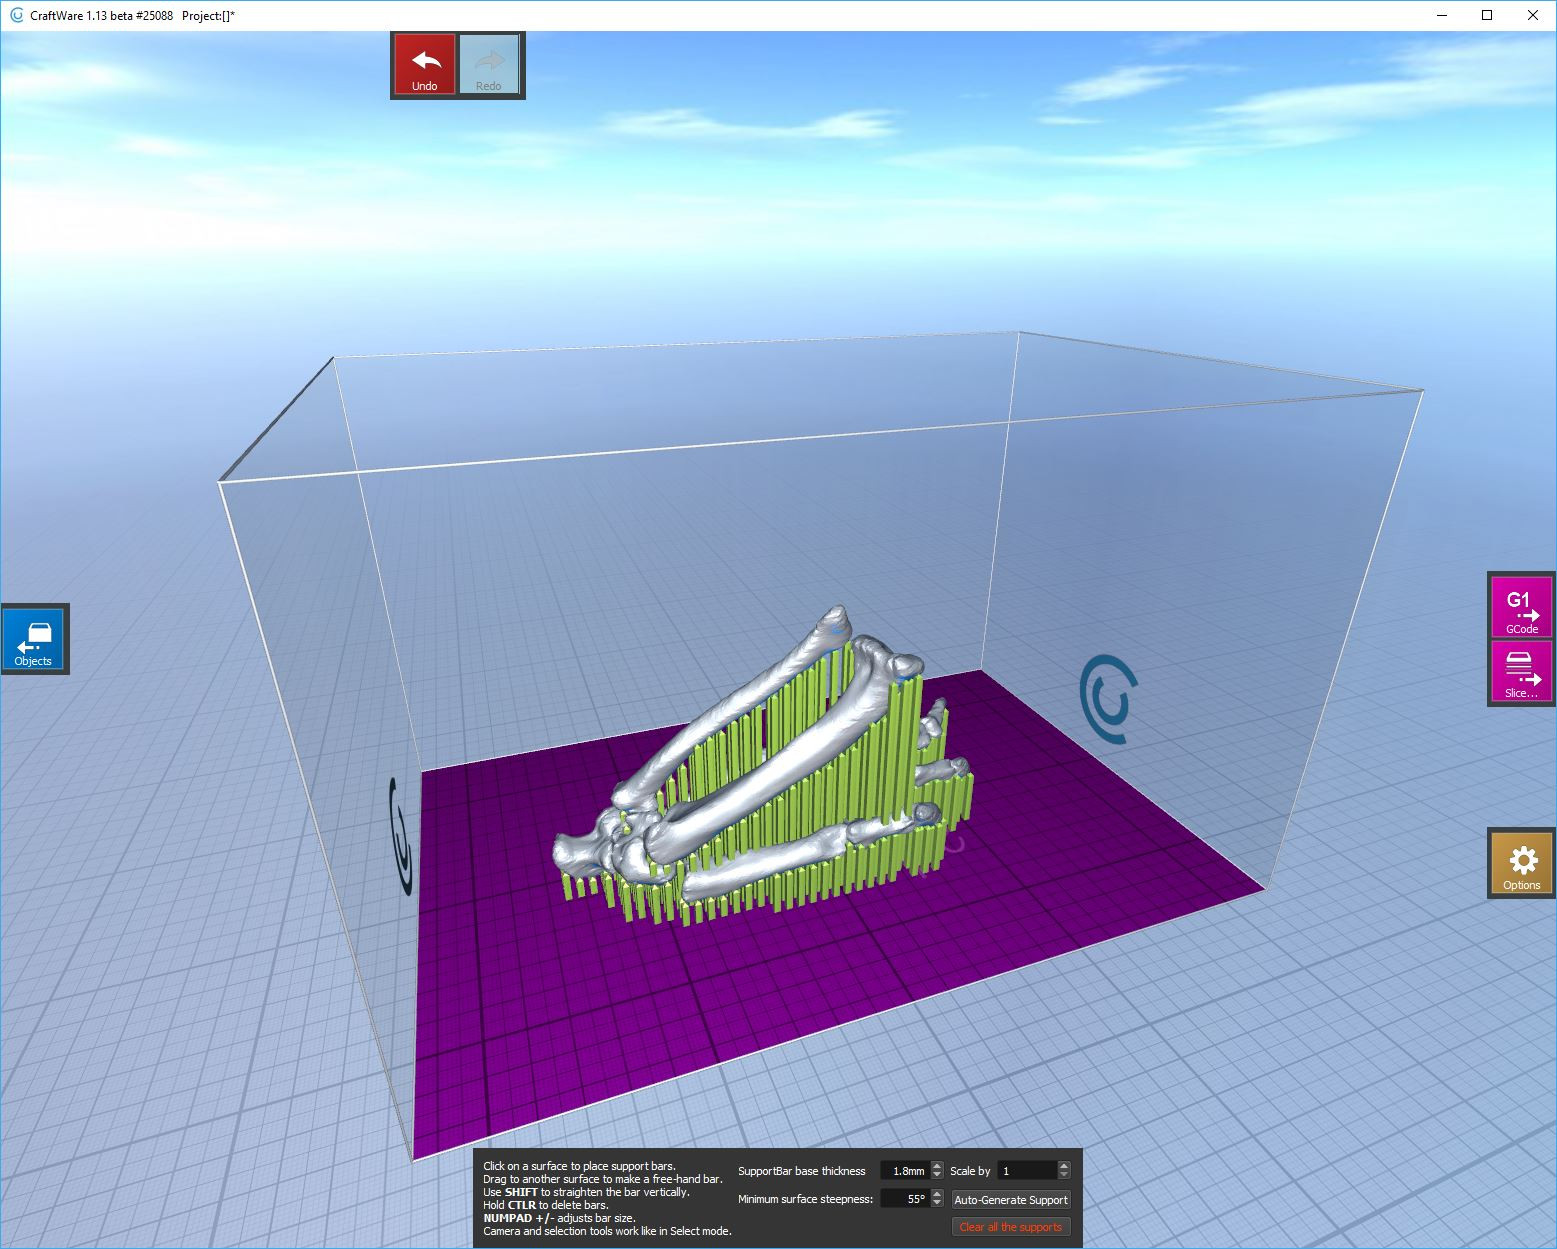 Lovely lovely scaffold style supports!
You can further customize support settings, such as enabling rafts or adjusting the support angle threshold. For initial attempts, the default settings often work effectively, although you might consider adjusting the angle to around 45 degrees for more comprehensive support.
5. Slice Your Model
Click the “Slice” button in Craftware. This will process your model and generate the toolpaths necessary for 3D printing, including the scaffold supports.
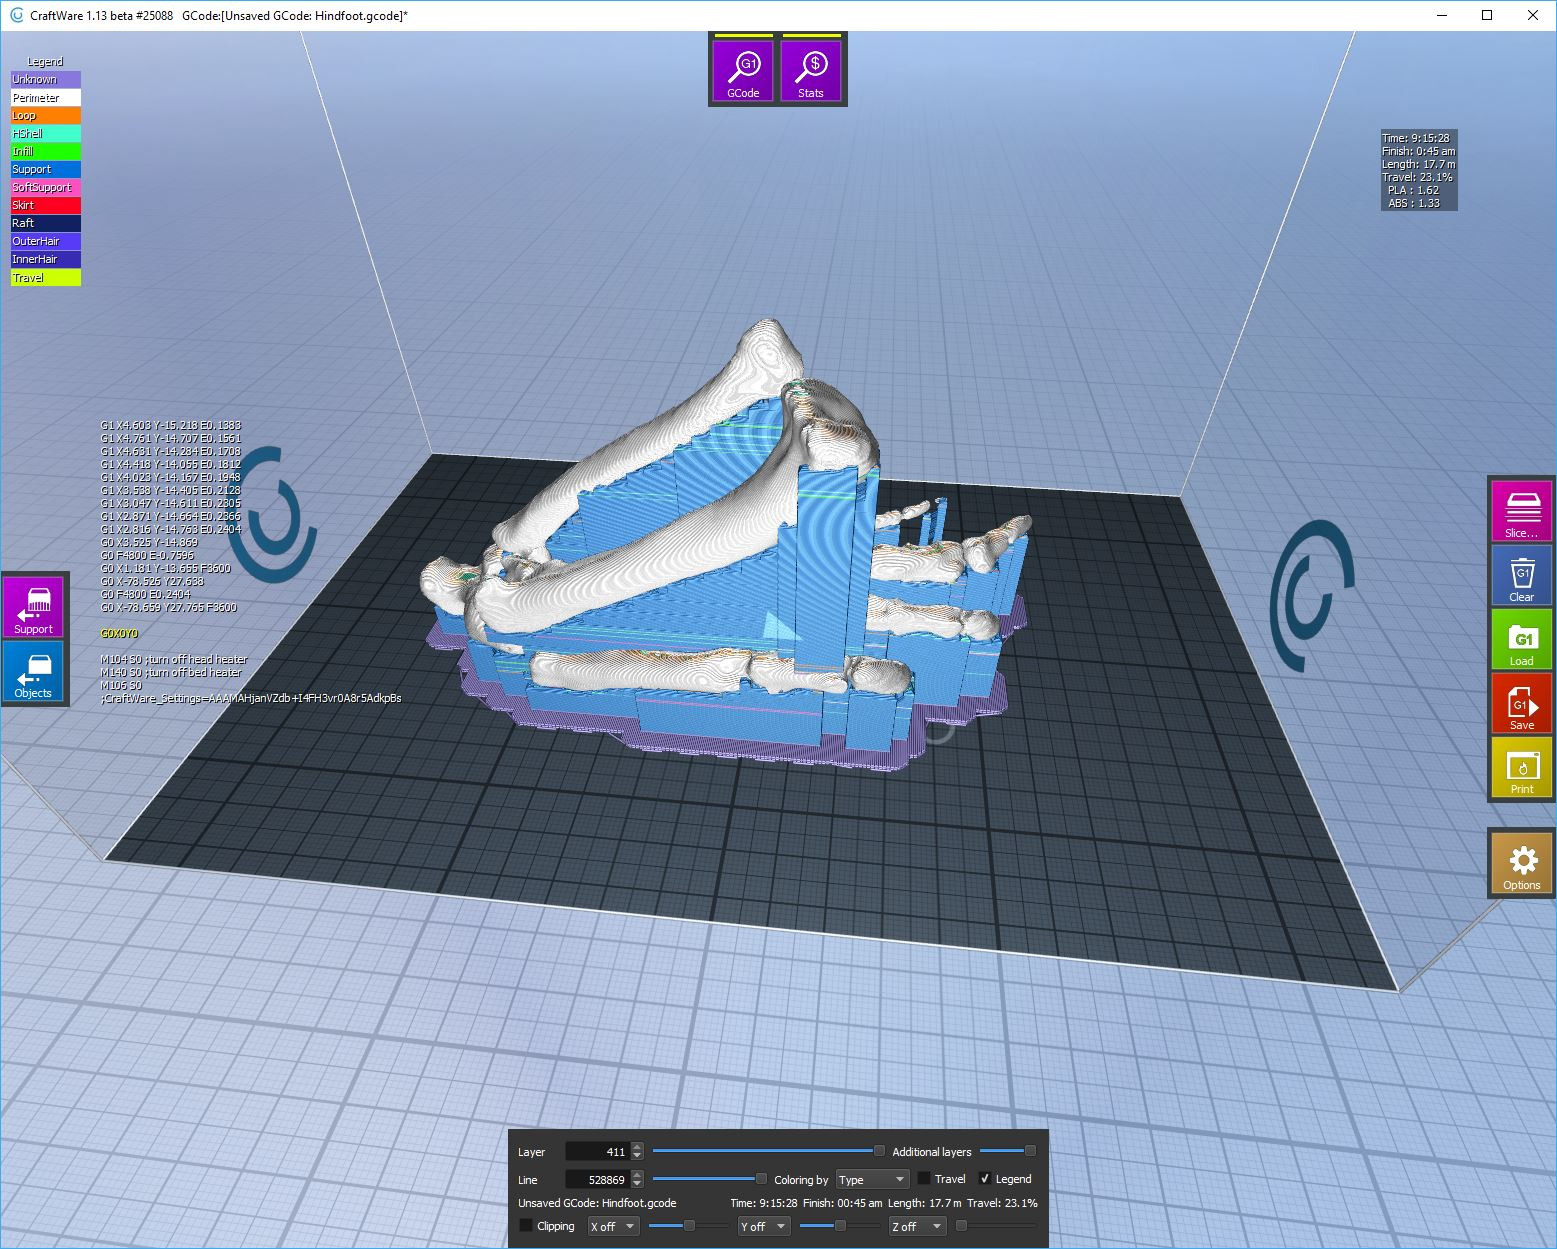 The sliced model complete with scaffold-style supports
After slicing, Craftware provides a preview of the sliced model, allowing you to examine each layer using the slider at the bottom of the screen. Pay attention to the filament length and estimated print time displayed in the top right corner. Note these values down, as they won’t be directly visible in the Dremel software later in this process.
6. Export G-code from Craftware
Click the “Save” button and choose to save the generated gcode file to a location on your computer.
7. Convert G-code to 3gdrem Format
This is the most technical step, requiring a text editor capable of handling binary files and a pre-existing *.3gdrem file from your Dremel printer.
Tools Required:
- Notepad++: A free text editor that can open files with binary content. Download it here: https://notepad-plus-plus.org/
- Existing *.3gdrem file: Any *.3gdrem file previously created for your Dremel Idea Builder will work as a template.
Conversion Process:
-
Open both the *.3gdrem file and the *.gcode file (exported from Craftware) in Notepad++. Open each file in separate panes for easy comparison and editing.
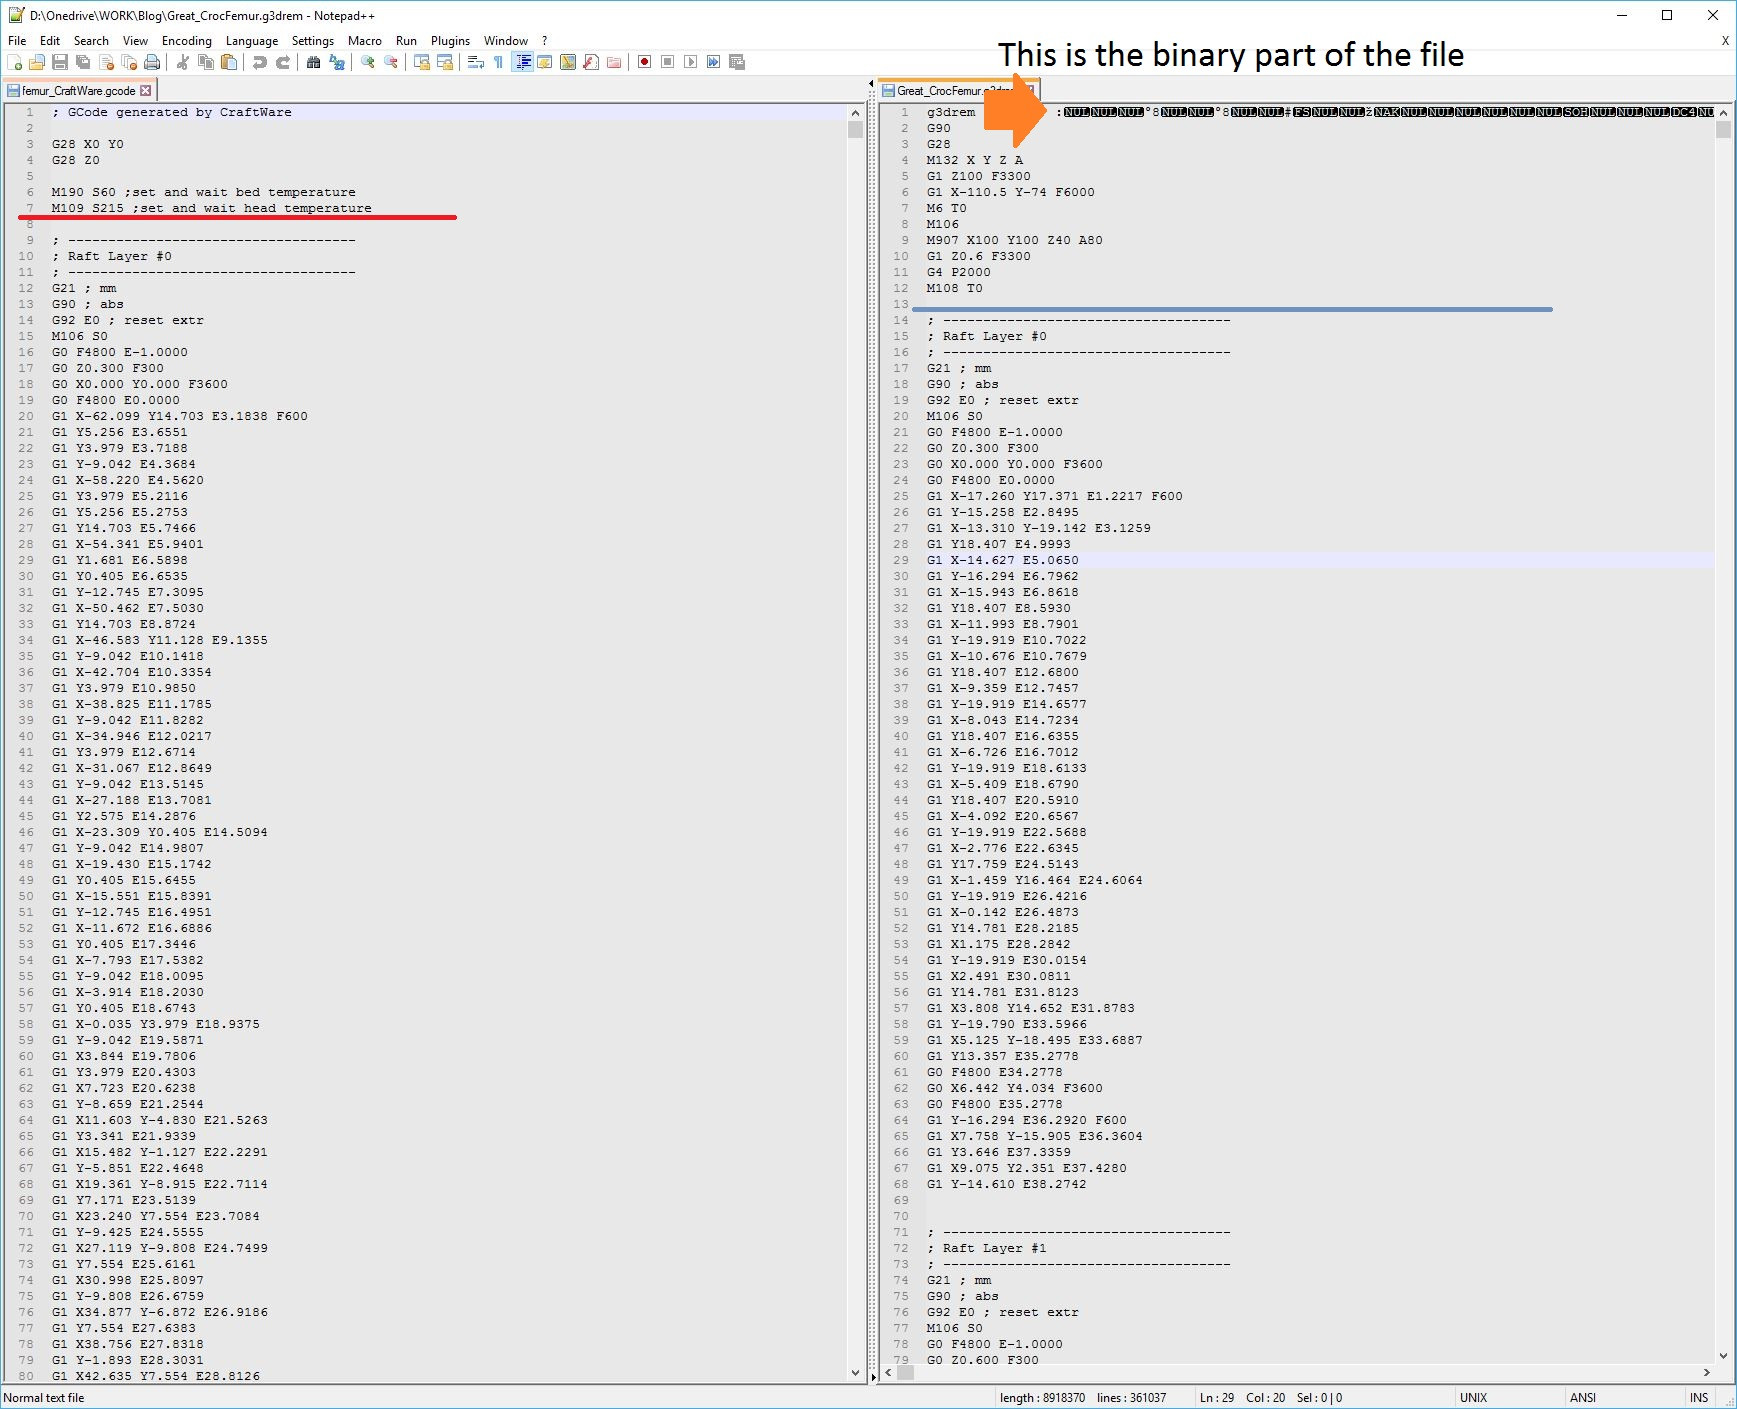 Left, the *.gcode file produced by Craftware. Right, the *.3gdrem containing binary stuff at the beginning. Replace everything below the blue line with the stuff from beneath the red line.
 -
Examine the *.3gdrem file. You’ll notice a section of binary code at the beginning, followed by what appears to be standard g-code. Identify the line where the binary section ends and the g-code begins (indicated by the “blue line” in the image above).
-
In the *.3gdrem file, delete everything below the line you identified in step 2 (the binary header section should remain).
-
In the *.gcode file, copy everything below the first line (indicated by the “red line” in the image above) – this is the standard g-code generated by Craftware.
-
Paste the copied g-code from the *.gcode file into the *.3gdrem file, replacing the content you deleted in step 3.
-
Save the modified *.3gdrem file.
Essentially, you are replacing the g-code portion of the dummy *.3gdrem file with the g-code generated by Craftware, while preserving the necessary binary header that allows the Dremel printer to recognize the file.
8. Load and Print from Your Dremel 3D Printer
-
Open the modified *.3gdrem file in the Dremel 3D software.
-
Verify that the model appears correctly positioned on the build platform in the Dremel software preview.
-
Ignore the print time and filament length estimations displayed in the Dremel software, as these will be based on the original dummy *.3gdrem file, not your current model. Refer back to the estimations you noted down from Craftware in Step 5 for accurate print parameters.
-
Send the file to your Dremel Idea Builder and initiate the print.
You should now be able to successfully print complex objects with robust scaffold-style supports generated by Craftware on your Dremel Idea Builder.
This process, while initially seeming complex, becomes straightforward with practice. It significantly expands the capabilities of your Dremel 3D printer, allowing you to tackle more intricate and challenging 3D printing projects.
It is worth noting that since this original workaround was developed, Dremel has made significant improvements to their software and firmware. As of updates in 2019 and firmware version v1.5 (20180611), Dremel has moved to a Cura-based slicing software and enabled standard *.gcode support for the Dremel 3D20 model. This means that for users with updated machines, the need for this workaround may be eliminated, as standard gcode generated by various slicers, including Cura and potentially Craftware, should now be directly compatible. Always ensure your Dremel firmware and software are up to date to benefit from the latest features and compatibility improvements.
For users with older Dremel Idea Builder models or those seeking advanced control over support structures, this Craftware method remains a valuable technique to unlock the full potential of their Dremel 3D printer.
Further Resources and Updates
For users interested in automating the gcode conversion process, a forum post on RepRap.org (http://forums.reprap.org/read.php?263,785652) provides a script for automatically wrapping gcode files with the necessary binary headers for Dremel compatibility. This script can streamline the conversion process described in Step 7.
This guide provides a detailed solution for enhancing your Dremel 3D printing experience by leveraging Craftware’s advanced support generation. By following these steps carefully, you can overcome the limitations of the original Dremel software and achieve high-quality prints of even the most complex 3D models.