
Setting up a printer at the University of Vermont (UVM) for your office or department can seem daunting, but with the right guidance, the process becomes straightforward. UVM supports a robust printing environment primarily through Konica Minolta and Kyocera devices, ensuring reliable and efficient printing services for faculty and staff. This guide will walk you through the essential steps for setting up your UVM printer, optimizing it for your needs, and accessing support when you need it. Whether you are connecting a new printer or configuring an existing one, understanding the Uvm Printing ecosystem is the first step to seamless operation.
Getting Started with UVM Printing
Navigating the UVM printing landscape begins with understanding the partnerships and support structures in place. Enterprise Technology Services (ETS) collaborates with SymQuest for printer and copier services. Most UVM-supported printers are provided through SymQuest. It’s important to note that personally-owned printers are not officially supported by ETS, so this guide focuses on UVM-owned and SymQuest provided devices.
When you receive a new SymQuest printer or copier, a coordinated process between SymQuest and ETS ensures smooth delivery and setup. After physical delivery, several key configuration steps are necessary to integrate the device into the UVM network and ensure optimal functionality for uvm printing.
Here’s a checklist of the initial steps required for every new UVM printer and copier setup:
- Notify ETS: Inform ETS about the arrival of your new printer or copier by sending an email to [email protected]. This initial notification is crucial for network configuration.
- Network Connection & IP Address: Connect your printer or copier to the UVM network using an Ethernet cable. Upon connection, the device will automatically obtain an IP address via DHCP (Dynamic Host Configuration Protocol).
- Static IP Conversion: For reliable and consistent access, ETS will convert the DHCP assigned dynamic IP address to a static IP address. This ensures the printer’s address remains constant on the network.
- Device Registration: ETS will register the device within the UVM system. Copiers are typically registered under a five-year lease, while printers are generally under a ten-year lease.
- Additional Configuration: Several specific settings need to be configured to align with UVM’s IT infrastructure:
- NTP Server: Set the Network Time Protocol (NTP) server to
time.uvm.eduto synchronize the device’s clock. - DNS Domain: Set the DNS Default Domain Name to
uvm.edu. - SMTP Server: Configure the Simple Mail Transfer Protocol (SMTP) Server Address to
smtp.uvm.edufor email functionalities like scan-to-email. - SSL/TLS & Port: Disable SSL/TLS and set the port to 25 for SMTP communication.
- Device Mail Address: Set a device-specific email address for system notifications and scan features.
- Server Capacity Limit: Set the Server Capacity Limit to 20MB, particularly relevant for scan-to-email functions.
- SMB Authentication: Set SMB (Server Message Block) Authentication Setting to NTLMv2 only for secure file sharing.
- Bonjour & AirPrint: Disable Bonjour and AirPrint as these are generally not utilized in the UVM enterprise printing environment.
- NTP Server: Set the Network Time Protocol (NTP) server to
Completing these initial steps is vital for ensuring your uvm printing device is correctly configured and ready for use within the university network.
Setting Up Your UVM Printer on Windows Systems
The process for adding a UVM printer to your Windows computer depends on whether your machine is joined to the UVM CAMPUS domain. Domain-joined computers offer a simplified setup process.
For UVM CAMPUS Domain Joined Computers (Recommended)
For computers that are part of the UVM CAMPUS domain, adding printers is significantly easier. This method leverages Active Directory published print queues on dedicated print servers, minimizing manual configuration. The key advantage here is the automatic installation of printer drivers and the elimination of the need to search for printer IP addresses. This streamlined approach greatly simplifies uvm printing setup.
To confirm if your computer is joined to the CAMPUS domain, you can follow the instructions provided in this UVM Knowledge Base article: https://www.uvm.edu/it/kb/article/campus-domain.
Adding Printers to CAMPUS Domain Computers:
- Log in with NetID: Ensure you are logged into your Windows computer with your UVM NetID and password. Domain-joined functionality requires NetID credentials for authentication and access to UVM resources.
By logging into the CAMPUS domain, you gain access to UVM’s centrally managed print services, making printer installation a breeze.
For Non-Domain Joined Windows Computers
If your Windows computer is not joined to the CAMPUS domain, you’ll need to manually install printer drivers and add the printer using its IP address. This process requires a bit more manual configuration but is still manageable with the right steps. Before proceeding, ensure you know the manufacturer and model of your printer, as well as its assigned IP address. This information is essential for correctly setting up uvm printing on non-domain joined machines.
Adding Printers to Non-Domain Joined Computers:
Driver Installation: Drivers are software programs that enable your computer’s operating system to communicate with hardware devices like printers and copiers. While Windows often provides generic printer drivers, Konica Minolta and Kyocera printers at UVM may have advanced features (like staplers or hole punch units) that require specific drivers to function correctly. To fully utilize the capabilities of your uvm printing device, installing the manufacturer-provided driver is recommended.
For Konica Minolta printers, follow these steps to find and install the appropriate drivers:
- Visit Konica Minolta Driver Download Center: Go to the official Konica Minolta download site: https://www.biz.konicaminolta.com/download/driver.html.
- Search for Your Printer Model: Enter your Konica Minolta printer model in the search bar. Note that the driver name might not exactly match the model number. Common drivers include “C368SeriesPCL” (for C308 and C368 copiers) and “C658SeriesPCL” (for C458 and C558 copiers). Verify the series number against your printer model.
- Download the Correct Driver: For Windows, it’s generally recommended to download the PCL6 driver. Select the appropriate driver for your Windows operating system version and download it.
- Install the Driver: Run the downloaded driver installation file and follow the on-screen instructions to install the driver on your computer. You will typically need administrator privileges to install drivers.
 Konica Minolta Printer in Office Environment
If you are using a printer from a different manufacturer, please visit the support website for that specific printer brand to download the correct drivers. After installing the drivers, you can proceed to add the printer to your Windows computer using its IP address.
macOS Printer Installation and Configuration for UVM Printing
Setting up uvm printing on macOS involves a similar process of driver installation and printer addition, with a focus on using IP addresses for network connectivity.
Downloading and Installing Drivers on macOS
Just like on Windows, drivers are essential for macOS to effectively communicate with printers and copiers. While macOS provides generic drivers, installing manufacturer-specific drivers is crucial to unlock all functionalities of your Konica Minolta or Kyocera printer, including features like stapling, hole punching, and account tracking. For optimal uvm printing experience, driver installation is a key step.
For Konica Minolta printers on macOS, use the same driver download site as for Windows: https://www.biz.konicaminolta.com/download/driver.html. For macOS, it’s generally recommended to use PS (PostScript) drivers when available. Ensure you download the driver compatible with your macOS version and follow the installation prompts.
Adding a Printer to Your macOS Computer
The recommended method for adding a printer on macOS within the UVM environment is by using the printer’s IP address. This ensures direct and reliable connection to the printer on the network. If you do not know the IP address of your Konica Minolta or Kyocera printer, consult the manufacturer’s website for instructions on how to obtain it from the printer’s control panel.
Adding a Printer by IP Address on macOS:
- Open System Preferences: Click on the Apple menu and select “System Preferences.”
- Go to Printers & Scanners: Click on “Printers & Scanners.”
- Add a New Printer: Click the “+” button at the bottom of the printers list to add a new printer.
- Select IP Tab: In the “Add Printer” window, click on the “IP” tab.
- Enter Printer Details:
- Address: Enter the IP address of your printer.
- Protocol: Select “Line Printer Protocol – LPD” or “Internet Printing Protocol – IPP”. (Try IPP first, if it doesn’t work, use LPD).
- Queue: Leave the queue field blank or enter “lp”.
- Name: The name will usually populate automatically. You can also enter a descriptive name for your printer (e.g., “Department Printer”).
- Location: Optionally, enter the physical location of the printer.
- Use: Select the driver for your printer. If you installed the manufacturer’s driver, select it from the list. If not, you can try using “Generic PostScript Printer” or “Generic PCL Printer” if specific drivers are not available.
- Click Add: Click the “Add” button to add the printer.
Your printer should now be added to your macOS system and ready for uvm printing.
Optional: Configure Automatic Passwords/Print Codes on Konica Minolta Printers (macOS)
For enhanced security and account tracking, you can configure automatic password or print code prompts when printing to Konica Minolta printers from macOS. This is particularly useful in shared office environments, but generally not recommended for public computers.
Configuring Print Codes on Konica Minolta (macOS):
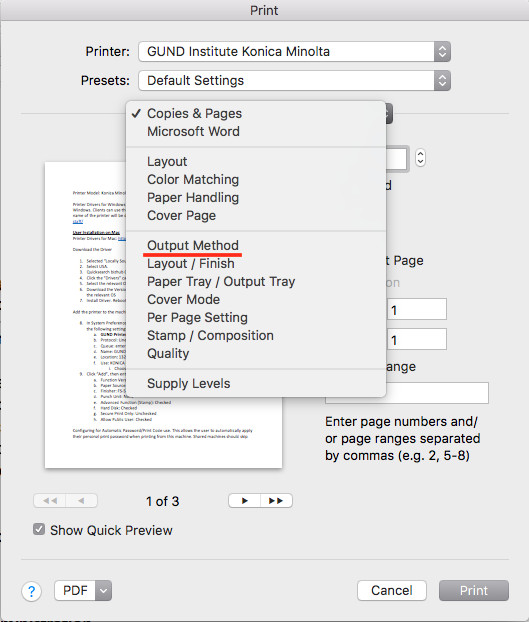
- Access Print Settings: In a Microsoft Office application (Word, Excel, etc.), press command-p to open print settings.
- Navigate to Output Method: Click on the “Copies & Pages” dropdown menu and select “Output Method.”
- Enable Account Track: Check the “Account Track” setting.
- Enter Print Code: A dialog box will appear.
- Leave “Department Name” empty.
- Enter your print code in the “Password” field.
- To save settings for future prints from this computer, check “Save Settings” and “Do not show this window when setting.” (Skip this on shared computers).
- Click “OK.”
- Close Print Settings.
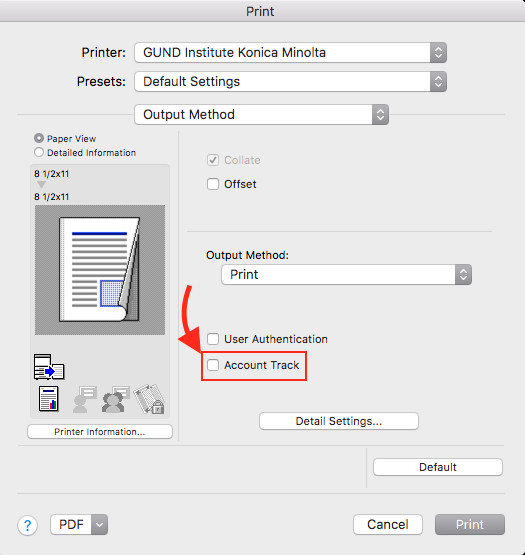 Konica Minolta Print Settings – Output Method
Optional: Configure Automatic Passwords/Print Codes on Kyocera Printers (macOS)
Similar to Konica Minolta, you can configure automatic print codes for Kyocera printers on macOS using the Kyocera Print Panel utility.
Configuring Print Codes on Kyocera (macOS):
- Open Kyocera Print Panel: Launch the “Kyocera Print Panel” application, which is installed with the Kyocera printer drivers.
- Select Device and Job Settings: Select your Kyocera printer from the device list, then choose “Job” from the left-hand menu.
- Enable Job Accounting: Check the box next to “Job Accounting” and enter your Account ID/print code in the “Account ID” field.
- Apply Settings: Click “OK” or “Apply.”
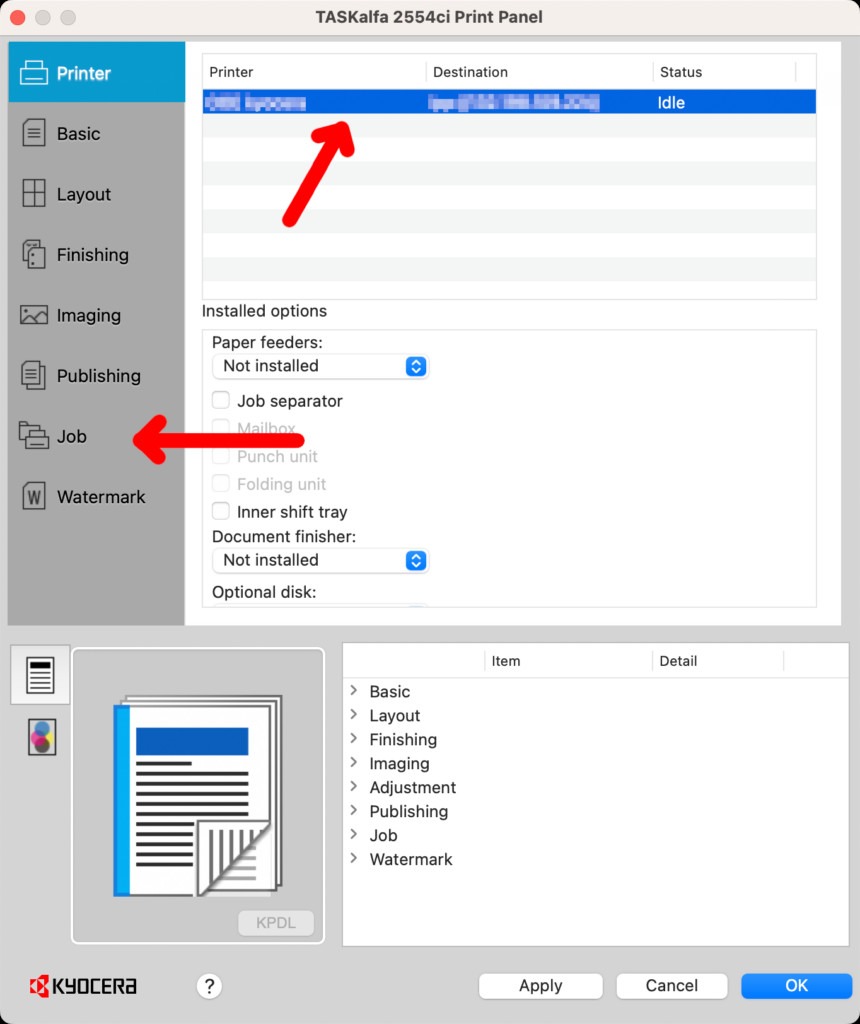 Kyocera Print Panel – Job Accounting Settings
Remember to restart any applications that were open during these setting changes (like Word, Preview, Firefox) to ensure the new print code settings are applied for uvm printing.
Advanced UVM Printing Configuration, Troubleshooting, and Descriptions
Beyond basic setup, UVM printing offers advanced features and troubleshooting methods to optimize your printing experience.
Clearing a Jammed Print Queue
Sometimes, a print job may get stuck in the print queue, preventing other jobs from printing. If simply deleting the job on the server doesn’t resolve the issue, you may need to manually clear the print queue.
Clearing a Jammed Print Queue (Windows):
- Stop Print Spooler Service: Open the Run dialog box (Windows key + R), type
services.msc, and press Enter. In the Services window, find “Print Spooler,” right-click on it, and select “Stop.” - Delete Print Queue Files: Open File Explorer and navigate to
C:WindowsSystem32spoolPRINTERS. - Delete All Files: Select all files in the
PRINTERSdirectory and delete them. (You might need administrator permissions). - Restart Print Spooler Service: Return to the Services window, right-click on “Print Spooler,” and select “Start.”
This process manually clears any lingering print jobs that might be causing issues with uvm printing.
General Printer Driver Information
Understanding printer drivers is crucial for effective uvm printing. Drivers are the communication bridge between your operating system and the printer. When adding a printer from a print server on the UVM domain, you generally don’t need to manually install drivers as they are managed server-side. However, for direct IP printing or advanced features, driver installation is key.
For Windows, PCL6 drivers are commonly used, while macOS often utilizes PS drivers for Konica Minolta and Kyocera printers. Remember that installing drivers typically requires administrator privileges on your computer.
Scanning to a Network Shared Folder
The scan-to-email feature is convenient, but it has a 20MB size limit due to email restrictions. For scanning large documents (over ~40 pages), saving directly to a network shared folder is a practical solution for uvm printing and document management.
This setup involves assigning the printer a service account with credentials to authenticate with a department shared folder. The scanned files are then saved directly to this folder.
Setting up Scan to Network Folder:
- Request a Service Account: Email [email protected] to request a service account for your printer. You’ll receive an account name like
sa_deptacronymcopier. - Create a Destination Folder: Designate or create a folder on a UVM shared drive where scans will be saved (e.g.,
S:departmentnamescans). - Grant Folder Access: Authorize the service account to access the destination folder. This typically involves granting “Read and Write” permissions to the service account at the destination folder and “Traverse folder” rights at each parent folder level. Contact [email protected] for assistance if needed.
- Create Address Book Entry on Printer:
- On your printer’s web interface or control panel, create a new address book entry of type “SMB.”
- Set a display name (e.g., “Scan2Shared”).
- Enable “Please check to enter host name” and enter
files.uvm.eduas the host name (using DFS). Alternatively, use the direct file server name if known. - Set the “File Path” to
shareddeptscans(adjust based on your folder path). - Enter the service account username and password.
- Save the address book entry.
Test the setup by scanning a document and verifying that it saves to the designated network folder.
Fax Forwarding
If your UVM printer contract includes the fax board option, you can enable fax forwarding for a paperless fax solution. Incoming faxes can be automatically converted to PDF and forwarded to an email address or saved to a network shared folder. You can even create groups for fax distribution using the printer’s address book.
HIPAA Warning: Be cautious when forwarding faxes containing Protected Health Information (PHI) via email, as email is not inherently secure for HIPAA compliance. For PHI, consider using the default print-only option or forwarding to a secure network share.
Adding by IP or Adding a Print Queue
When adding printers at UVM, you have the option to add them by IP address or by selecting a print queue from a print server. For macOS, adding by IP address is the standard method. For Windows domain-joined computers, adding a print queue is generally recommended for ease of driver management.
Print queues are created and managed by ETS. They offer convenience for large groups, but in rare cases, a jammed print queue can affect all users. However, the benefits of simplified setup and driver management often outweigh this potential drawback.
Account Tracking, Print Codes, Job Accounting
Account tracking provides a way to control and monitor uvm printing costs. This feature restricts printer access to users with valid PINs or print codes. Account tracking can be enabled on the printer itself, on the print server queue, or in direct-to-copier setups. While it adds complexity to setup and maintenance, it can be valuable for departments needing strict print management.
User Boxes
User boxes offer a secure method for temporary print job storage on the printer. Print jobs are held in a user’s “box” on the printer and are only released when the user arrives at the printer and authenticates. This enhances print privacy, especially for sensitive documents, and can also help manage printer usage during large print jobs.
To use user boxes, a box must be created on the printer, and the box number noted. Then, when adding the printer queue or configuring direct IP printing, the queue or printer settings must be configured to store jobs in the designated user box instead of printing immediately.
UVM Printer Support Resources
For any uvm printing related issues or support needs, UVM provides several resources.
SymQuest Printers
For printers provided by SymQuest, while direct calls are possible, it’s recommended to first contact the UVM Tech Team. The UVM Tech Team serves as the initial point of contact for printer support and can often resolve issues or escalate them to SymQuest if necessary.
If direct SymQuest contact is needed, the phone number is (800) 374-9900. When calling SymQuest, be sure to have the device number ready, which is found on a metal plate attached to all SymQuest printers.
UVM-Owned Printers (Non-SymQuest)
For printers not provided by SymQuest, contact the UVM Tech Team for all support needs. When contacting the Tech Team, having the printer’s IP address, MAC address, and physical location readily available will help expedite the support process.
Conclusion
Setting up and managing uvm printing is designed to be efficient and user-friendly. By following this comprehensive guide, UVM faculty and staff can confidently configure their printers and utilize the various features available. Remember to leverage the UVM Tech Team as your primary support resource for any assistance needed, ensuring a smooth and productive printing experience at the University of Vermont.