Google Sheets offers robust printing capabilities, allowing you to precisely control how your spreadsheets are printed, whether they contain intricate data tables, customer information, or complex financial analyses. You have the flexibility to print your entire workbook, a single sheet, or even a specific selection of cells. Furthermore, Google Sheets provides extensive options to customize the layout, scaling, and formatting of your print area, ensuring your printed output is exactly as needed.
These versatile printing options are readily accessible in both the browser and mobile app versions of Google Sheets. This guide will walk you through the process of setting your print area in Google Sheets and address common questions you might encounter during this process.
Before You Begin
Before proceeding with the steps below, it’s crucial to open your chosen Google Sheet in a web browser or the Google Sheets mobile app. This initial step is to verify that you possess the necessary permissions to print. If your access level is limited to “Commenter” or “Viewer,” you might be restricted from printing, downloading, or copying the sheet. This is because sheet owners or editors have the option to disable these features to control data sharing and modifications. For a deeper understanding of Google Sheets sharing controls, refer to resources detailing how to manage sharing settings in Google Docs, Sheets, and Slides.
Step-by-Step Guide to Setting a Print Area in Google Sheets
To access the print settings in Google Sheets, navigate to File > Print from a desktop browser. It’s important to note that in Google Sheets, you adjust print setting options after selecting the Print menu option. This sequence differs from Google Docs and Google Slides, which offer a File > Page setup option to configure page settings beforehand. Google Drawings uses File > Print settings and preview, which is also slightly different.
Customizing Print Settings in a Browser
Using a desktop browser like Chrome, Firefox, or Safari, you can fine-tune a wide array of print options. Follow these steps to customize your Google Sheet print settings in a browser:
- Select the Specific Cells for Printing: If you intend to print only a particular section of your sheet, begin by selecting the desired cells. Click and hold your cursor at the top-left corner cell of your intended print area, then drag your cursor to encompass all the cells you wish to include in the printout (Figure A).
Figure A
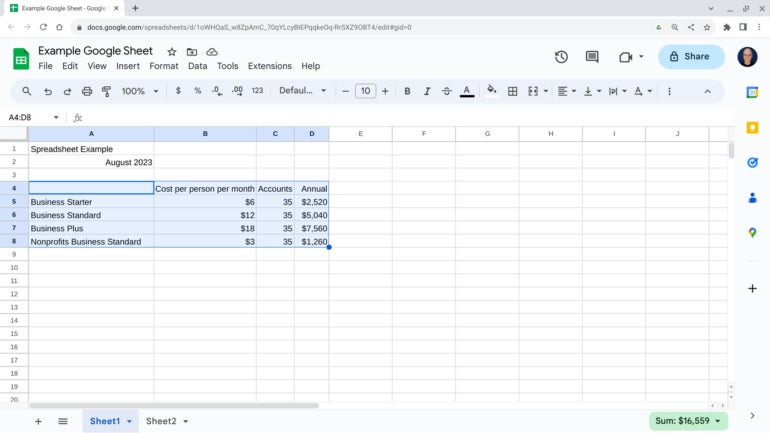 Selecting cells to define the print area in Google Sheets.
To print only a portion of your Sheet, select the cells you wish to print. Then, choose File | Print, select the printer icon in the menu bar, or press Ctrl + P.
Note: If your goal is to print the entire Workbook or the current Sheet, you can skip this cell selection step and proceed directly to the next step.
-
Access the Print Menu: Go to File > Print. Alternatively, you can use the keyboard shortcut Ctrl + P (on Windows) or Cmd + P (on Mac), or click the printer icon located to the right of the Redo arrow in the toolbar.
-
Adjust Print Preview Settings: The print preview screen will appear, presenting you with various adjustable settings:
- Print area: Define what to print – choose between Current sheet, Workbook, or Selected cells.
- Paper size: Select from a list of standard paper sizes or input custom dimensions for specialized printing needs.
- Page orientation: Choose between Landscape (wider than tall) or Portrait (taller than wide) to best fit your content.
- Scale: Control the size of your content on the page. Options include Fit to width, Fit to height, Fit to page to automatically scale your content, or Custom percentage to specify an exact scaling factor.
- Margins: Set the whitespace around your content. Choose from predefined options like Normal, Narrow, or Wide, or select Custom Numbers to precisely define margin sizes.
- Page breaks: Manage where pages break in your printed output for better readability.
- Formatting: Customize formatting elements such as adding gridlines or notes, setting page order, and choosing horizontal (center, left, or right) and/or vertical (top, middle, or bottom) alignment options.
- Headers and footers: Add essential information to each page, including page numbers, document title, sheet name, current date, time, and more.
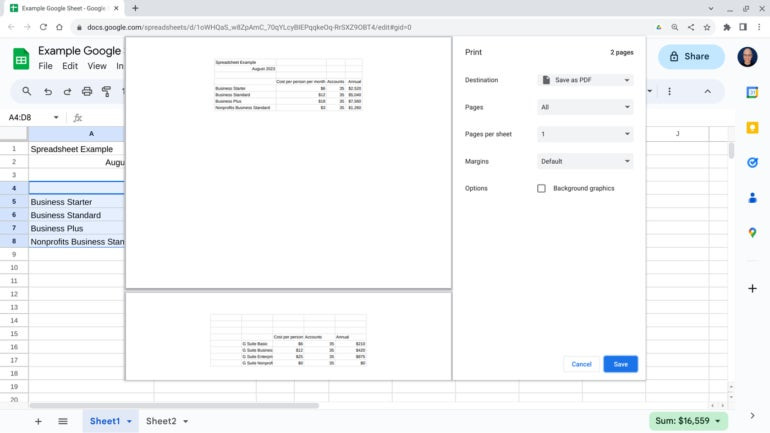
As you modify each setting, the print preview dynamically updates to reflect your chosen options. Continue adjusting these settings until the preview accurately represents your desired printed output (Figure B).
Figure B
 Configuring print settings in Google Sheets preview.
Adjust as many print settings as desired. As you make changes, the print preview adjusts to reflect your modifications.
-
Proceed to Next Steps: Once you are satisfied with the print preview settings, click Next in the upper right corner to move to the final print dialog.
-
Final Output Options: In this final dialog, you can further refine your output:
- Destination: Select your physical printer from the dropdown list, or choose to Save as PDF or Save to Google Drive as PDF to create a digital copy instead of printing.
- Pages: Specify the page range to print. Choose All pages, or define a custom range by entering specific page numbers.
- Pages per sheet: Conserve paper by printing multiple pages on a single sheet. Options include 1, 2, 4, 6, 9, or 16 pages per sheet.
- Margins: Select predefined margin options like Default, None, Minimum, or Custom to quickly adjust page margins.
- Background graphics: Check the Option box to print Background graphics if your sheet includes background colors or images that you want to include in the printout.
-
Print or Save: Finally, click either Print to send the job to your selected printer or Save if you chose to save as a PDF. The exact button text may vary slightly depending on your operating system and selected options (Figure C). In some cases, especially when saving as PDF, you might save the Sheet as a PDF file first, then open the PDF and print it separately.
Figure C
 Final print options and output selection in Google Sheets.
You can select which pages will print and make other adjustments on the final screen before you print. Note that the Print sequence allows you to save a Sheet to a PDF or to Google Drive.
Printing Header Rows on Every Page in Google Sheets
Freezing header rows is a valuable technique for maintaining organization in your Google Sheets, particularly when working with large datasets that span multiple rows. Header rows ensure that column titles remain visible as you scroll, eliminating the need to constantly refer back to the top of the sheet. This is especially helpful when printing lengthy spreadsheets, as it ensures headers appear on every printed page.
To print header rows on each page in the browser version of Google Sheets, follow these steps:
- Open Your Google Sheet: Begin by opening the Google Sheets file you intend to print.
- Freeze Header Row(s): Navigate to View > Freeze. Then, select the appropriate header row option. Typically, 1 row is chosen to freeze the first row as the header. The Freeze option keeps the specified top rows visible even when you scroll down. You can freeze more rows if your header spans multiple rows; options adjust based on your cursor’s current location.
- Access Print Settings: Click File > Print at the top left to open the Print Preview window, showing how your sheet will appear when printed.
- Enable Repeated Frozen Rows: In the right-hand settings column, click on Headers & footers.
- Select Repeat Frozen Rows: Scroll down within the Headers & footers options and check the Repeat Frozen Rows box. This ensures that the rows you froze earlier will be repeated as headers on every printed page.
Google Sheets also allows you to repeat multiple frozen rows. You can adjust the number of rows to repeat by modifying your selections in the Freeze menu under the View tab. Additionally, you can add page numbers and customize header and footer content further through the Edit Custom Fields tab within the Headers & footers print settings.
Adjusting Print Margins in Google Sheets
Margins refer to the blank space between the content of your sheet and the physical edges of the printed page. Google Sheets provides options to customize these print margins, allowing you to control the layout and density of information on each printed page.
While the default margin settings are generally suitable for most purposes, you might occasionally need to adjust them to refine the appearance of your printed sheet. Modifying margins, along with scaling, provides fine-grained control over how your sheet looks in print.
To access margin and scale settings, go to File > Print.
Margin Settings Explained
- Normal: This is the default margin setting in Google Sheets, providing standard spacing around your content.
- Wide: Selecting Wide margins increases the whitespace around the edges of the page. This reduces the content area on each page and may increase the number of pages needed for printing.
- Narrow: Narrow margins decrease the whitespace, allowing more content to fit on each page. This can reduce the total number of pages in your printout but also reduces the amount of blank space.
- Custom Numbers: For precise control, choose Custom Numbers. This option lets you enter specific values for each margin (top, bottom, left, right), giving you maximum flexibility in page layout.
Scale Settings Explained
- Normal: The default scale, printing your sheet at 100% size.
- Fit to Width: This option automatically scales your sheet to ensure all columns fit within the page width. It’s particularly useful when you have many columns and fewer rows, preventing columns from being cut off.
- Fit to Height: Fit to Height scales your sheet to fit all rows onto a single page vertically. This is ideal when you have numerous rows but fewer columns.
- Fit to Page: This setting scales the entire content of your sheet to fit onto a single page, both horizontally and vertically. Use this to condense your sheet onto one page for a quick overview, especially with smaller datasets.
- Custom Numbers: Similar to custom margins, Custom Numbers for scaling allows you to input a specific percentage to enlarge or reduce the printed size of your sheet content, offering precise control over scaling.
Printing from the Google Sheets Mobile App
You can also print directly from the Google Sheets mobile app on both Android and iOS devices, providing convenient printing capabilities on the go.
- Access the Print Option:
- Android: Tap the three vertical dots menu icon located in the upper right corner of the app interface.
- iOS: Tap the three horizontal dots menu icon, also in the upper-right corner (Figure D).
Figure D
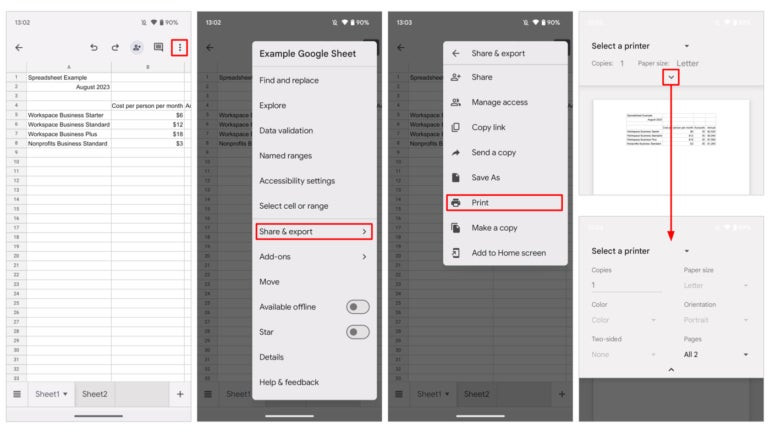 Accessing the print menu in Google Sheets mobile app on Android and iOS.
To print from Google Sheets on mobile, tap the three-dot menu in the upper right, tap Share & Export and then tap Print. Google Sheets on Android offers additional options you may adjust, as shown on the right.
- Navigate to Share & Export: Tap on Share & export from the menu options that appear.
- Select Print: Tap Print from the Share & export options.
- Choose Printer and Copies: Select your desired printer from the available list and specify the number of copies you need.
Depending on your mobile platform and printer capabilities, you might have access to additional print settings. For example, on Android, tapping the down arrow in the print preview screen may reveal options to adjust paper size, page orientation, specific pages to print, color or black and white printing, and even two-sided printing if your printer supports it.
Limitations of Mobile App Print Options
When printing from the Google Sheets mobile app on Android, iOS, or iPadOS, it’s important to note that you have fewer settings and controls compared to printing from a desktop browser. As of late 2023, selecting specific cells to print is not available in the mobile app.
However, within the Google Sheets mobile app, particularly on Android, you can typically adjust settings for:
- Device: Choose a printer or select Save as PDF.
- Copies: Specify the number of copies to print.
- Color: Select between color or black and white printing.
- Two-sided printing: Enable or disable two-sided printing if your printer supports it.
- Paper size: Choose from supported paper sizes based on your printer.
- Orientation: Switch between portrait and landscape page orientation.
- Pages: Define the range of pages to print.
Expanding Your Google Sheets Proficiency
While Google Sheets is known for its user-friendly features, mastering its more advanced capabilities and shortcuts can significantly boost your productivity, especially for complex projects. Interestingly, with features like using Google Sheets as a data source for mail merge in Gmail, you might even reduce your need for printing altogether.
To further enhance your Google Sheets skills and work more efficiently, explore these valuable learning resources from comprehensive Google Workspace tutorial libraries. These tutorials cover a wide range of business applications and specific tasks. For in-depth training and to significantly upgrade your expertise, consider exploring certification courses focused on Google Sheets and Microsoft Excel, which can provide structured learning and advanced techniques.
Read next: Delve into a detailed side-by-side comparison of Google Workspace vs. Microsoft 365.