
Printing exactly what you need from an Excel worksheet can sometimes be a challenge. Instead of printing entire sheets filled with data, you might only need a specific section. Fortunately, Excel offers a powerful feature called “Print Area” that allows you to designate precisely which parts of your worksheet will be printed. This guide will walk you through the process of How To Set Print Area On Excel, ensuring you print only the essential data you require, saving paper and streamlining your workflow. Whether you’re preparing reports, sharing data subsets, or simply need a focused printout, understanding how to manage print areas in Excel is an invaluable skill.
Setting a Print Area in Excel
The most fundamental task is to define a print area. This tells Excel exactly which cells you want to include in your printed output. Here’s how to set it up:
-
Select the Desired Cells: Begin by highlighting the cell range you want to designate as your print area. This is the portion of your worksheet that you want to print.
Tip: To select multiple, non-contiguous areas for printing, press and hold the Ctrl key while selecting each range you want to include. Each selected area will print as a separate page.
-
Navigate to Page Layout Tab: In the Excel ribbon at the top, click on the Page Layout tab. This tab houses all the settings related to the visual layout and printing of your worksheet.
-
Locate the Print Area Option: Within the Page Setup group on the Page Layout tab, find and click on the Print Area dropdown menu.
-
Set the Print Area: From the dropdown menu, select Set Print Area. Excel will now remember this selected range as the designated print area for this worksheet.
After setting the print area, it’s a good practice to visually confirm your selection. You can do this by switching to Page Break Preview. Go to the View tab, and in the Workbook Views group, click Page Break Preview. This view will show you the boundaries of your print area(s) clearly marked with page breaks. Remember that the print area setting is saved with your Excel workbook, so you only need to set it once.
Expanding an Existing Print Area
Sometimes, your data grows, and you need to include more cells in your print area. Excel allows you to easily add cells to an already defined print area. Here’s how:
-
Select Cells to Add: On your worksheet, select the new cells that you want to append to the current print area.
Note: You can only add adjacent cells to an existing print area. If you select cells that are not directly next to the current print area, Excel will create a new, separate print area instead. Each distinct print area will be printed on its own page.
-
Go to Page Layout and Print Area: Navigate again to the Page Layout tab, and within the Page Setup group, click on Print Area.
-
Add to Print Area: From the dropdown menu, choose Add to Print Area. Excel will expand the existing print area to incorporate the newly selected cells, provided they are adjacent.
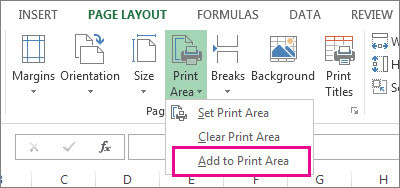 Add to Print Area
This image demonstrates how to add to the print area in Excel, highlighting the ‘Add to Print Area’ option under the ‘Print Area’ dropdown menu in the Page Layout tab.
Just like setting the initial print area, any additions are saved when you save your Excel workbook, making it convenient for future printing.
Clearing a Print Area in Excel
If you no longer need a specific print area and want to revert to printing the entire worksheet, you can easily clear the defined print area. It’s important to note that clearing the print area will remove all defined print areas from the worksheet.
-
Select Any Cell on the Worksheet: Click on any cell within the worksheet for which you wish to remove the print area setting.
-
Access Print Area Options: Go to the Page Layout tab, and in the Page Setup group, click on the Print Area dropdown.
-
Clear Print Area: Select Clear Print Area from the dropdown menu. This action will remove any previously defined print areas on the current worksheet, and Excel will now print the entire sheet by default.
By clearing the print area, you reset the printing behavior of the worksheet back to its default state, where everything is considered for printing.
Conclusion
Mastering the “Print Area” feature in Excel is essential for anyone who needs to print specific sections of their worksheets. By following these simple steps, you can effectively control what gets printed, ensuring efficiency and saving resources. Whether you are setting a print area, adding to it, or clearing it, these tools provide the flexibility needed for precise Excel printing. Take advantage of these techniques to enhance your productivity and get the most out of Microsoft Excel.
For further assistance and to connect with other Excel users, consider exploring the Excel Tech Community or seeking support through Microsoft Communities.