Is your HP printer producing faded, streaky, or spotty prints? You’re likely dealing with a clogged printhead. Print heads, the unsung heroes of inkjet printing, can become obstructed over time due to dried ink and dust accumulation. This issue is particularly common with infrequent printer use, leading to ink drying and potential clogs that can shorten the lifespan of your cartridges and printer. Fortunately, cleaning your printer heads is often a straightforward process that can restore print quality and save you money on replacement cartridges.
In this in-depth guide, we’ll delve into the workings of HP printheads, explore the different types, and provide step-by-step instructions on how to clean them effectively. Whether you prefer an automated solution or a hands-on approach, we’ve got you covered to ensure your HP printer operates at its best.
Understanding the Printhead: The Heart of Your Inkjet Printer
The printhead is a critical component in your inkjet printer, responsible for transferring ink onto paper with precision. It achieves this by utilizing thousands of microscopic nozzles that spray tiny droplets of ink to form text and images. When these delicate nozzles become clogged, the ink flow is disrupted, resulting in the print quality issues you may be experiencing. Regular cleaning can prevent these problems and maintain optimal printing performance.
Identifying Your HP Printhead Type: Integrated vs. Built-in
Before you begin cleaning, it’s crucial to determine the type of printhead your HP printer uses. HP printers employ two main types of printhead designs, and the cleaning method will vary depending on which type you have.
Type 1: Integrated Printheads – Part of the Cartridge
Integrated printheads are incorporated directly into the ink cartridge itself. These cartridges are often referred to as “integrated ink cartridges.” The nozzle plate, which is the actual printhead, is built into the side of the cartridge. A key advantage of this design is that every time you replace an ink cartridge, you are also replacing the printhead. This can be particularly beneficial if you encounter persistent print quality issues with a specific cartridge, as replacing it with a new one effectively resolves any potential printhead problems associated with the old cartridge. HP commonly uses integrated cartridges for black and tri-color inks in more affordable Deskjet and ENVY printer models, such as the Deskjet 1112 or the ENVY 7855.
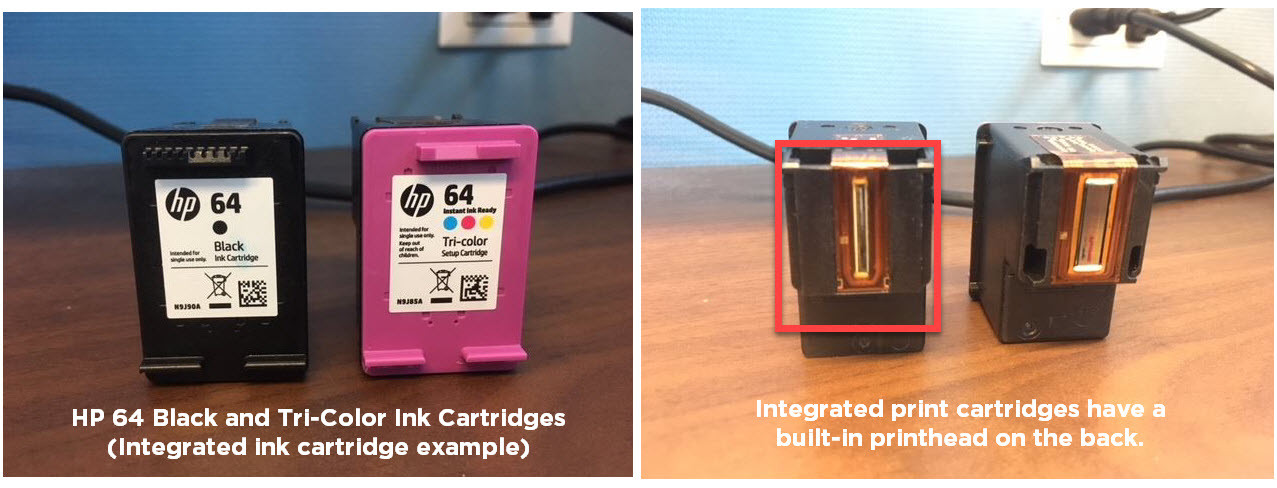 HP 64 ink cartridge with integrated printhead
Examples of integrated ink cartridge series include: HP 61, HP 62, HP 63, HP 64, HP 65, and HP 67 series.
Type 2: Built-in Printheads – Separate from Cartridges
In contrast to integrated printheads, some HP printers feature printheads that are built directly into the printer itself. These printers utilize individual ink cartridges that install into the built-in printhead. With this design, the printhead is a separate, more permanent component of the printer, and the ink cartridges serve solely as ink reservoirs. While built-in printheads are designed for long-term use, they can eventually require replacement. However, due to the cost of replacement printheads, which can often exceed $100, and their potential scarcity, replacing the entire printer is often a more economical solution than replacing the printhead alone.
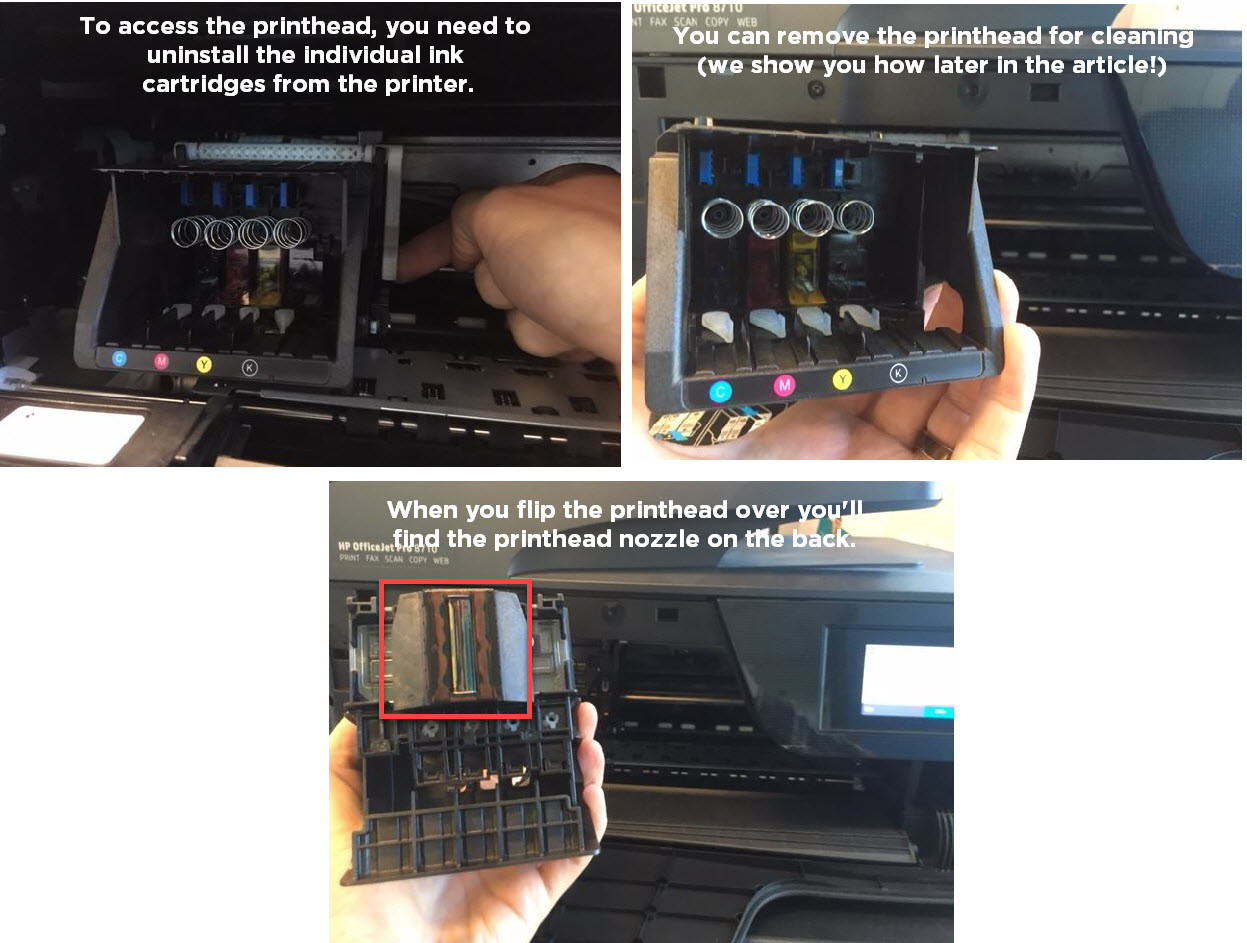 HP printer with a removed built-in printhead
Examples of individual ink cartridge series used with built-in printheads include: HP 902, HP 952, HP 910, and HP 962 series.
Automatic Printhead Cleaning: The Software Solution
The easiest and often most convenient way to address print quality issues caused by clogged printheads is to utilize your HP printer’s automatic cleaning function. This feature is standard on virtually all HP printer models and is typically accessible through the printer’s control panel or software interface. The cleaning process involves the printer automatically flushing ink through the nozzles to dislodge any clogs.
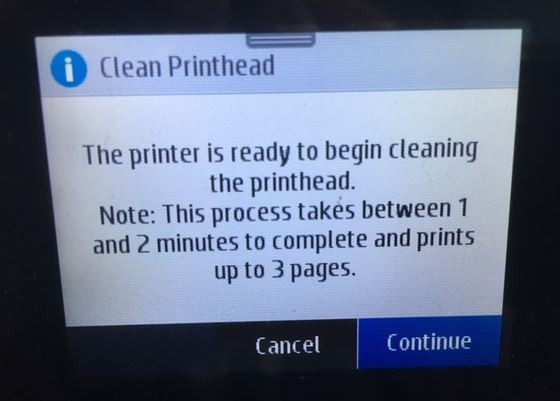 HP printer control panel showing the printhead cleaning option
To initiate an automatic printhead cleaning, navigate to the “printer maintenance” or “tools” section of your printer’s display menu. The exact steps may vary slightly depending on your specific printer model, so consulting your printer’s manual for detailed instructions is always recommended.
Automatic printhead cleanings usually take just a minute or two to complete. It’s important to note that this process does consume a small amount of ink as it flushes the system. After the cleaning cycle is finished, print a test page to evaluate the improvement in print quality. If the test print looks satisfactory, you can resume normal printing. However, if the print quality is still lacking, you may need to run the cleaning function 2-4 more times. If print quality remains poor after multiple automatic cleanings, it’s time to consider manual cleaning methods. Avoid running the automatic cleaning function excessively, as it can deplete your ink cartridges unnecessarily.
Manual Printhead Cleaning: Hands-on Methods for Stubborn Clogs
For more persistent printhead clogs that don’t resolve with automatic cleaning, manual cleaning offers a more direct approach. It’s important to reiterate the two types of HP printheads before proceeding with manual cleaning, as the method differs slightly depending on whether your printhead is built into the printer or integrated into the cartridge.
Manual Cleaning for Built-in Printheads (Printer-Integrated)
Manually cleaning a built-in printhead requires a bit more effort but can be effective for stubborn clogs. The following steps are specifically for HP printers with removable built-in printheads, such as the HP OfficeJet 8710. This method can also be applied to non-HP printers with built-in printheads.
Supplies you’ll need:
- A plastic container
- Paper towels (2-3 dry sheets)
- Lint-free cloth
- Filtered or distilled hot water
Step-by-step cleaning process:
- Prepare the soaking container: Fold the dry paper towels into quarters and place them at the bottom of the plastic container.
- Add hot water: Pour approximately two inches of hot water into the container, ensuring the paper towels are fully submerged. The hot water will help dissolve dried ink.
- Access the printhead: Open your printer and carefully remove all ink cartridges from their carriage.
- Set cartridges aside: Place the removed cartridges upright on a separate paper towel to prevent ink leakage.
- Release the printhead: Locate the gray latch behind the cartridge carriage. Lift this latch to release the printhead from the printer mechanism.
- Remove the printhead: Gently pull the printhead upwards and outwards to remove it from the printer.
- Initial cleaning: Dampen the lint-free cloth with hot water.
- Wipe excess ink: Gently wipe away any excess ink visible on the printhead nozzle plate.
- Soak the printhead: Place the printhead in the container with the submerged paper towels, ensuring the nozzle plate is facing downwards. Be careful not to touch the nozzle directly, as it is delicate and can be damaged easily.
- Soaking time: Allow the printhead to soak in the hot water for about ten minutes.
- Dry the printhead: Remove the printhead from the container and place it nozzle-up on a dry paper towel to air dry for approximately fifteen minutes.
- Reinstall and clean: Reinstall the printhead back into the printer, ensuring the latch is securely fastened. Then, reinstall the ink cartridges. Run the automatic printhead cleaning function on your printer one more time to prime the printhead and ensure optimal ink flow.
Manual Cleaning for Integrated Printheads (Cartridge-Integrated)
If your HP printer utilizes cartridges with integrated printheads, the “paper towel method” is a simple and effective manual cleaning technique.
Supplies you’ll need:
- A warm, damp paper towel or coffee filter
- A dry paper towel
Step-by-step cleaning process:
- Blot with damp towel: Take a warm, damp paper towel or a coffee filter and gently blot the printhead (the nozzle plate on the bottom of the cartridge) facing down onto the damp towel. This action will help to dissolve and remove any dried ink obstructing the nozzles.
- Wick ink with dry towel: Immediately after blotting, hold the cartridge with the printhead facing down against a dry paper towel for 2-3 minutes. The dry paper towel will wick away excess ink and moisture from the printhead. Avoid wiping the printhead, as this could potentially cause damage.
- Reinstall and test: Reinstall the cleaned cartridge back into your printer and attempt to print again. If print quality remains poor after this manual cleaning, it may indicate that the cartridge is nearing the end of its life or is damaged, and replacement may be necessary.
Conclusion: Maintaining Optimal Print Quality
By understanding the different types of HP printheads and mastering both automatic and manual cleaning techniques, you are well-equipped to maintain optimal print quality and extend the life of your HP printer and ink cartridges. If, after attempting these cleaning methods, you continue to experience print quality issues, it may unfortunately indicate the need for a printhead replacement. For printers using integrated cartridges, this means replacing the entire cartridge. For printers with built-in printheads, replacing the printhead itself is an option, but as mentioned earlier, the cost can be substantial, often making a new printer a more practical choice.
If you have any further questions or encounter persistent issues cleaning your HP printhead, don’t hesitate to leave a comment below. We’re here to help!