
Stickers are a powerful and affordable way to get your message seen. Think about it – stickers on laptops, water bottles, or even street signs grab attention in a way that online ads sometimes miss. Like many print materials, stickers offer lasting impact for a one-time cost. That cool sticker on your laptop bag keeps promoting your message without any recurring fees.
Stickers vs Labels: Understanding the Difference While often used interchangeably, stickers are generally more graphic-focused, while labels are for informational purposes like addresses or product details. For this guide, we’ll use “stickers” to cover both, as the printing process is very similar. Let’s dive into how you can print your own stickers, broken down into three straightforward sections:
Printing Your Own Stickers: A Step-by-Step Guide
1. Choosing Your Sticker Paper: Paper vs. Vinyl
The first key step is selecting the right material for your stickers. The two main options are paper and vinyl, and understanding their differences is crucial for achieving your desired outcome.
Quick Tip: Be aware that some label papers are specifically designed for handwriting only.
Paper Sticker Labels: Paper labels are the simplest and most budget-friendly sticker option. They’re excellent for various uses like scrapbook embellishments, personalized tags, instant photo stickers, and many other creative projects. When choosing paper sticker paper, you can opt for pre-cut labels (like Avery labels, readily available in various shapes and sizes) or full sheets of sticker paper (such as LD Photo Sticker Paper). Both are user-friendly for home sticker printing.
[ ]
Pre-cut labels are particularly convenient for jar labels, bottle labels, and adding a personal touch to homemade gifts. If you want a seamless look without a white border, clear glossy sticker paper is the way to go. Clear sticker paper is fantastic for printing transparent stickers that look amazing on windows, transparent bottles, and product labels where you want the background to show through.
For those who prefer more customization in sticker shapes and sizes, whole sheets of sticker paper offer greater flexibility.
When using full sticker paper sheets, consider how you’ll cut your stickers. For simple rectangular or square stickers, a standard paper cutter will suffice. However, for more intricate designs, a Cricut Machine or similar cutting machine is a worthwhile investment. Remember to space out your sticker designs adequately on your template to allow for easy cutting.
Need Water-Resistant Paper Stickers? Keep in mind that most printable paper labels are not water-resistant or weatherproof. They won’t hold up well to moisture or outdoor conditions. If water resistance is needed, choose matte label paper AND use a printer with pigment-based ink (avoid using pigment ink in a dye ink printer). Pigment ink is known for its durability and archival qualities. Pigment ink adheres to paper better than dye-based ink, making it more resistant to water and fading. You can learn more about dye vs. pigment ink in our Paper and Ink article.
To further protect your paper stickers from water and sun, lamination is an excellent solution. You can use clear laminating sheets, which are adhesive plastic films applied over the sticker, or a thermal laminating machine for larger quantities. For budget-friendly lamination, clear sheets are ideal. Choose a sheet slightly larger than your sticker sheet (e.g., 9″x12″ laminating sheet for 8.5″ x 11″ sticker paper). To apply, peel off the laminating sheet, place it sticky-side up, and carefully lay your printed stickers on top. Use a squeegee, ruler, or credit card to smooth out any air bubbles. Then, cut out your laminated stickers. Now they are much more durable and water-resistant!
Can Laser Printers Print Stickers? Yes! Laser printers can print stickers, but you MUST use sticker paper specifically designed for laser printers. Using inkjet sticker paper in a laser printer can cause the adhesive to melt and damage your printer – a costly mistake!
Always use inkjet sticker paper with inkjet printers and laser sticker paper with laser printers. They are not interchangeable. Inkjet sticker paper is not heat-resistant and will melt in a laser printer. If using a laser printer, ensure you select laser-compatible sticker paper.
Vinyl Stickers: Inkjet printable vinyl paper offers an affordable way to create durable vinyl stickers at home. Vinyl stickers are the most resilient paper option and are perfect for various applications: product labels, bumper stickers, laptop decals, water bottle stickers, promotional giveaways, and more. Home-printed vinyl stickers can be waterproofed using laminate sheets or clear coat spray sealants like Krylon or Mod Podge, enhancing their outdoor durability compared to unprotected paper labels. However, they may fade faster than professionally printed vinyl stickers due to ink longevity. Most vinyl sticker papers include usage guidelines in their product descriptions. Numerous online tutorials guide you through making vinyl stickers at home or in the office; the process is similar to printing on regular sticker paper.
What About Decals? Decals are specifically designed for outdoor use and feature a permanent adhesive. A key difference between stickers and decals is the application process. Stickers are peeled from a backing and applied directly, while decals are transferred to surfaces (and then the backing is removed). If you need die-cut lettering for your brand on a car window, decals are the answer. For a deeper dive into decal benefits, check out this article from WebSticker. You can print decals at home, but it is a more complex process. WikiHow offers a basic step-by-step guide if you’re interested in trying it yourself.
Important Note: Before choosing any sticker paper, always check your printer’s compatibility. Some printers only accept certain paper types and thicknesses. Consult your printer manual before purchasing sticker paper to avoid issues.
2. Selecting the Right Printer for Stickers
What’s the Best Printer for Sticker Printing?
Having the appropriate printer is just as critical as choosing the right paper. The best printer for stickers depends on your design complexity, but generally, a 4-color inkjet printer with a 1200 dpi (dots per inch) print resolution is more than adequate for most sticker projects. If your sticker designs require very subtle color gradients or a wider range of tones, consider a printer with at least 6 ink cartridges for enhanced color accuracy. Here are some recommended printers for stickers across different budget ranges:
Top Budget Inkjet Printers for Stickers
Canon® PIXMA® TR8620 – Buy on Amazon
The Canon PIXMA TR8620 is a fantastic entry-level printer that delivers vibrant color prints at a remarkably low running cost. It’s perfect for small business owners or hobby photographers starting out with sticker printing. This printer uses five individual ink cartridges, available in standard and high-yield (XL) sizes. Canon’s high-yield cartridges are priced from $19.99-$24.99*, but you can significantly save by using compatible cartridges from LD Products for as low as $11.99. Wireless connectivity makes printing various sticker types and sizes from tablets or smartphones quick and easy.
HP® Envy® 6055 – Buy on Amazon
The HP Envy 6055 is an ultra-affordable printer that produces quality stickers without breaking the bank. Its wireless capabilities allow for effortless printing from mobile devices. Unlike the Canon PIXMA TR8620, the Envy 6055 uses just two cartridges: black and tri-color, offered in standard and high-yield versions. Maximize your savings with LD InkPods replacement ink cartridges from LD Products, available here at a fraction of the HP price!
Mid-Range Inkjet Printer for Enhanced Sticker Quality
Canon® PIXMA® Pro-200 – Buy on Amazon
The Canon Pixma Pro-200 series is a step up in price but offers significantly enhanced features and superior print quality for stickers. Its 8 dye-based ink cartridges provide a wider color spectrum, resulting in stickers with richer colors and finer details. Dedicated black, gray, and light gray cartridges ensure high-quality monochrome prints, and a built-in Chroma Optimizer maintains natural color fidelity. The Pro-200 supports wide-format printing up to 13”x19” and is compatible with a broad array of paper types, giving you flexibility in your sticker projects. Canon CLI-65 cartridges are priced at $13.99 each. Keep an eye out for affordable compatible CLI-65 cartridges from LD Products coming soon!
Professional Grade Inkjet Printer for Stickers
Epson® SureColor® P600- Buy on Amazon
The Epson SureColor P600 delivers exceptional print quality and a high page yield, making it ideal for creating professional-grade stickers and photos. While the initial investment and running costs are higher, the unparalleled print quality might be worth it for your business, especially if color accuracy and longevity are paramount. Each Epson UltraChrome HD pigment ink cartridge costs around sixty dollars. Compatible with various media sizes, including 13”x19” borderless prints, this printer is a valuable asset for serious creatives. Save significantly with LD-brand compatible cartridges for your Epson SureColor printer, available for just $16.99 each.
Remember the crucial point from earlier: always ensure your sticker paper is compatible with your printer type. Never use inkjet sticker paper in a laser printer. The consequences can be damaging and potentially ruin your laser printer.
3. The Sticker Printing Process: Key Considerations
You can design your stickers using any graphic design software you are comfortable with. However, like any DIY project, sticker printing can become costly if you make mistakes. To help you avoid common pitfalls, here are essential tips to remember for successful sticker printing:
Tip #1: Color Matching is Key. The accuracy of your sticker colors heavily depends on the printing process you choose. CMYK (cyan, magenta, yellow, and black) is the standard for home printing and budget-friendly professional printing. This process layers dots of color ink to create the desired hue. For example, green is created by layering cyan and yellow dots. Most home and office printers use CMYK, and even professional photo printers use a similar method (though with more ink color variations). CMYK printing provides good color accuracy at a reasonable cost.
For vinyl stickers, Pantone® color matching is a superior option for absolute color precision and consistency, especially for designs with large areas of solid color. While CMYK can lose up to 10% of color tones, Pantone offers near-perfect screen-to-sticker accuracy. However, Pantone printing for custom designs typically comes at a premium and isn’t easily done at home. Pantone is ideal when professional-level color consistency is crucial. Over 10 million designers and producers worldwide rely on Pantone for color-accurate product creation.
Tip #2: Color Choice Matters. Lighter color values often don’t translate well in CMYK printing. Colors in the lightest 10% of the spectrum may not reproduce at all, appearing white. This means subtle yellow or pink shades in your sticker design might look washed out. Similarly, designs with significant black areas can vary in appearance depending on the color balance used to create the black tone in your design. The color combinations creating your black tone on screen determine the ratios of black and color ink used on paper. Incorrect design choices can result in tinted black hues or unwanted color casts. StickerRobot offers valuable tips on achieving accurate light and dark colors in your prints.
Tip #3: Permanence and Longevity. Stickers are not all created equal in terms of durability. Ink type, printing process, and paper choice all affect longevity. If durability is important, ensure you use the right materials or order the appropriate type of stickers from a professional printer. Imagine investing in vinyl bumper stickers only to have them peel and fade within a year – damaging your brand image. While not every sticker needs to last indefinitely or withstand harsh weather, if longevity is a factor, research your supply options carefully.
Tip #4: Die Cutting for Custom Shapes. Shaping your stickers through die cutting significantly enhances visual appeal and emphasizes design elements. Die cutting is the fastest and easiest method for custom-cutting stickers or decals. Professional printing services often offer die cutting, but you can also die-cut stickers at home using a laser cutter or craft cutting machine.
Tip #5: Break Up Large Solid Color Areas. Printing large areas of consistent solid color is challenging and expensive. Pantone printing yields cleaner, more solid colors but is more costly than standard CMYK. A practical solution for home printing is to avoid designs with large blocks of solid color. Consider incorporating patterns, textures, or gradients instead.
Tip #6: Optimize Print Quality Settings. Most printer drivers offer various print quality settings to adjust print speed and ink usage. For high-quality stickers, always select the “best” or “high quality” print mode. This will be slower than standard or draft modes but will yield significantly better results. You can adjust these settings in your printer’s properties menu. While there, also select the correct paper or media type. For instance, on a Canon PIXMA TR8620, change the print quality from “standard” to “high” and select the “glossy photo paper” setting when printing on glossy sticker paper like LD sticker paper. If you see multiple glossy paper settings, the number often indicates paper thickness; higher numbers mean thicker paper. After printing, allow your stickers to dry for 15-20 minutes before cutting or applying them. This allows the ink to fully set and reduces smudging risks.
[ 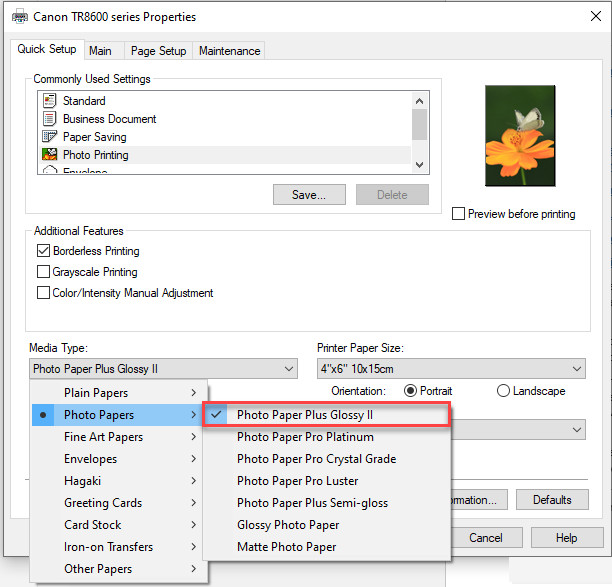 Screenshot of printer settings showing print quality set to 'High' and media type set to 'Glossy Photo Paper', demonstrating optimal settings for sticker printing. ]
Tip #7: Monitor Ink Cartridges. Always ensure your ink cartridges are adequately filled before printing stickers. Low ink levels can lead to inaccurate colors. Running out of ink mid-print, especially when printing multiple stickers, can be disruptive. While printer ink can be expensive, you can save considerably by purchasing compatible ink cartridges from reputable retailers like LD Products. These cartridges are often made with similar components to brand-name cartridges but are custom-refilled and rigorously tested for quality, offering savings of up to 40-50% compared to OEM inks.
Tip #8: Paper Compatibility Check. Different printer models have limitations on paper thickness and dimensions. This is particularly true for compact laser printers, which may not handle thicker papers well. If you are printing stickers, you are likely using an inkjet printer. Inkjet printers use either dye-based or pigment-based inks. Understanding which paper types work best with each ink type can significantly impact your print results. For example, LD Glossy Sticker Paper, like most gloss-coated media, works exceptionally well with dye-based inks. Once you grasp these basics, achieving excellent results with your sticker or decal projects becomes straightforward. Stickers are a highly effective and often underestimated marketing tool. Whether you are making stickers for an office event or a large-scale professional print run for product packaging or giveaways, investing time in ensuring your designs and materials are right will guarantee satisfaction with the final product.
How to Print on Avery Pre-Cut Inkjet Sticker Labels: A Quick Guide
- Prepare Your Template: Avery provides free downloadable templates for Microsoft Word, Adobe programs, and Google Docs. Download the template that matches your Avery product number and ensure your design fits perfectly within the template guidelines.
- Test Print on Plain Paper: Before printing on your Avery sticker sheets, print your template on a blank sheet of paper. Align this test print with an Avery pre-cut sticker sheet to verify that your design positioning aligns correctly with the labels. Adjust the design placement as needed before proceeding to print on the actual sticker paper.
- Load Sticker Paper: Load your Avery sticker paper into your printer. Refer to your printer manual for specific instructions on loading sticker paper, as some printers may have special paper handling requirements.
- Adjust Paper Width Lever: Ensure the printer’s paper width lever is not too tight against the edges of the sticker paper to prevent buckling or jams.
- Print Finalized Templates: Once you are satisfied with your test print alignment, print your finalized sticker templates onto the Avery pre-cut sticker sheets.
- Allow Ink to Dry: Let the ink dry completely before removing the stickers from the sheet to prevent smudging.
- Avoid Re-Printing on the Same Sheet: Do not attempt to print on the same Avery sticker sheet multiple times, as this can lead to printer jams and misfeeds.
Sticker printing might initially seem complex, but once you understand the process and key considerations, you can focus on the creative aspects of your designs rather than technical hurdles. Taking the time to learn the technical details of sticker printing upfront can save you frustration and money in the long run. Are there any sticker printing experts in our audience who would like to share their insights? Please feel free to contribute in the comments below!
*Savings based on price comparison between remanufactured/compatible cartridge prices on www.LDProducts.com and OEM cartridge and printer prices from Amazon and Staples. All prices effective as of July 12, 2023. OEM names are registered trademarks of their respective owners and are not affiliated with, and do not endorse LD Products.
| Cartridge Series |
|---|
| Thank you for reading this post! This article is brought to you by the ink experts at LD Products, a Long Beach, California-based company specializing in compatible ink and toner cartridges. With over 20 years of experience in the printing industry, we are dedicated to helping you save money on printer ink without compromising print quality. If you found this guide helpful, we encourage you to support us by visiting LDProducts.com for all your ink and toner needs. Your support is greatly appreciated! |