Is your HP printer refusing to print properly? It can be incredibly frustrating when your printer suddenly decides to misbehave, especially when you need important documents printed urgently. Before you assume the worst, there are several simple troubleshooting steps you can take to diagnose and potentially fix the issue yourself. This guide will walk you through common causes of printing problems and provide effective solutions to get your HP printer back in working order.
One frequent reason for printing issues, especially if your printer hasn’t been used recently, is dried ink. Ink cartridges can dry out if left inactive for a couple of weeks, leading to poor print quality or a complete failure to print.
To determine whether the problem lies with your printer’s hardware or software drivers, start by performing a standalone copy. This test bypasses your computer and directly utilizes the printer’s core functions.
- Perform a Standalone Copy: Refer to your printer’s manual for specific instructions on making a copy. Typically, this involves placing a document on the scanner glass and pressing the copy button directly on your printer’s control panel. If the copy function works correctly, it indicates that the printer hardware is likely functioning as expected, and the issue might be related to your computer or printer drivers. If the copy also fails to print correctly, it suggests a hardware problem, such as dried ink cartridges or other internal issues.
Another crucial factor affecting print quality is your ink levels. Low or empty ink cartridges are a common culprit behind faded, streaky, or incomplete prints.
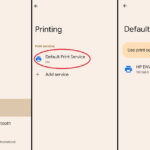
- Check Estimated Ink Levels: Access your printer’s control panel menu or use the HP Smart app on your computer or mobile device to check the estimated ink levels. Replace any ink cartridges that are low or empty. Even if some colors appear to have ink remaining, low ink levels can still significantly impact print quality and cause your printer to not print correctly.
If your ink levels are sufficient, cleaning the ink cartridges is another essential troubleshooting step to resolve print quality problems. This process helps to clear any clogs or dried ink that may be obstructing the print nozzles.
-
Clean the Ink Cartridges:
- On your printer’s control panel, swipe down from the top of the screen to open the Dashboard, and then touch the Setup icon.
- Swipe up on the display and touch Printer Maintenance.
- Touch Clean Cartridges, and then touch Continue. Your printer will initiate the cleaning process, and a Print Quality Diagnostic page will be printed.
- Examine the Print Quality Diagnostic Page: Carefully inspect the printed page for any defects such as missing colors, streaks, or faded areas.
-
If the print quality is unacceptable after the first cleaning, touch Clean Again to proceed with the next level of cleaning. Repeat these steps for a third cleaning stage if necessary.
Note: For heavily clogged printheads, additional cleaning cycles might be needed. If the print quality remains poor after three cleaning attempts, wait for 30 minutes before repeating both levels of cleaning again. This allows the ink to soften and further dissolve any clogs.
To gain a clearer understanding of the print quality and identify any persistent issues, printing a Print Quality Diagnostic Report is highly recommended. This report provides a detailed analysis of your printer’s print output.
-
Print a Print Quality Diagnostic Report:
- On the printer control panel, swipe down to open the Dashboard, and then touch the Setup icon.
- Swipe up on the display, touch Reports, and then touch Print Quality Report.
- Check for any defects on the printed Print Quality Report. This report will display color bars and text patterns that help you assess the printer’s ability to reproduce colors accurately and print clearly. Examine the report for any breaks in lines, missing colors, or blurring.
By following these troubleshooting steps, you can effectively diagnose and resolve many common issues causing your HP printer to not print correctly. Remember to check for dried ink, ensure sufficient ink levels, clean the ink cartridges, and utilize the Print Quality Diagnostic Report to pinpoint the problem and restore your printer to optimal performance. If problems persist after trying these steps, further assistance from HP support or a qualified technician might be necessary.