
If you’re encountering challenges with bed adhesion and warping during your 3D printing projects, especially when working with materials like ABS and other temperature-sensitive filaments, understanding and utilizing bed adhesion techniques is crucial. Among these techniques – skirts, rafts, and brims – each offers unique benefits to ensure successful prints. This article delves deep into the 3d Printing Brim, explaining what it is, when to use it effectively, when it might not be necessary, and how to configure it within your slicer software.
Understanding the 3D Printing Brim
What Exactly is a Brim in 3D Printing?
A 3D printing brim is a flat, single-layer perimeter of filament that is printed around the base of your 3D model. Crucially, unlike a skirt which is printed around the object but doesn’t touch it, a brim is directly connected to the edges of your 3D printed part. This connection effectively increases the surface area of the object’s base that is in contact with the print bed. Unlike a raft, which is a multi-layer platform printed underneath the entire model, a brim is only a single layer and extends outwards from the object’s edges, not underneath its first layer.
The primary purpose of a 3D printing brim is to enhance first layer adhesion. By providing a wider footprint, the brim helps to anchor the part more firmly to the build platform. This improved adhesion is particularly effective in minimizing warping, especially with materials prone to shrinkage as they cool. For smaller or parts with narrow bases, a brim provides essential stability, preventing them from detaching or shifting during the printing process.
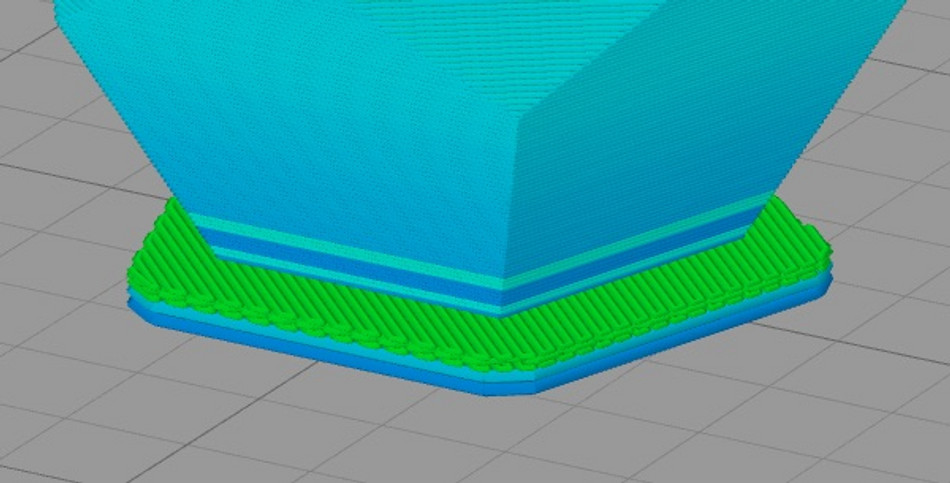
 3D printed model with brims
When is a 3D Printing Brim Necessary?
There are specific scenarios where employing a 3D printing brim is highly advantageous, significantly increasing the likelihood of print success:
- High-Temperature Filaments: When you are 3D printing with filaments that require higher temperatures, such as ABS, polycarbonate (PC), or nylon, the risk of warping is considerably higher. These materials tend to shrink more as they cool down, which can pull the edges of the print away from the bed. A brim provides extra surface area and adhesion to counteract these warping forces, ensuring the print remains firmly attached to the bed throughout the process.
- Small Footprint Parts: Objects with a small base relative to their height are inherently less stable during printing. The limited contact area with the build plate makes them susceptible to tipping or warping, especially as the center of gravity shifts upwards with each layer. A 3D printing brim effectively widens the base, providing much-needed stability and preventing the part from detaching or shifting mid-print.
- Intricate Geometries and Fine Details: Models with fine features, sharp corners, or thin sections often require excellent bed adhesion to prevent these delicate parts from lifting or warping. The added adhesion from a brim is crucial for ensuring that these intricate details adhere properly to the bed, maintaining the accuracy and integrity of the printed design.
- Challenging Build Surfaces: If you are using a build surface that is not perfectly optimized for adhesion, or if it has minor imperfections, a brim can act as a safety net. It provides a larger, more reliable contact area, improving the chances of successful adhesion even on less-than-ideal surfaces.
- First Layer Issues: If you consistently struggle with first layer adhesion, despite bed leveling and proper Z-offset calibration, a brim is a straightforward solution to try. It’s a simple setting adjustment in your slicer that can make a significant difference in first layer success and overall print quality.
Recommended reading: What Causes 3D Print Warping (PLA, PETG, ABS) and How to Prevent It
When to Skip the 3D Printing Brim
While brims are incredibly useful, they are not always necessary, and in some cases, they might even be counterproductive:
- Large Base Prints: If your 3D model already has a large, stable base with ample contact area on the build plate, adding a brim might be redundant. It will consume extra filament and require unnecessary post-processing for removal without providing significant additional benefit to bed adhesion.
- Dimensionally Critical Parts: While brims are generally easy to remove, the point of connection can sometimes leave slight imperfections or require sanding. If dimensional accuracy and a perfectly clean base are paramount for your project, especially for parts requiring tight tolerances or specific surface finishes on the bottom face, you might want to avoid brims if adhesion is already sufficient without them.
- Calibration and Test Prints: For quick calibration prints, bed leveling tests, or filament flow checks, a brim is usually overkill. A skirt is often sufficient for these purposes, as it uses less material and still allows you to observe the initial extrusion consistency and bed leveling without adding extra adhesion.
- Materials with Excellent Bed Adhesion: Some materials, like PLA printed on a heated PEI bed, naturally exhibit excellent bed adhesion. In these cases, unless the part geometry is particularly challenging (small base, tall and thin, etc.), a brim might not be necessary. Over-adhesion can sometimes make part removal more difficult.
Configuring 3D Printing Brim Settings in Your Slicer
Generating a 3D printing brim is typically a straightforward process within your slicer software. The settings for brims are often found within the bed adhesion or support settings, sometimes grouped with skirt and raft options. Here’s a breakdown of the key slicer settings you’ll want to adjust:
- Brim Width: This is the most crucial setting for controlling the effectiveness of your brim. Brim width determines how far the brim extends outwards from the edge of your part. Wider brims offer greater adhesion, but also use more filament and require more removal effort. Common default widths range from 5-10mm, but you can adjust this depending on the material and the severity of your adhesion issues. For highly warp-prone materials like ABS or for parts with very small bases, you might increase the brim width to 15-20mm or even more.
- Brim Lines/Count: Some slicers express brim width in terms of lines rather than millimeters. This setting dictates the number of concentric lines that make up the brim. Increasing the line count effectively increases the brim width. This can be an intuitive way to visualize and adjust the brim size.
- Brim Offset (Skirt Offset): In some slicer software, brim settings might be located under “Skirt” options. In this case, to create a true brim that is attached to the part, ensure the “Skirt Offset” is set to zero. A non-zero skirt offset would create a skirt, not a brim.
- Brim Layers (rare): Generally, brims are single-layer features. However, some slicers might offer an option to adjust the number of brim layers. Sticking to a single layer is usually recommended for ease of removal and material efficiency.
- Brim Type (Inner/Outer/Both): Some advanced slicers might offer options to control whether the brim is printed inside, outside, or both sides of the part’s perimeter. For standard bed adhesion, an “Outer” brim is typically sufficient.
Experiment with these settings to find the optimal brim configuration for your specific printer, materials, and part geometries. Start with default settings and gradually increase brim width if you continue to experience adhesion issues.
Removing 3D Printing Brims Effectively
The ease of brim removal is significantly influenced by your slicer settings, particularly the brim width and the material used. Ideally, brims should peel away cleanly from the printed part with minimal effort, leaving a smooth edge. However, depending on the settings and material, removal can sometimes require additional tools and post-processing.
-
Manual Peeling: In many cases, especially with moderately sized brims and materials like PLA or PETG, you can simply peel the brim away by hand. Start at a corner and gently pull the brim away from the part. It should detach relatively easily along the connection point.
-
Using Tools: For wider brims, tougher materials, or when manual peeling is difficult, tools can be helpful.
- Needle-nose pliers: Useful for gripping the brim edge and pulling it away, especially in tight corners or for stubborn sections.
- Hobby knife or scalpel: Carefully use a sharp knife to gently score along the line where the brim connects to the part. This can weaken the connection and make peeling easier and cleaner. Be extremely cautious when using sharp tools to avoid injury and damaging the print.
- Deburring tool: A deburring tool can be used to gently shave away the brim connection point, providing a cleaner finish.
- Spatula or thin metal scraper: Slide a thin spatula or scraper between the brim and the part to help separate them.
-
Post-Processing (Sanding): After brim removal, you might notice slight imperfections or rough edges where the brim was connected. Sanding with fine-grit sandpaper can smooth out these edges and achieve a cleaner, more refined finish. Start with a higher grit (e.g., 220 grit) and gradually move to finer grits (e.g., 400 grit, 600 grit) for a smooth surface.
Best Practices for Brim Removal:
- Remove brims while the part is still slightly warm: Warm plastic is generally more pliable and easier to work with.
- Work slowly and patiently: Avoid rushing the removal process, as this can lead to damaging the part.
- Support thin or delicate features: When removing brims from parts with thin walls or delicate features, provide support to these areas to prevent breakage.
- Practice makes perfect: With experience, you’ll develop a feel for optimal brim settings and removal techniques for different materials and part types.
Pros and Cons of Using 3D Printing Brims
Like any 3D printing technique, using brims has both advantages and disadvantages. Understanding these pros and cons will help you make informed decisions about when to use brims for your prints:
Pros:
- Superior Warping Prevention: Brims are highly effective at preventing warping, especially for materials prone to shrinkage. By anchoring the part’s edges to the build platform with a wider surface area, they counteract the lifting forces caused by uneven cooling and material contraction. This leads to more dimensionally accurate and successful prints, particularly for challenging materials and geometries.
- Enhanced First Layer Adhesion: Brims significantly improve first layer adhesion. The increased contact area provides a stronger bond between the print and the build plate, preventing parts from detaching mid-print. This is crucial for ensuring a solid foundation for the entire print and minimizing print failures.
- Smoother First Layer Finish Compared to Rafts: Unlike rafts, which are printed underneath the entire base of the part, brims are only removed from the perimeter. This results in a smoother and cleaner first layer surface finish compared to parts printed on rafts, which often require more extensive post-processing to remove raft remnants.
- Material Efficiency Compared to Rafts: Brims consume less filament than rafts. They are single-layer features and only extend around the perimeter of the part, whereas rafts are multi-layered platforms that cover the entire base. This material efficiency makes brims a more cost-effective and environmentally friendly adhesion solution compared to rafts.
Cons:
- Post-Processing Requirement: Brims always require removal after printing. While often straightforward, this adds an extra step to the workflow and can sometimes be time-consuming, especially for complex parts or large prints with wide brims.
- Potential for Surface Marks and Post-Processing: Brim removal can sometimes leave slight marks or imperfections along the edges of the printed part where the brim was attached. This might necessitate additional post-processing steps like sanding to achieve a perfectly smooth and clean finish, potentially affecting dimensional accuracy if excessive sanding is required.
- Material Waste (Minimal but Present): Although brims are more material-efficient than rafts, they still contribute to material waste. The filament used for the brim is typically discarded after removal. While the amount is generally small, it’s a factor to consider, especially for users aiming for minimal waste.
Beyond Brims: Rafts and Skirts in Brief
While this article focuses on brims, it’s helpful to understand how they compare to other common bed adhesion techniques: rafts and skirts.
3D Printing Rafts: A Platform for Problematic Prints
A raft is a multi-layer foundation printed underneath your 3D model. Think of it as a disposable platform that your part is built upon. Rafts are particularly useful in extreme cases of bed adhesion challenges:
- Severely Warped Beds: Rafts can create a level printing surface even on significantly warped or damaged build plates.
- Extremely Warp-Prone Materials: For materials like ABS printed without a heated bed enclosure, rafts can provide a crucial layer of insulation and adhesion.
- Complex Support Structures: Rafts can offer a stable base for complex support structures, especially for models with extensive overhangs.
However, rafts come with drawbacks: They use significantly more material than brims or skirts, increase print time, and often leave a rougher bottom surface finish requiring more post-processing.
 3D model of raft (Image: Simplify3D)
3D Printing Skirts: Nozzle Priming and Bed Leveling Checks
A skirt is a perimeter line printed around your model, but not connected to it. Skirts serve different purposes than brims and rafts:
- Nozzle Priming: Skirts ensure consistent filament flow before the actual print begins, preventing under-extrusion at the start.
- Bed Leveling Verification: By observing the skirt as it prints, you can quickly assess bed leveling and make adjustments before the main print starts, saving time and filament on potentially failed prints.
- Visual Boundary: Skirts can provide a visual outline of the print area on the bed.
Skirts use minimal material and are very easy to remove, but they do not improve bed adhesion or prevent warping in the way brims and rafts do.
