Capturing what’s on your computer screen, known as taking a screenshot or screen capture, is a fundamental skill for PC users. Whether you need to share information, create tutorials, or simply save a visual record of something, the Print Screen function in Windows is your go-to tool. Once you press the Print Screen key, Windows conveniently copies a snapshot of your screen to the clipboard, ready for you to use. Windows offers several ways to utilize the Print Screen key, alone or in combination with other keys, allowing you to capture:
- The entire display of your screen
- All currently active windows
- Only the window you are currently working in
After capturing your screen, you can paste the screenshot directly into applications like documents, emails, or image editing software such as Paint. Alternatively, you can insert the screenshot as an image file into various applications.
Understanding the Print Screen Key
The Print Screen key is a standard fixture on almost all PC keyboards, but its labeling and location can vary slightly depending on your keyboard type.
On desktop keyboards, you can typically find the Print Screen key situated in the upper right-hand area of the keyboard layout, often near the function keys and the number pad. While the function remains the same, the key label might appear in several forms, such as PrintScreen, PrtScn, PrntScr, PrtSc, PrntScrn, or similar abbreviations. For simplicity, we will use PrtScr throughout this guide to refer to all these variations.
It’s worth noting that some specialized keyboards may have unique configurations. For instance, the Dell Wireless Keyboard and Mouse combo, model KM3322W, does not feature a dedicated Print Screen button. On this model, you need to press the Fn (Function) key and the Insert key simultaneously to initiate a screen capture.
On laptop keyboards, the Print Screen key is commonly integrated within the Function Key row (F1, F2, F3, etc.). To use it, you’ll generally need to press and hold the Fn key along with the associated Function key that is labeled as PrtScr (often F10).
Some modern laptops are equipped with capacitive (illuminated) Function Key rows. On these, pressing the Fn key toggles the function of the keys. You may need to press Fn once to illuminate the Print Screen function on a key, and then press that PrtScr key, possibly with other keys as described below, to take your screenshot. Consult your laptop’s user manual for precise instructions if you are unsure.
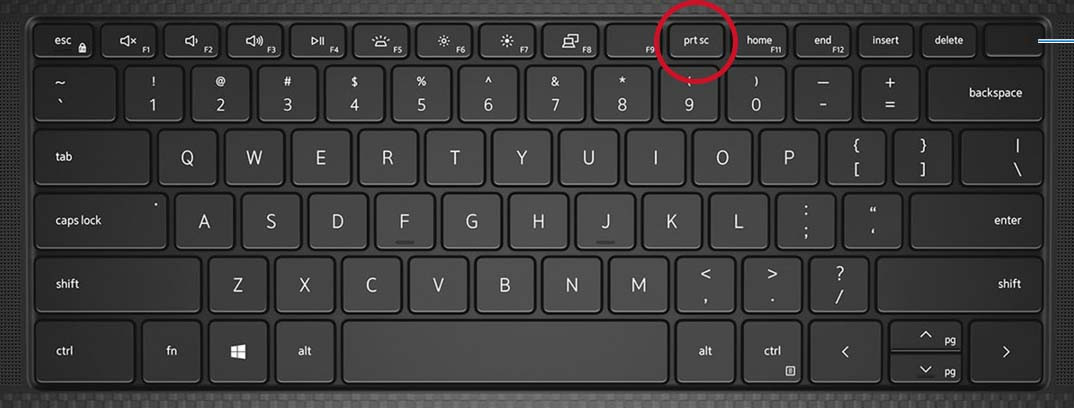 Illustration of the print screen key on Dell KM5221W wireless keyboard
Figure 1: Example of the Print Screen key on a Dell KM5221W wireless keyboard. Notice its location in the upper right corner.
Illustration of the print screen key on Dell KM5221W wireless keyboard
Figure 2: The Print Screen key as seen on a Dell Precision 5550 mobile workstation keyboard, again located within the function key area.
Illustration of the print screen key on Dell KM5221W wireless keyboard
Figure 3: A laptop keyboard showcasing a capacitive Function Key row. The functions of these keys can change, so ensure the Print Screen function is active when you intend to use it.
The exact behavior of the Print Screen function can differ slightly between Windows operating systems, but the core functionalities remain consistent in Windows 10 and Windows 11.
Different Ways to Print Screen in Windows 11 and Windows 10
Windows offers several shortcuts using the Print Screen key to capture different parts of your screen. Here’s how to use them:
Capturing the Entire Screen
To take a screenshot of everything visible on your monitor(s), you have a couple of options:
- Windows logo key + PrtScr key: Pressing these two keys simultaneously will capture a screenshot of your entire screen and automatically save it as a file. The screenshot is saved in the Screenshots folder, which is located within your Pictures folder in your user profile. This is a quick method for saving screenshots directly.
- PrtScr key (alone): Simply pressing the PrtScr key by itself will also capture a screenshot of your entire screen. However, in this case, the screenshot is only copied to your clipboard. You will need to paste it into an application (like Paint) to view, edit, or save it.
- Windows logo button + Volume Down button (on tablets): If you are using a Windows tablet without a physical keyboard, you can capture the entire screen by pressing the Windows logo button and the volume down button at the same time. Similar to the Windows logo key + PrtScr shortcut, this method usually saves the screenshot directly to the Screenshots folder.
Capturing All Active Windows
If you want to capture all windows that are currently active and visible on your screen, use the following method:
- PrtScr key: Just press the PrtScr key. This command captures an image of your entire screen, including all open windows, and copies it to the clipboard. You can then paste this image into an image editor to isolate the specific active windows if needed.
Capturing a Single Active Window
To capture only the window you are currently working in and have selected, follow these steps:
- Select the Active Window: Click on the title bar of the window you wish to capture to make sure it is the active window.
- Alt + PrtScr keys: Press and hold the Alt key, and then press the PrtScr key while still holding Alt. This action captures only the currently active window and copies it to the clipboard.
Using Your Screenshot: Pasting and Editing
Once you have captured your desired screen area using the Print Screen key combinations, the screenshot is temporarily stored on your clipboard. To make use of it, you need to paste it into an application.
The most common way to use your screenshot is to paste it into an image editor like Microsoft Paint, Photoshop, or GIMP. You can also paste screenshots into document processing programs like Microsoft Word, email clients, and even messaging apps.
To paste the screenshot, open your chosen application and press Ctrl + V (hold down the Ctrl key and press the V key). This will paste the screenshot as a new image document within the application.
In image editors like Paint, you can then crop, resize, annotate, or perform other basic edits on your screenshot before saving it as an image file (e.g., JPEG, PNG).
Beyond the Print Screen Key: Exploring the Snipping Tool
For more versatile and feature-rich screen capturing options, Windows includes the Snipping Tool. This utility offers more control over what you capture and how you capture it. The Snipping Tool allows you to capture:
- Rectangular Snip: Drag a rectangle to select a specific area of the screen.
- Free-form Snip: Draw a freehand shape around the area you want to capture.
- Window Snip: Capture a single window of your choice.
- Full-screen Snip: Capture the entire screen (similar to the basic PrtScr key).
The Snipping Tool also provides options for delaying captures, adding annotations, and saving your snips in various formats. For a deeper dive into its capabilities, you can refer to Use Snipping Tool to capture screenshots.
Conclusion
The Print Screen key is a quick and easy way to capture your screen in Windows. By understanding the different combinations and options, you can efficiently take screenshots of your entire screen, active windows, or specific portions. For more advanced capturing needs, the Snipping Tool provides a wider array of features. Whether for work, communication, or personal use, mastering the Print Screen function and exploring tools like Snipping Tool will undoubtedly enhance your productivity and PC skills.