Navigating the world of wireless printers can sometimes feel like deciphering a secret code. You’re all set to print crucial documents, family photos, or even that urgent recipe, and suddenly, your printer seems to have gone offline. Before frustration sets in, understanding how to find your printer’s IP address is the first and most crucial step in troubleshooting and maintaining a seamless printing experience.
Just like every device connected to your network, your printer has a unique IP (Internet Protocol) address. This address acts as its digital identity, allowing your computer and other devices to communicate and send print jobs wirelessly. Knowing this IP address is essential for various tasks, from resolving connection hiccups to setting up direct network printing and even enhancing your printer’s security.
This comprehensive guide will walk you through multiple methods to effortlessly find your printer’s IP address, regardless of your printer model, operating system, or network setup. Whether you are a Windows user, a Mac enthusiast, or prefer managing your network through your router, we’ve got you covered. Let’s dive in and unlock the secrets to finding your printer’s IP address.
Simple Methods to Uncover Your Printer’s IP Address
There are several straightforward ways to locate your printer’s IP address. The best method for you will often depend on your printer’s capabilities and your comfort level with different devices and interfaces. Here are some of the most effective techniques:
1. Print a Network Configuration Page Directly from Your Printer
This is often the quickest and most universal method, working across a wide range of printer brands and models. Your printer, whether it’s an inkjet or laser printer, usually has a built-in menu system accessible through its control panel. Navigating this menu allows you to directly print a configuration page that contains vital network information, including the IP address.
Here’s a general guide on how to do this:
- Access the Control Panel: On your printer, locate and open the main menu. This is typically done using buttons on the printer itself or via a touchscreen interface.
- Navigate to Settings or Setup: Look for options like “Settings,” “Setup,” “Network Settings,” or “Wireless Settings.” The exact wording may vary depending on your printer manufacturer (e.g., HP, Canon, Epson, Brother).
- Find Network Configuration or Reports: Within the settings menu, search for options such as “Network Configuration,” “Network Summary,” “Wireless LAN Report,” or “Print Reports.”
- Print the Configuration Page: Select the option to print a network configuration page or similar report.
- Locate the IP Address: Once printed, examine the page. You’ll find various network details listed, including the “IPv4 Address” or simply “IP Address.” This numerical sequence is your printer’s IP address.
A sample network configuration page from a printer, highlighting where the IP address is typically located within the IPv4 settings section.
2. Find Your Printer’s IP Address on Windows
If your printer is connected to a Windows computer, you can find its IP address through the operating system’s settings. This method is convenient if you’re already at your computer and prefer not to interact directly with the printer’s control panel.
Follow these steps to find your printer’s IP address on Windows:
- Open Control Panel: Click on the Start Menu, type “Control Panel,” and select it from the search results.
- Go to Hardware and Sound: In the Control Panel, click on “Hardware and Sound.”
- Open Devices and Printers: Under “Hardware and Sound,” click on “Devices and Printers.”
- Right-Click on Your Printer: Locate your printer in the list of devices. Right-click on it to open the context menu.
- Select Printer Properties or Properties: In the context menu, choose “Printer properties” or simply “Properties.”
- Navigate to the Ports or Web Services Tab:
- Ports Tab: In the Properties window, if you see a “Ports” tab (often found in older printer drivers), click on it. Look for a checked port for your printer. Click “Configure Port…” and you might find the IP address listed there.
- Web Services Tab: For newer printers, you may find a “Web Services” tab. The IP address might be listed within this tab, often under device information or network settings.
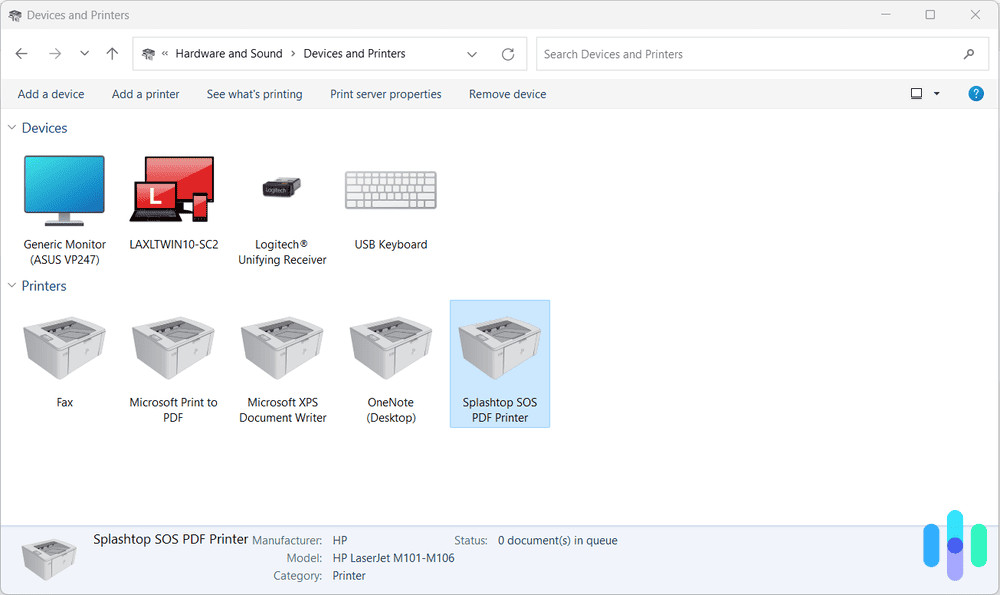 Devices and Printers page in Windows Control Panel, showing printer properties options
3. Access Your Router’s Interface to Find the Printer IP
Your router acts as the central hub of your network, assigning IP addresses to all connected devices, including your printer. If you have access to your router’s administration interface, you can find a list of connected devices and their corresponding IP addresses.
Here’s how to find your printer’s IP address through your router:
- Access Your Router’s Settings: Open a web browser and enter your router’s IP address in the address bar. This is commonly
192.168.1.1,192.168.0.1, or10.0.0.1. Refer to your router’s documentation if you are unsure. - Log in to Your Router: You’ll be prompted to enter your router’s username and password. These are usually found in your router’s manual or on a sticker on the router itself. If you’ve changed them, use your custom credentials.
- Find the DHCP Client List or Connected Devices: Once logged in, navigate to sections like “DHCP Client List,” “Attached Devices,” “Client List,” or “Device List.” The naming varies across router brands (e.g., Netgear, TP-Link, ASUS, Linksys).
- Locate Your Printer: Look through the list of devices. Devices are often listed by name or MAC address. Identify your printer by its name (if recognizable) or by comparing the MAC address to the one printed on your printer (sometimes found on a sticker).
- Note the IP Address: Once you’ve located your printer in the list, its corresponding IP address will be displayed next to it.
 Finding printer IP address from a router's admin interface
4. Using Command Prompt (Windows) to Discover Printer IP
For users comfortable with command-line interfaces, Windows Command Prompt offers a quick way to display network connections, potentially revealing your printer’s IP address.
Steps to use Command Prompt for finding the printer IP:
- Open Command Prompt: Press the Windows key, type “cmd,” and select “Command Prompt” from the results.
- Run the
arp -acommand: In the Command Prompt window, typearp -aand press Enter. This command displays the Address Resolution Protocol (ARP) cache, which lists recent IP addresses your computer has communicated with on the local network. - Examine the List: A list of IP addresses and corresponding physical addresses (MAC addresses) will appear. Look for IP addresses that seem to be in your local network range (often starting with
192.168.or10.0.). You might need to cross-reference with your printer’s MAC address (if you know it) or try to identify it based on other contextual clues.
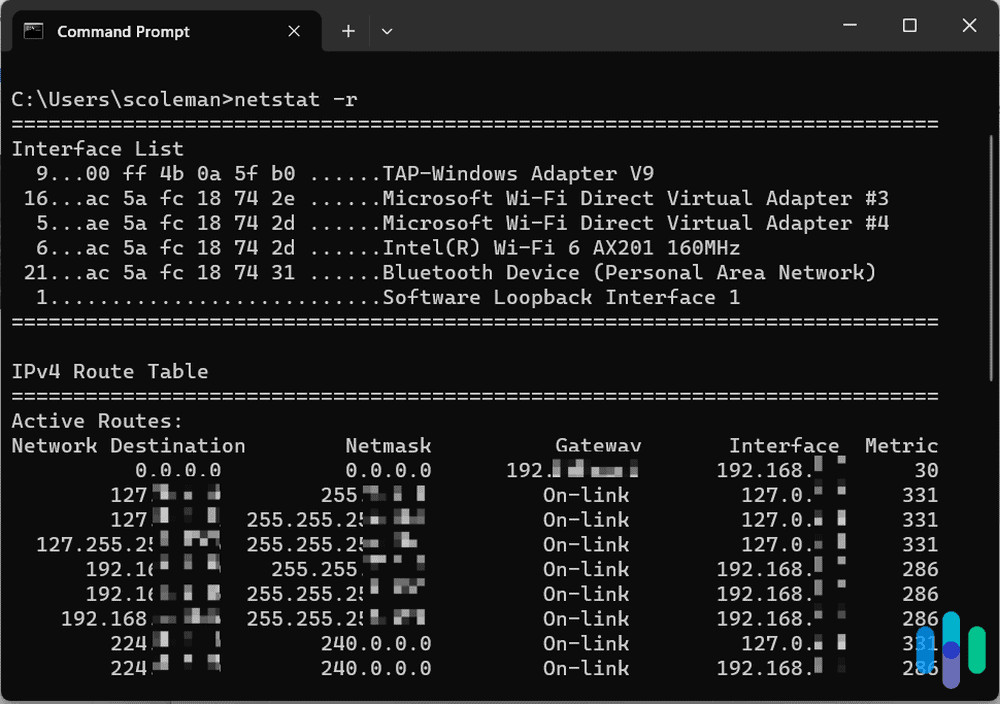 Command Prompt showing ARP -a results, potentially listing printer IP
5. Finding Printer IP on macOS
For Mac users, finding the printer IP address is easily done through System Settings.
Here’s how to locate your printer’s IP on macOS:
- Open System Settings: Click on the Apple menu in the top-left corner and select “System Settings” (or “System Preferences” on older macOS versions).
- Go to Printers & Scanners: In System Settings, find and click on “Printers & Scanners.”
- Select Your Printer: In the left sidebar, select your printer from the list of installed printers.
- Locate the IP Address under Location: On the right side, you should see details about your printer. Look for the “Location” field. Often, the printer’s IP address is displayed here.
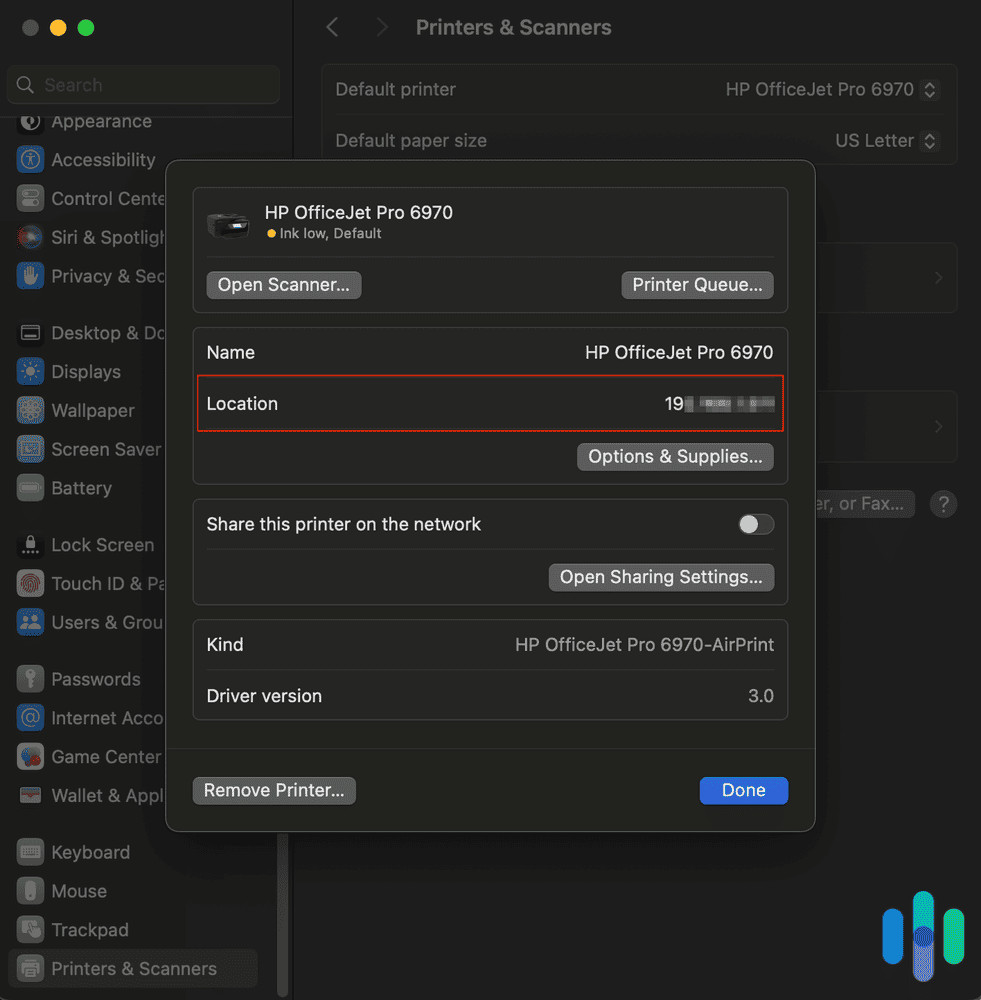 Printer settings on macOS showing IP address location
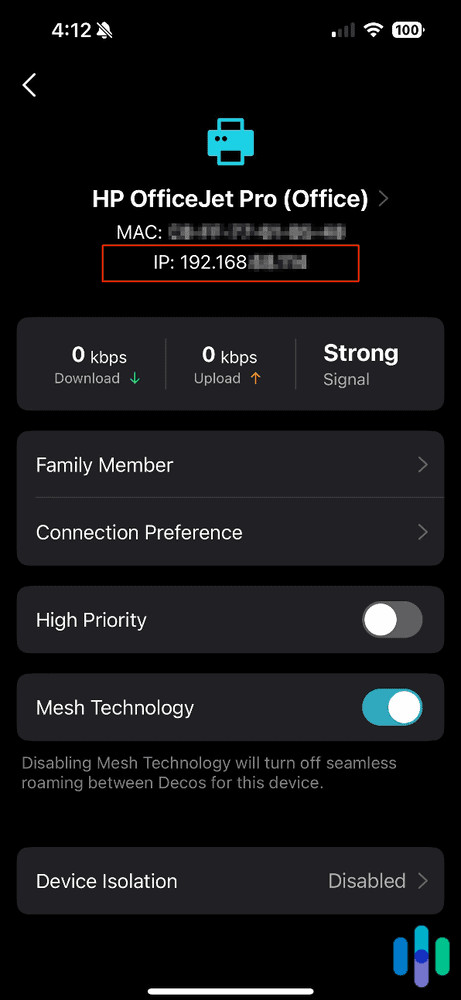
6. HP Smart App Method for HP Printers
If you own an HP printer, the HP Smart application provides a user-friendly interface for managing your printer, including finding its IP address.
Steps to find IP using HP Smart App:
- Open HP Smart App: Launch the HP Smart application on your computer or mobile device. If you don’t have it, you can download it from the Microsoft Store, Mac App Store, Google Play Store, or Apple App Store, or access it via
hpsmart.com. - Select Printer Settings: In the HP Smart app, select your printer. Then, look for and click on “Printer Settings.”
- Find Printer Reports or Tools: Within Printer Settings, find options like “Printer Reports” under “Tools” or similar sections.
- Run Network Configuration Report: Select or click on “Network Configuration Report.” This will instruct the printer to print a configuration page.
- Find IP Address on Printed Report: Examine the printed Network Configuration Page to find your printer’s IP address, usually listed under “IPv4 Configuration” or similar.
7. CUPS Web Interface for Mac (Advanced)
For more technically inclined Mac users, the Common Unix Printing System (CUPS) offers a web interface that can provide detailed printer information, including the IP address.
Accessing Printer IP through CUPS Webpage:
- Enable CUPS Web Interface: Open the Terminal application (found in Applications > Utilities). Type the command
cupsctl WebInterface=yesand press Enter. - Open Safari and Navigate to CUPS: Open the Safari web browser and type
localhost:631/printersin the address bar, then press Enter. - Find Your Printer: You’ll see a list of printers managed by CUPS. Click on your printer’s name.
- Locate IP Address in Location: On the printer details page, look for the “Location” section. The IP address of your printer should be listed here.
The CUPS web interface in Safari, showing printer details and the “Location” field where the IP address is displayed.
8. Chromebook Printer IP Discovery
Finding the IP address on a Chromebook involves navigating through Chrome OS settings.
Steps for Chromebook:
- Open Settings: Click on the clock in the bottom-right corner of your Chromebook screen, then click the gear icon to open Settings.
- Go to Advanced Settings: At the bottom of the Settings menu, click “Advanced.”
- Navigate to Printers: Under the “Advanced” section, find and select “Printers.”
- Save Available Printers: Click “Save printers.”
- Set Up Your Printer: In the list of “Saved printers,” right-click on your printer and select “Set up.”
- Access Printer Details: Continue through the setup prompts, clicking “Model,” “Label,” and “Add.” Eventually, under “Printer Information,” you should see your printer’s IP address displayed.
9. Canon Printer IP Address Retrieval via Printer Menu
Canon printers often have a menu system that allows you to directly access network settings and display the IP address on the printer’s screen.
Steps for Canon Printers:
- Access Settings/Adjustments: On your Canon printer’s control panel, find and select “Settings” or “Adjustments.”
- Navigate to Menu Setup: Click on “Set” or “Adjust Menu,” then press “OK.”
- Expand IP Address Menu: Look for and expand the “IP Address Menu.”
- Select Interface Setup: Choose “Interface Setup.”
- Choose TCP/IP: Select “TCP/IP.”
- Go to IPv4 Settings: Open the next tab or option and select “IPv4 Settings.”
- View IP Address: A box or screen should pop up displaying your Canon printer’s IP address, typically starting with
192.168..
EXPERT TIP: Printing a network configuration page remains the most universally applicable method to find your printer’s IP address. If the steps outlined above don’t precisely match your printer’s menu, consult your printer’s manual for specific instructions on printing a configuration page for your model.
What Can You Do With Your Printer’s IP Address?
Once you’ve successfully found your printer’s IP address, you unlock several capabilities that can enhance your printing experience and troubleshoot issues. The primary uses of a printer IP address revolve around managing network connections and resolving connectivity problems.
Resolving Printer Connection Issues
One of the most common reasons to find your printer’s IP address is to fix connection problems, especially with wireless printers. Wireless connections can be susceptible to interruptions, and knowing the IP address is crucial for diagnosing and resolving these issues.
Often, wireless printers use dynamic IP addresses assigned by your router. Dynamic IPs can change periodically due to:
- Device Inactivity and Reconnection: After a period of being idle, the printer might get a new IP when it reconnects to the network.
- Router Reboots: Restarting your router will often cause it to reassign IP addresses to connected devices.
- IP Address Lease Expiration: Routers typically lease IP addresses for a certain duration. When the lease expires, a new IP might be assigned.
If your printer’s IP address changes, your computer might lose its connection because it’s trying to communicate with the printer at the old address. To prevent this, you can set a static IP address for your printer. A static IP is a permanent address within your network, ensuring consistent connectivity.
Setting a Static IP Address (Windows Example):
- Open Start Menu and Devices and Printers: Go to the Start Menu and click on “Devices and Printers.”
- Select Print Server Properties: Click on any printer, then in the menu bar that appears at the top, select “Print server properties.”
- Navigate to Ports Tab and Add Port: In the Print Server Properties window, go to the “Ports” tab and click “Add Port.”
- Choose Standard TCP/IP Port: Select “Standard TCP/IP Port” and click “New Port.”
- Enter Printer IP and Port Name: Follow the wizard, entering the printer’s IP address and a descriptive port name.
- Apply Changes: Click “Apply” to save the settings.
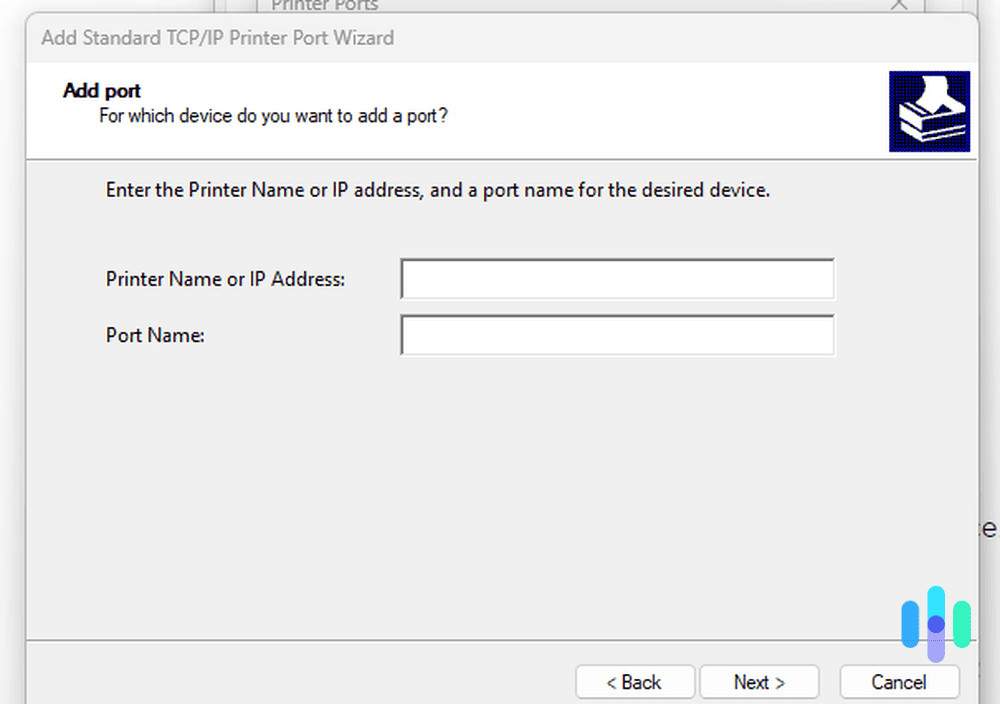 Add Standard TCP/IP Printer Port Wizard interface
Setting a Static IP Address (macOS Example):
- Open System Settings and Printers & Scanners: Go to System Settings and click on “Printers & Scanners.”
- Select Printer and Options & Supplies: Select your printer, click the “>” next to its name, and then click “Options & Supplies.”
- Change IP Address in Location: In the “Options & Supplies” window, you may be able to directly edit the IP address in the “Location” field.
- Confirm Changes: Click “OK” to save the new static IP address.
The Printer Options and Supplies window on macOS, highlighting the “Location” field where you can potentially configure the printer’s IP address.
IMPORTANT TIP: Before changing your printer’s IP settings, it’s advisable to consult your printer manufacturer’s support resources or documentation for specific guidance tailored to your printer model and network setup.
Connecting New Devices to Your Printer
When adding a new computer, smartphone, or tablet to your network, you’ll need the printer’s IP address to establish a connection and enable printing from these new devices.
Connecting a New Windows Device:
- Open Start and Printers & Scanners: Click Start, type “Printers,” and select “Printers & scanners.”
- Add Printer or Scanner: Click “Add printer or scanner.”
- Choose ‘The printer that I want isn’t listed’: If your printer isn’t automatically detected, select “The printer that I want isn’t listed.”
- Add Manually with TCP/IP Address: Choose “Add a printer using a TCP/IP address or hostname” and click “Next.”
- Enter Printer IP Address: Select “TCP/IP Device” as the device type and enter your printer’s IP address.
- Complete Setup: Follow the remaining prompts to install the printer driver and complete the connection.
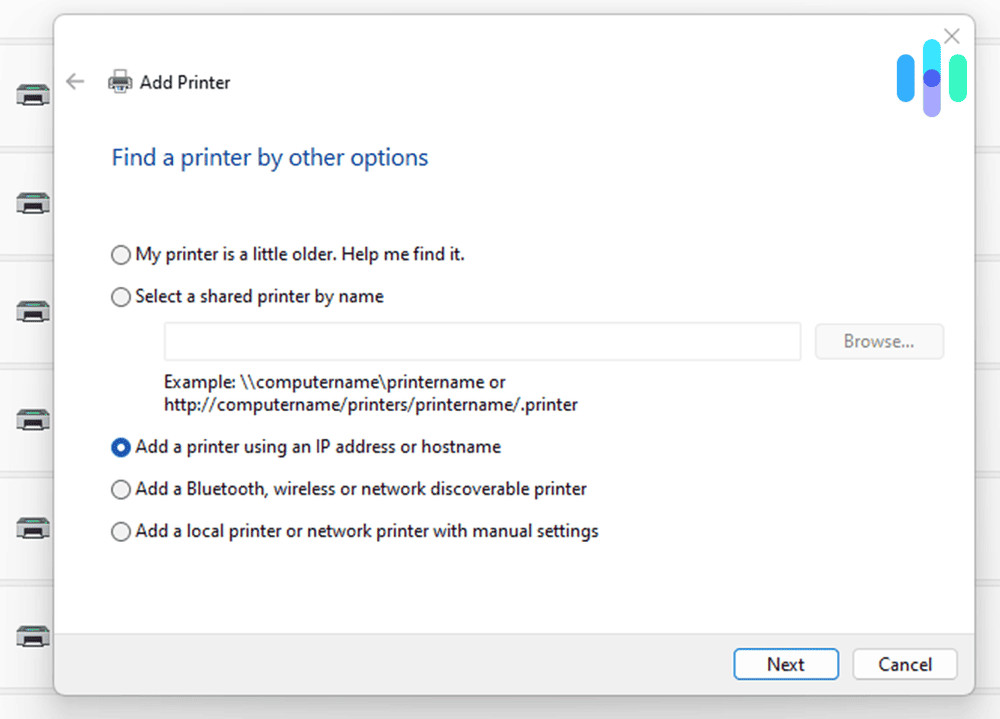 Add a printer using an IP address option in Windows
Connecting a New Apple Device (Mac, iPhone, iPad):
- Open System Settings and Printers & Scanners: Go to System Settings and click on “Printers & Scanners.”
- Add Printer, Scanner, or Fax: Click the “Add Printer, Scanner, or Fax…” button.
- Select IP Icon or Printer Display: In the Add Printer window, click on the “IP” icon or wait for your printer to appear in the list and select it.
- Enter IP Address: If using the IP method, enter your printer’s IP address.
- Add Printer: When your printer is found, click “Add” to complete the setup.
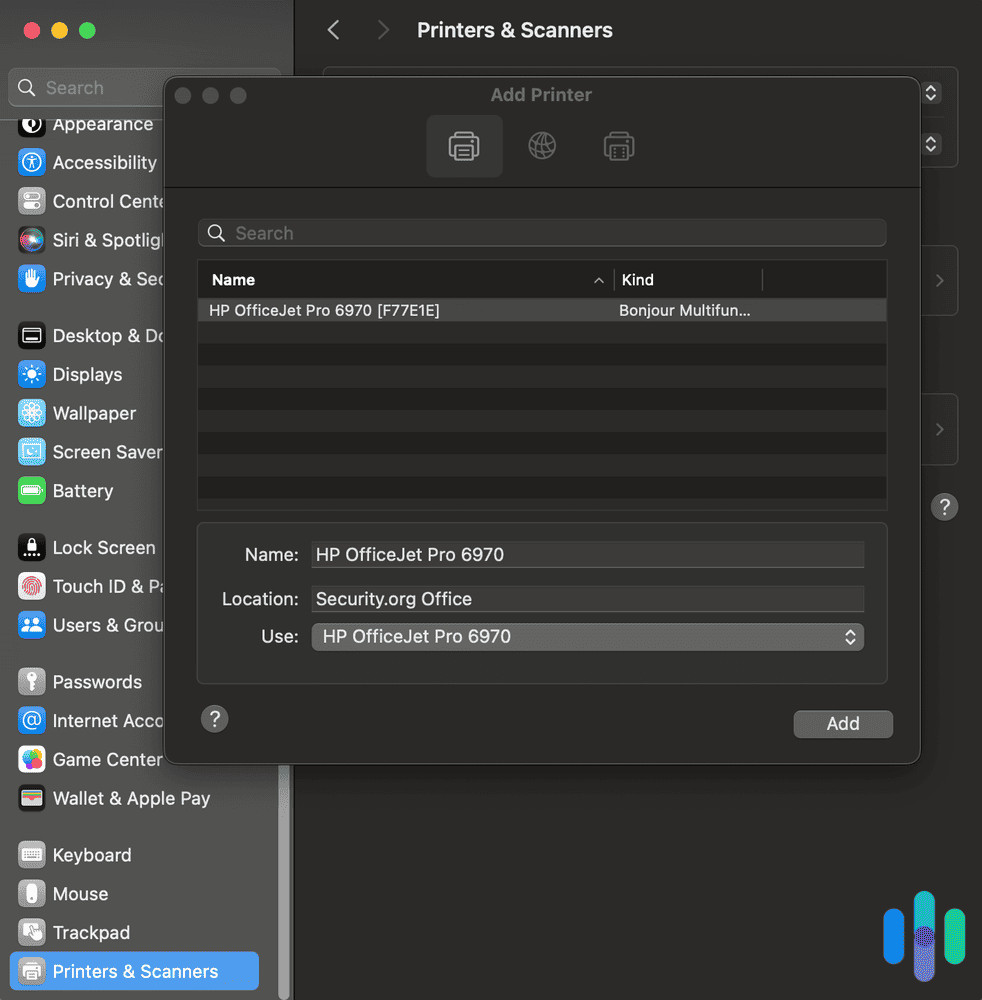 Adding a new device connection to a printer on macOS
In Conclusion
Finding your printer’s IP address is a fundamental skill for anyone using a wireless printer. It’s the key to diagnosing connection issues, establishing stable network printing, and adding new devices to your printing setup. By using the methods outlined in this guide, you can confidently locate your printer’s IP address and take control of your printing environment. Whether you prefer printing a configuration page directly from your printer, using your computer’s settings, or accessing your router’s interface, there’s a method that suits your technical comfort and printer capabilities. Take a moment to find and note down your printer’s IP address – it’s a piece of information that will save you time and frustration in the long run, ensuring smooth and efficient printing whenever you need it.
Frequently Asked Questions (FAQs) About Printer IP Addresses
Q: Is the printer IP address the same as my computer’s IP address?
A: No, each device on your network, including your printer and computer, has its own unique IP address. These IP addresses allow devices to communicate with each other within your local network and with the internet.
Q: Will my printer’s IP address always stay the same?
A: Not necessarily. By default, most home networks use dynamic IP addresses assigned by the router. These addresses can change periodically. To ensure your printer’s IP address remains constant, you can set a static IP address for it through your printer’s network settings or router configuration.
Q: Can I use the printer’s IP address to access a webpage for my printer settings?
A: Yes, for many modern network printers, you can enter the printer’s IP address into a web browser to access the printer’s embedded web server. This interface allows you to configure various printer settings, monitor ink levels, update firmware, and manage network configurations directly from your browser.
Q: What if I can’t find the IP address using any of these methods?
A: If you’re struggling to find your printer’s IP address, double-check that your printer is actually connected to your network and powered on. Ensure that Wi-Fi is enabled on your printer if it’s a wireless model. Consult your printer’s user manual for model-specific instructions on network setup and IP address retrieval. You may also need to troubleshoot your network connection or contact your printer manufacturer’s support for assistance.