
Google Calendar is an indispensable tool for managing schedules, appointments, and reminders in today’s fast-paced world. Whether for professional engagements or personal organization, Google Calendar’s versatility is unmatched. From scheduling video meetings to serving as a digital diary, it caters to a wide array of needs. However, there are times when a tangible, printed copy of your schedule becomes essential. Whether it’s for a physical office meeting, personal reference, or simply to have a hard copy backup, knowing how to print your Google Calendar is a valuable skill.
This guide will walk you through several methods to print your Google Calendar effectively. We’ll cover printing from your desktop or laptop, directly from your phone or tablet, and leveraging Google Cloud Print for seamless printing. By the end of this article, you’ll be equipped with all the knowledge you need to get your Google Calendar onto paper.
Printing from Your Desktop or Laptop
Printing your Google Calendar from a desktop or laptop offers the most comprehensive set of customization options. Here’s how to do it:
Step 1: Access Google Calendar.
Navigate to Google Calendar in your web browser and ensure you are logged into your Google account. Once loaded, you will see your calendar interface. Look to the top right corner, where you’ll find the ‘Settings menu’ icon, typically represented by a gear symbol.
Step 2: Choose Your Calendar View.
Directly to the left of the settings menu, you’ll notice view options such as ‘Day’, ‘Week’, ‘Month’, ‘Year’, ‘Schedule’, and ‘4 days’. Select the view that best suits your printing needs. For a detailed daily schedule, ‘Day’ or ‘Schedule’ might be ideal. For a broader overview, ‘Week’ or ‘Month’ views are more appropriate.
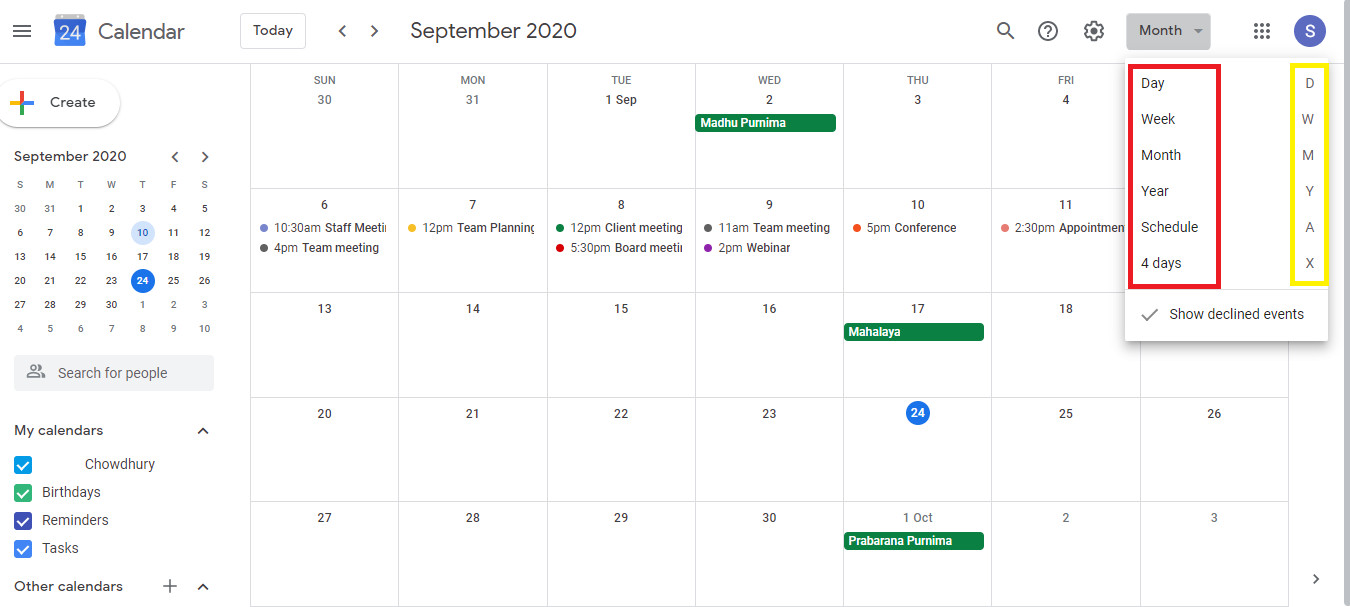 Select your preferred calendar view – Day, Week, Month, Year, or 4 days – in Google Calendar settings before printing.
Step 3: Open Print Settings.
Click on the ‘Settings menu’ (gear icon) located at the top right. From the dropdown menu, select ‘Print’. This action will open the print preview settings, allowing you to customize your printed calendar.
Step 4: Customize Print Preview Options.
The left side of the print settings window displays the ‘Print preview’. Here, you can tailor your calendar printout:
- Print Range: Define the date range you want to print. You can select ‘Custom’ to specify exact start and end dates.
- View: Choose how your calendar is displayed. ‘Auto’ adjusts automatically, ‘Day’ prints a daily view, and ‘Week’ prints a weekly view. Select the option that aligns with your chosen calendar view in Step 2.
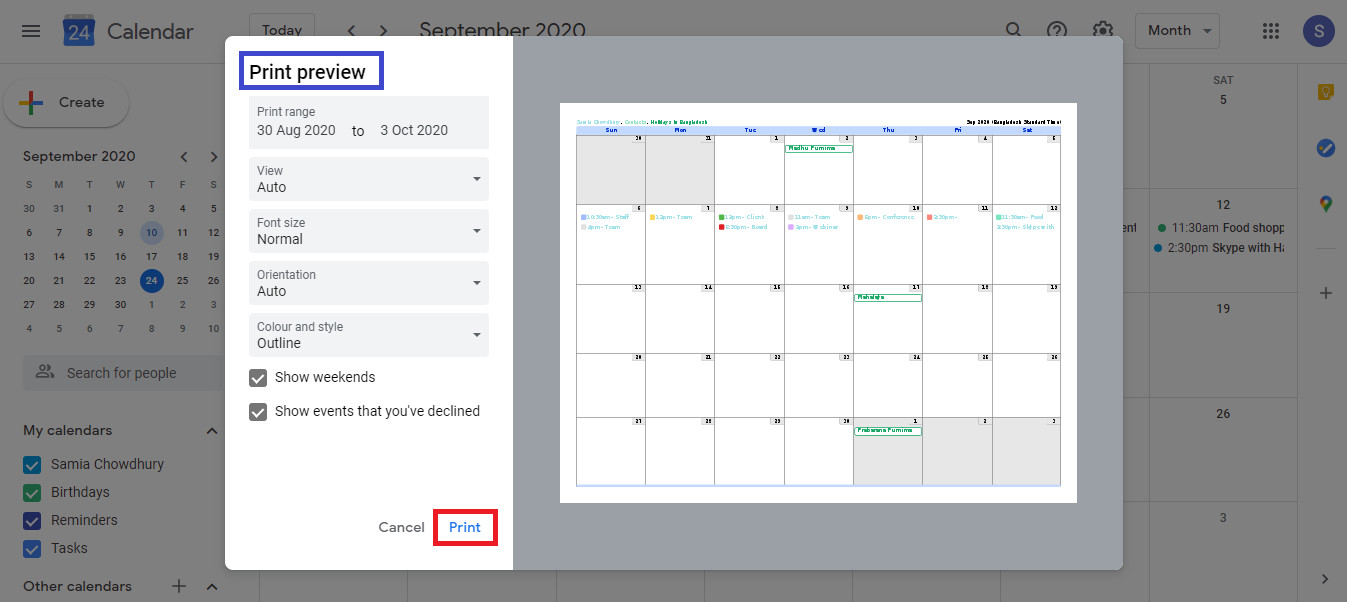 Google Calendar Print Preview screen, showing options for date range, view (Auto, Day, Week), font size, and orientation.
Step 5: Adjust Font and Orientation.
Further down the settings, you’ll find options to customize the text appearance:
- Font Size: Choose from seven font sizes, ranging from ‘Smallest’ to ‘Largest’. ‘Normal’ is usually a good balance for readability and space.
- Orientation: Select ‘Auto’, ‘Portrait’, or ‘Landscape’. ‘Portrait’ is vertical, and ‘Landscape’ is horizontal. ‘Landscape’ often works better for weekly or monthly views to accommodate more information horizontally.
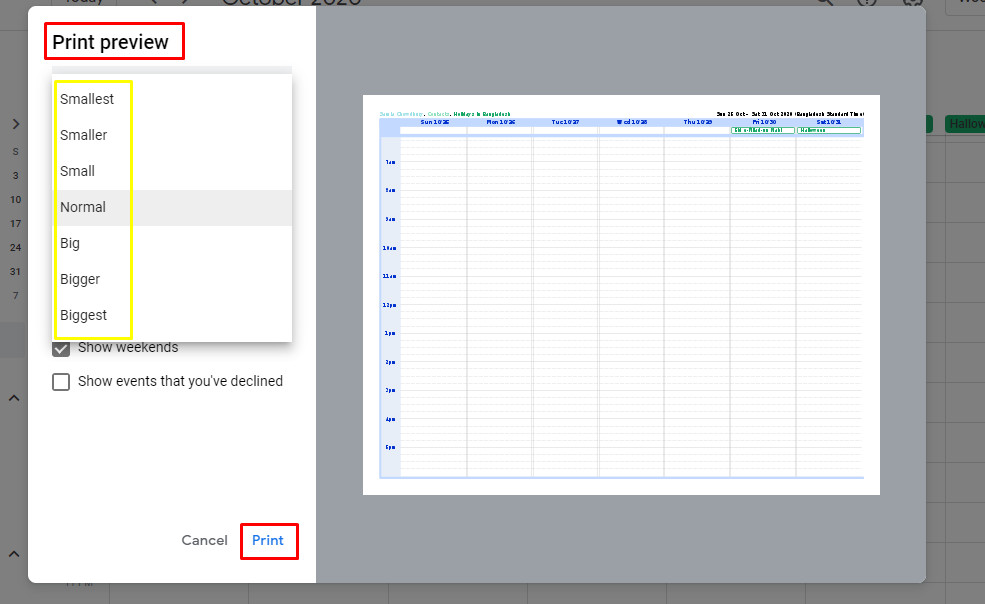 Font size options in Google Calendar print settings, including Smallest, Normal, and Largest.
Step 6: Select Style and Color Options.
Finally, customize the visual style of your printed calendar:
- Style: Choose between ‘Outline’, ‘Full color’, and ‘Black and white’. ‘Full color’ prints with colors as seen on screen, ‘Black and white’ prints in grayscale, and ‘Outline’ may simplify some elements.
- Include Weekends: Check the box to include weekends in your printout.
- Show declined events: If you want to include events you’ve declined, check this box.
 Style and color preferences for printing Google Calendar, including options for Outline, Full color, and Black and white.
Step 7: Print or Save as PDF.
Click the ‘Print’ button in the top left. This will open your system’s print dialog. Here, you can select your printer. To preview the layout, consider ‘Save as PDF’ first. This allows you to review the digital version before committing to a paper print.
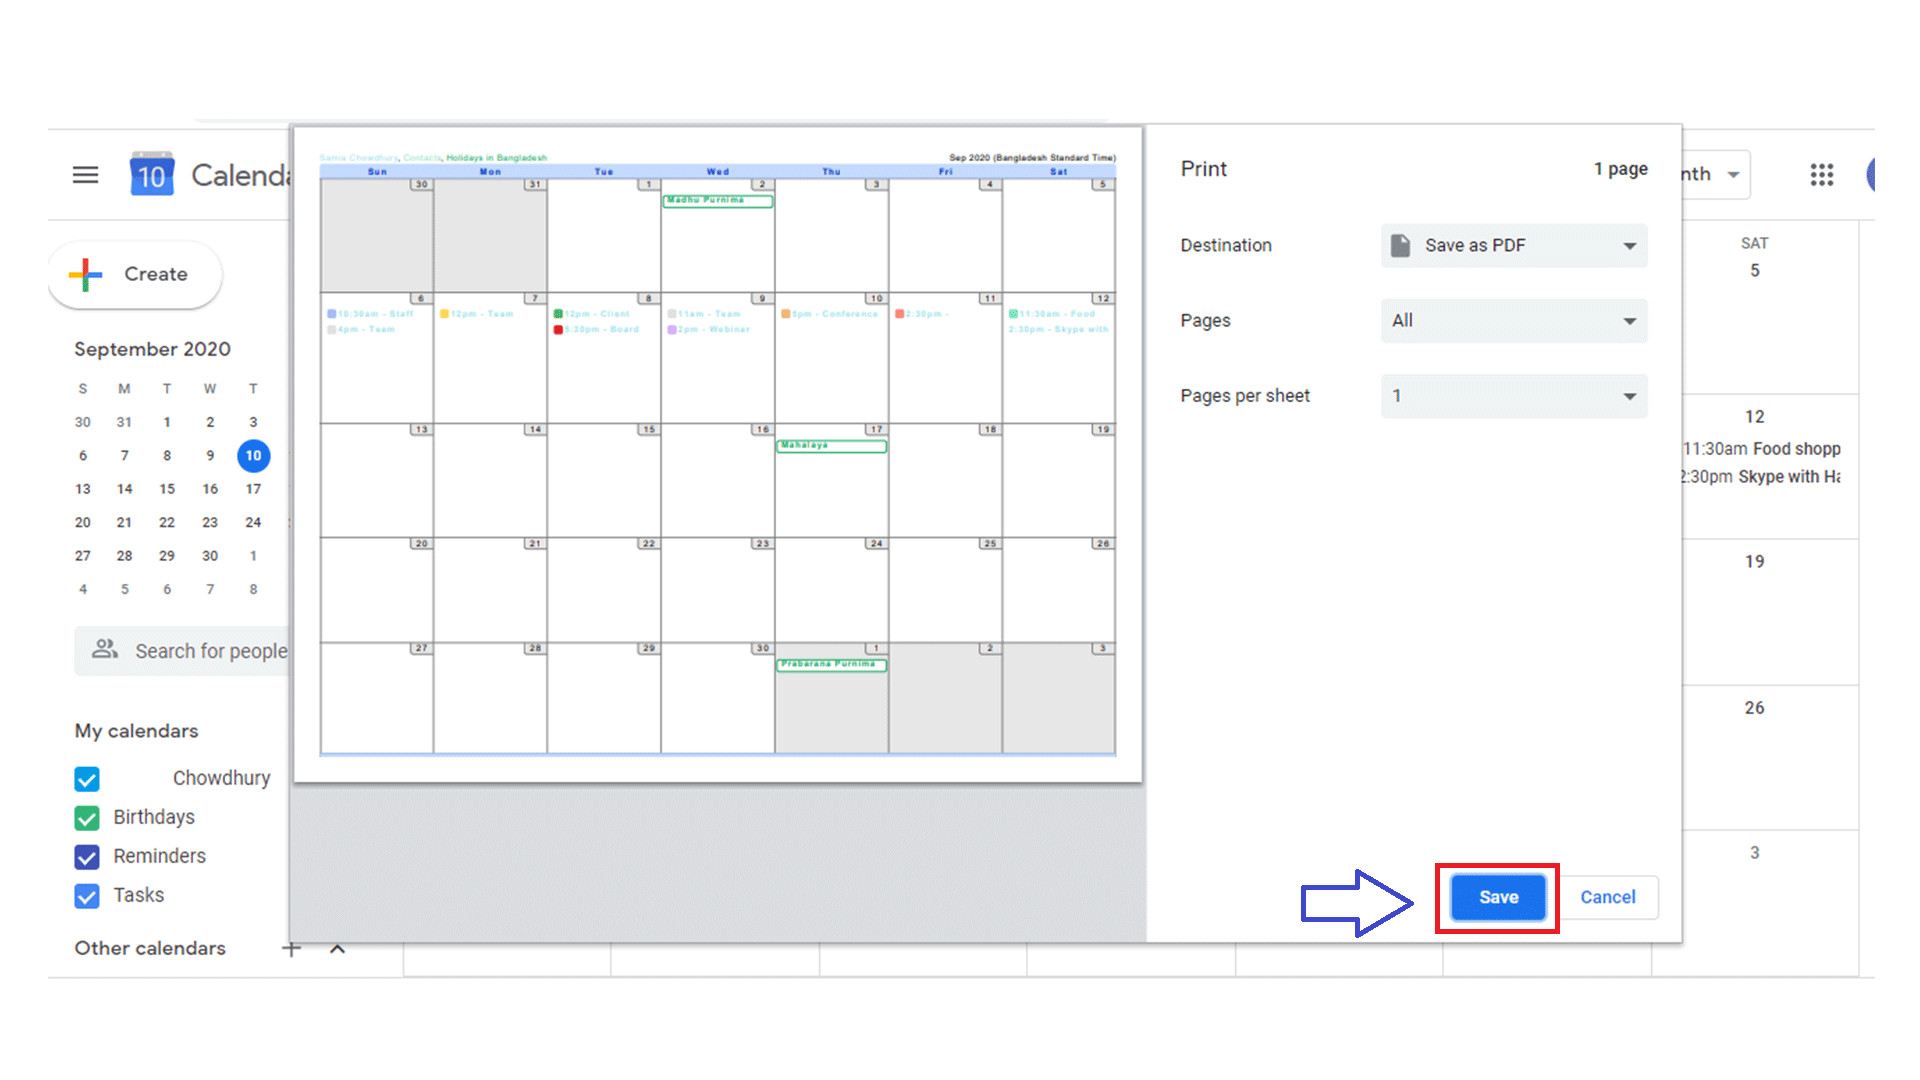 Final print preview before printing a Google Calendar, showing save as PDF and page options.
Step 8: Final Print Settings and Printing.
In the print dialog, ensure your printer is selected. You can further customize settings like pages per sheet if needed. Once satisfied, click ‘Print’ to get your hard copy. For initial prints, consider printing a test page to ensure all settings are correct before printing multiple copies.
Printing from Your Phone or Tablet
Printing directly from your phone or tablet offers convenience when you’re away from your desktop. Here are a couple of methods:
Method 1: Using a Mobile Print App
- Install a Print App: Download a mobile printing application like “Mobile Print – Print Share” from the Google Play Store (for Android) or App Store (for iOS).
- Connect Printer: Connect your printer to your mobile device. This might involve a USB OTG adapter for direct USB connection or connecting via Wi-Fi, depending on your printer and app capabilities.
- Print from App: Open the print app, and it should detect your connected printer. Follow the app’s instructions to select and print your Google Calendar. You may need to export your calendar as a PDF first and then print the PDF via the app, depending on app features.
Method 2: Direct Print (Android)
For Android devices, direct printing is often possible without additional apps if your printer is compatible with Android’s printing framework.
- Open Calendar View: Open the Google Calendar app and navigate to the calendar view you wish to print (Day, Week, Month, etc.).
- Share and Print: Tap the menu button (usually three dots) within the Calendar app. Look for a ‘Share’ or ‘Send’ option, and then choose ‘Print’ if available. Alternatively, some Android versions may have a ‘Print’ option directly in the menu.
- Select Printer and Print: You’ll be directed to a print preview screen similar to desktop printing options (though potentially with fewer customizations). Select your printer from the dropdown, adjust copies and page settings, and tap the print icon to proceed.
Printing with Google Cloud Print (Direct Method)
Google Cloud Print, while no longer directly supported by Google, might still function if you have printers set up with it previously. It allows for printing over the internet without needing to be on the same local network as the printer.
- Ensure Google Cloud Print Setup: Verify if your printer is set up with Google Cloud Print. Modern printers often have built-in cloud print capabilities.
- Access Print Options: From your desktop or Android device, access the print options for your Google Calendar as described in the previous desktop or phone/tablet sections.
- Select Cloud Printer: In the printer selection dropdown, choose your Google Cloud Print-enabled printer. As long as the printer is online and connected to Google Cloud Print, you can send the print job remotely.
 Google Cloud Print logo, highlighting its benefits for printing Google Calendar from anywhere with an internet connection.
While Google Cloud Print as a standalone service is discontinued, many printer manufacturers now offer their own cloud printing solutions that integrate similarly. Check your printer’s documentation for options like ePrint, AirPrint, or similar cloud-based printing features.
FAQ
How can I share my Google Calendar?
Sharing your Google Calendar allows others to view your schedule, promoting coordination and transparency. Here’s how to share it:
Step 1: Open Google Calendar on your computer.
Step 2: Locate ‘My Calendars’ on the left panel. If needed, click the arrow to expand the list.
Step 3: Hover over the calendar you want to share, click the three dots (More options), and select ‘Settings and sharing’.
Step 4: Under ‘Share with specific people or groups’, click ‘Add people and groups’.
Step 5: Enter the email addresses of the people you want to share with.
Step 6: Use the ‘Permissions’ dropdown to choose their access level: ‘See only free/busy (hide details)’, ‘See all event details’, ‘Make changes to events’, or ‘Make changes and manage sharing’.
Step 7: Click ‘Send’. They will receive an email invitation to access your calendar.
Remember, sharing your calendar with ‘publicly available’ makes it visible to anyone on the internet. Exercise caution when sharing sensitive information.
How to print a blank monthly calendar?
To print a blank monthly calendar for manual scheduling:
- Create a New Calendar: In Google Calendar, on the left panel next to ‘Other calendars’, click the ‘+’ icon and select ‘Create new calendar’. Name it “Blank Calendar” or similar.
- Deselect Your Primary Calendars: In the ‘My Calendars’ section on the left, uncheck all your existing calendars so only the newly created blank calendar is selected. This ensures no events are displayed.
- Set View to Month: Select ‘Month’ view in the top right.
- Print: Follow the ‘Printing from Desktop or Laptop’ steps, choosing your preferred print settings. Since the calendar is blank, it will print an empty monthly grid.
How to display the agenda view instead of the usual monthly view?
The agenda view provides a list of your upcoming events. To set it as the default:
- Open Google Calendar Settings: Click the ‘Settings menu’ (gear icon) and select ‘Settings’.
- Customize Default View: Under ‘General’ settings, find the ‘View options’ section.
- Set Default View: Use the ‘Default view’ dropdown menu to select ‘Agenda’.
- Save Changes: Changes are usually saved automatically. Now, whenever you open Google Calendar, it will default to the agenda view.
How to add a Google Calendar button on your website?
Embedding a Google Calendar button on your website can streamline event scheduling for your visitors.
- Access Calendar Settings: On your computer, open Google Calendar, click the ‘Settings menu’, and select ‘Settings’.
- Select Calendar to Embed: On the left panel, choose the calendar you want to embed under ‘Settings for my calendars’.
- Integrate Calendar: In the ‘Integrate calendar’ section, you’ll find an ‘Embed code’. This is an iframe code.
- Customize (Optional): Click ‘Customize’ under the embed code to adjust colors, size, and default view (like Agenda).
- Copy and Paste Code: Copy the HTML embed code. Paste this code into the HTML of your webpage where you want the calendar to appear.
Ensure the calendar you embed has appropriate sharing settings if you intend for public website visitors to view it.
Related Reading: How to Export Google Calendar to Excel
Printing your Google Calendar is straightforward once you know the steps. Whether you prefer a desktop, mobile, or cloud-based approach, these methods will help you get your digital schedule into a convenient, paper format.